


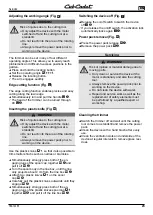

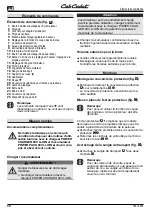
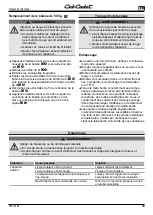


Operating controls
21
769-12285
EN
operating controls
operating elements (Fig .
P
)
1
Power pack release
2
Handle
3
Hook for carrying belt
4
Middle handle
5
Height adjustable telescopic arm
6
Adjustment of edge cutting function
7
Protective cover
8
Plant protection bow
9
Shield lock
10
On/off switch
11
Unlock (both sides)
12
End stop height adjustment / middle handle adjustment
13
Working angle adjustment
14
Shield
15
Power pack compartment
16
Carrying belt
17
Wheels bracket
18
Adapter
19
Wheels
20
Spool cap for plastic knife
21
Plastic knife
22
Line box
23
Line spool
24
Spool cap
25
Cutting device for shortening the line length
Information
Operating elements marked with are
optionally available as accessories and not
contained in the scope of the delivery.
Start-up
Supplementary documentation
Make sure the operating instructions of
the PoWEr cHArGEr 80V LI-IoN char-
ger and of the PoWEr PAcK 80V LI-IoN
power pack are available . Please read
and understand them before putting the
device into use .
Power pack charging
WArNING!
Risk of injuries or material damage
¾
Only charge the power pack with the
POWER CHARGER 80V lithium-ion
charger.
Attention!
The power pack is supplied partially charged. Be-
fore first use, fully charge the power pack using the
POWER CHARGER 80V Li-ion charger to ensure
the full capacity of the power pack.
Î
Power pack charging must be carried out ac-
cording to the instructions in the supplementary
documentation.
operating times
Î
Observe the times stipulated in local byelaws.
Î
Check if there are any operating time limitations
with your local authorities.
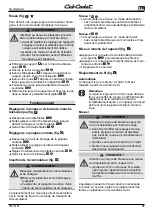
Assembly
Fitting the protective cover (Fig .
B
)
Î
Forcefully press the protective cover
Ac
on to the
trimmer
B 1
.
3
The protective cover audibly engages.
Attaching the shield (Fig .
C
)
Note
The shield must be removed before using
the edge cutting function.
The shield
Ab
prevents the cut material from being
excessively scattered if you are working close to the
edge of the lawn area.
Î
Clip the shield into the protective cover
C 1
.
Î
Fold the shield lock over the shield to provide
additional securing
C 2
.
Attaching the carrying belt (Fig .
D
)
Î
Attach the carrying belt
Af
at the two hooks
D
.
Note
For safety reasons only carry the device
supported over your shoulder and never
around your neck. The belt has a quick
release attachment so that it can be quickly
disconnected in the event of a malfunction.
Содержание 769-12285
Страница 1: ...769 12285 MTD Products Aktiengesellschaft Saarbrücken Germany ...
Страница 2: ......
Страница 3: ...6 e f g h ...
Страница 4: ... 90 ...
Страница 5: ... P ...
Страница 6: ......
Страница 125: ......