Cub Cadet 550 2017 Скачать руководство пользователя страница 6

6

Introduction

2

Important Notice

This UTV is designed and manufactured for 

OFF-ROAD

 use only. It is illegal and unsafe to operate this UTV on any public street, road or highway.

This UTV complies with all applicable 

OFF-ROAD

 noise level and spark arrester laws and regulations in effect at the time of manufacture.

Please check your local riding laws and regulations before operating this UTV.

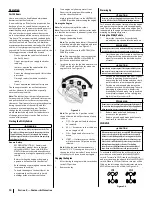
When the temperature is below -4°F (-20°C), park the UTV in a place where the temperature is higher than -4°F (-20°C). Start the UTV after the UTV has warmed up. Please see the manual on the warming up process.

Follow the proper parking procedures when the temperature is higher than 100°F (38°C): turn off the engine; make sure the radiator fan is on for 3 minutes before turning off the power switch.

Starting the UTV for the first time will take longer because the fuel will need to reach the fuel injectors. To start the UTV the first time, hold the ignition key on at 5-second intervals. Allow the starter to rest 15 seconds 
between each start attempt.
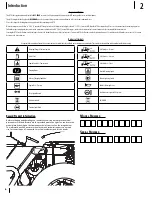
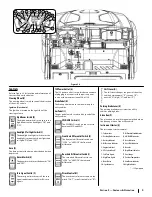
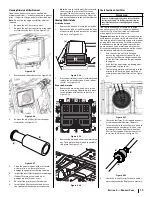
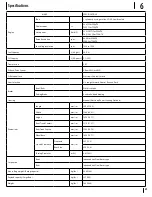
Universal Symbols

As a guide to the operation of your vehicle, various universal symbols have been utilized on the instruments and controls. The symbols are shown below with an indication of their meaning.

Warning/Danger/Caution Symbol

Diesel Fuel

Engine Coolant -- Temperature

Parking Brake

Battery Charging Condition

Engine Oil -- Pressure

Turn Signal/Hazard

Differential Lock

Position Light Bulb

Lift Cylinder -- Retract

Lift Cylinder -- Extend

Lift Cylinder -- Float


Hazard Warning Lights

Master Lighting Switch

Audible Warning Device

Fault Indicator Light of EPS System

2WD/4WD

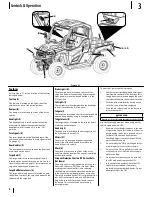
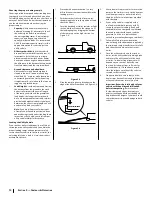
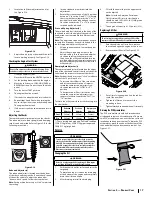
Record Product Information

Before setting up and operating your new utility vehicle please locate the model 

plate and record the information in the provided area to the right. You can locate the 

model plate by looking on the frame above the left rear tire. See the image below. 

This information will be necessary, should you seek technical support via our web 

site, Customer Support Department, or with a local authorized service dealer.

M

odel

 N

uMber

S

erial

 N

uMber

Содержание 550 2017

Страница 1: ...RESULT IN PERSONAL INJURY Operator s Manual Form No 769 13052 November 30 2017 NOTE This Operator s Manual covers several models Features may vary by model Not all features in this manual are applicab...

Страница 2: ...d remove the key 21 Check overhead clearances carefully before driving under low hanging tree branches wires power lines bridges before entering or leaving buildings or in any other situation where th...

Страница 3: ...ox Loading Operation 1 Do not exceed vehicle s Total Load Capacity rating of 1000 lbs 453 5 kg This includes operator passenger accessories and cargo 2 Do not exceed 500 lbs 226 7 kg load in cargo box...

Страница 4: ...n result in accidents injuries or death 12 Observe proper disposal laws and regulations for gas oil etc to protect the environment 13 Prior to disposal determine the proper method to dispose of waste...

Страница 5: ...eways sliding skidding or fishtailing and never do donuts Slow down before entering a turn Avoid hard acceleration when turning even from a stop Plan for hills rough terrain ruts and other changes in...

Страница 6: ...time hold the ignition key on at 5 second intervals Allow the starter to rest 15 seconds between each start attempt Universal Symbols Asaguidetotheoperationofyourvehicle variousuniversalsymbolshavebee...

Страница 7: ...or illustrated in this manual may not be applicable to all models We reserve the right to change product specifications designs and vehicle without notice and without incurring obligation If applicab...

Страница 8: ...ide of the vehicle and are used to see behind the utility vehicle Winch N The winch is located on the front of the utility vehicle inside the bumper The winch is controlled by the winch control Occupa...

Страница 9: ...ng brake Glove Box P The glove box is a small storage area in the dash on the passenger side of the utility vehicle Instrument Cluster Q The instrument cluster contains 1 Tachometer 11 DifferentialLoc...

Страница 10: ...ngine will not start without the gear shift in the NEUTRAL N or PARK P position and the brake depressed 3 Insert the key into the ignition and turn it to START position Release the key when the engine...

Страница 11: ...atch Lever Lift Up Cargo Bed From Here Figure 3 7 4 Once unloaded lower the cargo bed and securely latch it before operating the utility vehicle Do not drive the utility vehicle with cargo bed in the...

Страница 12: ...loading ramps and equipment to safely secure the utility vehicle to the truck or trailer the only thing left to do is load it Here s how to best accomplish this task 1 Proceed with extreme caution It...

Страница 13: ...ust engine valve clearance P Check fuel injection P Check injection P Change brake fluid P Replace remote hydraulic hose P Replace rear brake cylinder seal P Replace front brake cylinder seal P Flush...

Страница 14: ...See Figure 5 3 When re installing the seat make sure the pins a in the seat are inserted into the holes b in the frame a a b b Figure 5 3 15 Battery light comes on when engine is running Low engine s...

Страница 15: ...s a on each hinge adjust the door until an equal gap is achieved all the way around Retighten all four bolts a See Figure 5 9 a a Figure 5 9 If the door is not latching properly the latches a can be a...

Страница 16: ...to see that the brake fluid level on the brake fluid reservoir a is up to the MIN b level See Figure 5 14 a c b Figure 5 14 2 If it is below the MIN b level add brake fluid but do not exceed the MAX c...

Страница 17: ...er is located on the upper part of the shock and controls the ride of the utility vehicle and the impact resistance of the shocks Note Each position has a stop or click to indicate which of the 18 pos...

Страница 18: ...tely Donotmixdifferenttypes ofAntifreeze Themixturecanproduceachemicalreaction betweensubstances Antifreezeisextremelyflammable andexplosiveundercertainconditions Keepfireaway fromantifreeze Keepchild...

Страница 19: ...he bottom of the utility vehicle See Figure 5 29 a a a a a a a a a Figure 5 29 2 Remove the drain and allow the water to run out Then replace the drain and the middle skid plate See Figure 5 29 a Figu...

Страница 20: ...ened particles out of the screen assembly and lightly clean the screen with wire brush Soak in solvent and clean with wire brush if necessary 3 If there is any damage the assembly must be replaced 4 R...

Страница 21: ...ol Switch Gear Selection H L range forward Neutral Reverse Park Brakes Front Rear Wet disc brake Parking Brake Axis brake hand braking Steering Manual Electronic Power Steering Optional Dimensions Len...

Страница 22: ...ons The Vehicle has been thoroughly tested for proper performance with implements sold or approved by manufacturer Use with implements which are not sold or approved and which exceed the maximum speci...

Страница 23: ...Notes 7 23...

Страница 24: ...24 Section 7 Notes...

Страница 25: ...25 Section 7 Notes...

Страница 26: ...period of two years The warranty period begins on the date the outdoor equipment is delivered to an ultimate purchaser or first placed into service Subject to certain conditions and exclusions as sta...

Страница 27: ...cause of the need for repair or replacement of the part That notwithstanding any adjustment of a component that has a factory installed and properly operating adjustment limiting device is still elig...

Страница 28: ...site at www mtdcanada com This limited warranty does not provide coverage in the following cases a The engine or component parts thereof These items may carry a separate manufacturer s warranty Refer...

Отзывы: