Crytec D30MB Скачать руководство пользователя страница 23

MINI TRACKED DUMPER

22

GB

PARTS SCHEDULE

Содержание D30MB

Страница 1: ...ed Dumper Operator s Manual MODEL NUMBER D30MB SERIAL NUMBER Both model number and serial number may be found on the main label You should record both of them in a safe place for future use FOR YOUR S...

Страница 2: ...uct and does not permit the use of a T V Rheinland mark of conformity Certification Body Date 2022 07 04 Ming Shan The UKCA mark may be used if all relevant UK Legislations and the UK Declaration of C...

Страница 3: ...of them as waste All tools hoses and packaging should be resorted taken to the local recycling center and disposed of in an environment friendly safe way The four speed gearbox three forward and one r...

Страница 4: ...es No smoking sparks or flames Do not touch parts that are hot from operation Serious burns may result Keep your hands clear from all rotating parts Never start or run the engine inside a closed area...

Страница 5: ...the machine may result in personal injury Avoid accidental starting Be sure the engine s switch is off before transporting the machine or performing any maintenance or service Understand Your Machine...

Страница 6: ...do not smoke and stay away from sparks open flames or other sources of ignition near the area of operation Never fill the fuel tank indoors To avoid sparking or arcing keep grounded conductive objects...

Страница 7: ...ever place any part of your body where it would be in danger if movement should occur during assembly installation operation maintenance repair or relocation Keep all bystanders children and pets at l...

Страница 8: ...locks Remove all the plywood plates and remove all the loose parts on the bottom pallets 1 2 3 4 QTY 1 GW 204 0 kg NW 177 0 kg Carton Size 113 5 X 76 5 X 87 8 cm MADE IN CHINA MiniTrackedDumper QTP300...

Страница 9: ...nel Bottom 9 Gas Spring Optional 10 Tools for Spark Plug Assembly 11 Operator s Manual Engine Manual 12 Hardware Bag Including M10 X 20 X 4 A M8 X 25 X 2 M16 X 238 X 1 F M16 X 2 B 4 X 35 X 2 M8 X 35 X...

Страница 10: ...mounting bracket Insert a long pin through holes and secure each side with a flat washer and cotter pin M16 X 238 X 1 F M16 X 2 B 4 X 35 X 2 Tipping Handle Engine Guard M8 X 35 X 2 C M8 X 30 X 2 2 1 2...

Страница 11: ...nt the mounting bracket to the blade using M8X30 hex bolts washers and nuts Insert the shorter control lever into the longer lever Align holes and fasten with M8X40 hex bolt washers and nut Position t...

Страница 12: ...gine warranty Attach control lever to the guide tube Line up holes and fasten with M8X35 bolt washers and nut Insert the handle grip into the holder Secure the support bracket into the control lever w...

Страница 13: ...GB KNOW YOUR MACHINE Features and Controls Throttle Control Engine Switch Right Steering Lever Clutch Control Lever Left Steering Lever Hopper Track Tipping Handle Gearbox Gear Selection Lever Gas Spr...

Страница 14: ...w If the engine slows down under a load or the tracks slip shift the machine into a lower gear If the front of the machine rides up shift the machine into a lower gear If the front continues to ride u...

Страница 15: ...d to allow for fuel expansion Pay close attention while filling the fuel tank to ensure that the recommended fuel level inside the tank is not exceeded Use a portable gasoline container with an approp...

Страница 16: ...h hard terrains full of sharp uneven points with a high degree of friction Even though the unit has rubber tracks remember to be careful when working in adverse weather conditions ice heavy rain and s...

Страница 17: ...disengage all command levers The engine must be cool Keep the engine s throttle lever in its SLOW position and remove the spark plug wire from the spark plug and secure Inspect the general condition o...

Страница 18: ...ubrication General Lubrication Lightly lubricate all moving parts of the machine at end of the season or every 25 operating hours Gearbox Lubrication The gearbox is pre lubricated and sealed at the fa...

Страница 19: ...it to jump its housing thus damaging wear to the housing To check track tightness proceed as follows If the distance is greater proceed as follows Use the tipping handle to tip the hopper and set it o...

Страница 20: ...e tracks are approximately 4 off the ground Loosen the adjusting bolts and pull the steering wheel axle toward the engine then track will be loosen Engine Maintenance Refer to the Engine Manual includ...

Страница 21: ...t fuel flow Start the engine and allow it to run until it stops This ensures no fuel is left in the carburetor Run the engine until it stops This helps prevent gum deposits from forming inside the car...

Страница 22: ...Dirty air cleaner 7 Improper carburetor adjustment 1 Connect and tighten spark plug wire 2 Move choke lever to OFF 3 Clean fuel line Fill tank with clean fresh gasoline 4 Clear vent 5 Drain fuel tank...

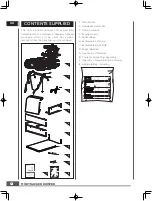
Страница 23: ...MINI TRACKED DUMPER 22 GB PARTS SCHEDULE...

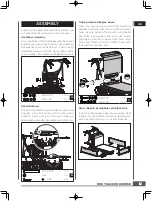
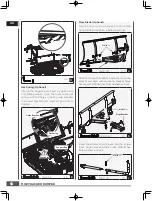
Страница 24: ...MINI TRACKED DUMPER 23 GB Gearbox 50...

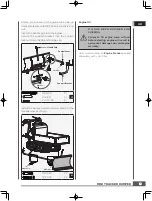
Страница 25: ...MINI TRACKED DUMPER 24 GB Box 88...

Страница 26: ...70 1 34 Brake Cable 1 35 Driving Wheel 2 36 Nut M8 25 37 Tensioner Pulley Bracket 1 38 Engine 1 No Description Q ty 39 Key 5x35 1 40 Belt Protect Frame 1 41 Bolt M8x30 3 42 Fixed Bracket 1 43 Washer 8...

Страница 27: ...08 Duplex Slip Gear 1 109 Gear 1 110 Bearing 6302 1 111 Gearshift Fork Guide Pin 1 112 Spring 1 113 Steel Ball 6 1 114 Gearshift Fork 1 No Description Q ty 115 Circlip 12 1 116 Rivet Assembly 1 117 Br...

Страница 28: ...165 Steel Ball 5 70 166 Circlip 58 2 167 Output Gear 1 168 Intermediate Joint Bush 1 169 Intermediate Joint Bush Composite Bushing 2 170 Circlip 26 2 171 Joint Bush 2 172 Spring Gasket 4 173 Circlip...

Страница 29: ...Washer12 2 16 Washer12 3 17 Washer10 2 18 Washer10 2 19 Pin 10X60 1 20 Curved Support Bracket Weldment 1 No Description Q ty 21 Bolt M8X50 1 22 Active Connecting Weldment 1 23 Nut M12 2 24 Bolt M10X25...

Отзывы: