


MINI TRACKED DUMPER
17
GB
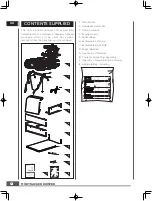
2.
1.
3.
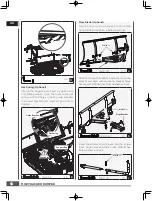
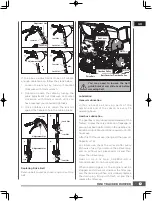
Loosen the jam nut by turning it counter
clockwise with 12mm wrench.
Tighten or loosen the cable by turning the
cable adjustment nut clockwise or counter
clockwise with 10mm wrench until you
have reached your required tightness.
Once tightness is set, return the jam nut
against the handle to hold the cable in place.
1
Jam Nut
Lock Nut
2
3
Jam Nut
Adjustment Nut
Adjustment Nut
Jam Nut
1
Jam Nut
Jam Nut
Lock Nut
Lock Nut
2
Adjustment Nut
3
Jam Nut
Adjustment Nut
Lock Nut
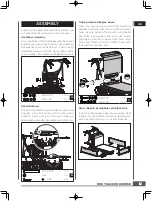
If the above adjustment does not create
enough cable tension, follow the steps below:
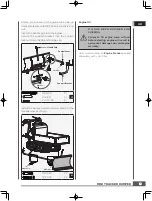
Replacing Drive Belt
Remove belt covers as shown and pull out the
belt.
You may need to loosen the belt
guide bracket and slide back before
removing belt.
Lubrication
General Lubrication
Lightly lubricate all moving parts of the
machine at end of the season or every 25
operating hours.
Gearbox Lubrication
The gearbox is pre-lubricated and sealed at the
factory. Unless there is evidence of leakage or
service has been performed on the gearbox, no
additional lubricate should be required until 50
hours use.
After first 50 hours use, change all the gear oil.
Capacity is 1.5L.
For future use, check the oil level after every
50 hours of use. If you remove the oil level plug
and no oil flows out, please add oil and then
screw the oil level plug.
G e a r o i l G L - 5 o r G L - 6 , S A E 8 0 W - 9 0 i s
recommended. Do not use synthetic oil.
When replacing gear oil, the engine must be
stopped and still warm. Unscrew the filter cap
and the drain plug. When oil is drained, replace
the drain plug, fill up with fresh oil, and then
replace the filter cap.
Belt Cover
M8×20
(×3)
M6×20
Belt Cover for Gearbox Pulley
Gearbox Pulley
Drive Belt
Содержание D30MB
Страница 23: ...MINI TRACKED DUMPER 22 GB PARTS SCHEDULE...
Страница 24: ...MINI TRACKED DUMPER 23 GB Gearbox 50...
Страница 25: ...MINI TRACKED DUMPER 24 GB Box 88...


