background image


44 

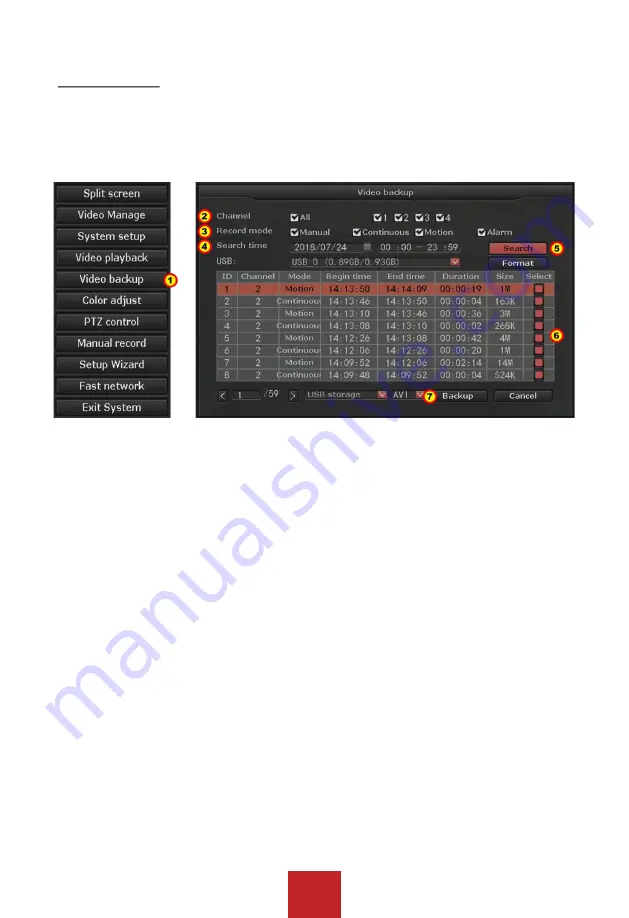
5.5 Video Backup 
Function: Backup the recorded videos in the hard drive into the USB flash drive 
You can back up the video to USB flash drive. 
Before you start please make sure to plug the USB flash drive into the NVR’s USB port. 
 

Operation Steps: 
1.  Right click to bring up the main menu, and go to: ‘Video Backup’. 
2.  Select the ‘Camera channel’ or ’All’ for search. 
3.  Select the record mode for search. (Select from ‘Manual’, ‘Time’, ‘Motion’
4.  Select the ‘Date’ & ‘Time frame’ (start time ~ end time) for search. 
5.  Click “Search” to load the recorded video files. 
6.  Find the channel and time frame of all of the files you will like to back up and ‘Check’ the 

Box’ on the right. 

7.  Once you have check all the box click “Backup” to start the backup process. 
 
Tip: Please make sure that the USB flash drive have enough storage space, and it is 
formatted to Fat32 format.  
 
Note: For HEVC (H.265) systems (CVT804A-20WB / CVT808A-20WB), you will need to 
download the HEVC (H.265) codec for your media player, or download 3rd party media player 
supports the HEVC (H.265) codec. For more information, please refer to the code information 
depends on your media player. 
 

Содержание CVT804A

Страница 1: ......

Страница 2: ......

Страница 3: ...the user to the presence of uninsulated dangerous voltage within the product s enclosure that may be of sufficient magnitude to constitute a risk of electric shock The exclamation point within an equ...

Страница 4: ...n Do not defeat the safety purpose of the polarized or grounding type plug A polarized plug has two blades with one wider than the other A grounding type plug has two blades and a third grounding pron...

Страница 5: ...2 Water and Moisture Do not use this product near water for example near a bath tub wash bowl kitchen sink or laundry tub in a wet basement near a swimming pool and the like 13 Heat The product should...

Страница 6: ...pecified by the product manufacturer can prevent fire electric shock or other hazards 4 Safety Check Upon completion of any service or repairs to this product ask the service technician to perform saf...

Страница 7: ...in this manual is only for users reference We don t promise it s exactly the same with the products you purchase Detailed information is in accordance with the final products The accessories and parts...

Страница 8: ...ly Used Button 14 3 Installation Connection 3 1 Installation Precautions 15 3 2 Preparations before Installation 15 3 3 Camera Mounting Spots 16 3 4 Antenna mounting Tips 16 4 System Operation 4 1 Sta...

Страница 9: ...0 5 3 3 2 DDNS 31 5 3 3 3 E mail 32 5 3 3 4 Wi Fi Setup 33 5 3 4 Channel 5 3 4 1 Channel info 34 5 3 4 2 PTZ 34 5 3 4 3 Channel OSD 35 5 3 4 4 Motion Detection 35 5 3 4 5 Bitrate 36 5 3 5 System 5 3 5...

Страница 10: ...Wizard 46 5 10 Fast Network 46 5 11 Exit System 47 5 11 1 Log Out 47 5 11 2 System Reboot 47 5 11 3 Close Screen Display 48 5 11 4 System Shutdown 48 6 Remote View 6 1 Smartphone Setup Android iOS 49...

Страница 11: ...x768 1440x900 1920x1080p Video Resolution 720P H 264 Frame Per Second 25 fps Live View 15 fps Recording Synch Playback 4 Channel Video Control Video Capture mode Manual Time Motion Playback mode Real...

Страница 12: ...0 1 Lux OSD Date Time Title White Balance Auto Day Night Auto Color BW 3D DNR Auto Mirror Flip On Off Remote Stream Dual Stream Mode HD 1280 x 720 SD 640 x 480 Anti thunder Level Standard IEC61000 4 5...

Страница 13: ...apture mode Manual Time Motion Playback mode Real time Manual Motion Backup USB Backup Hard Drive Interface 1x SATA Max Capacity 4 TB Hard Drive External Interface Network Interface RJ45 10M 100M LAN...

Страница 14: ...0 1 Lux OSD Date Time Title White Balance Auto Day Night Auto Color BW 3D DNR Auto Mirror Flip On Off Remote Stream Dual Stream Mode HD 1920 x 1080 SD 640 x 480 Anti thunder Level Standard IEC61000 4...

Страница 15: ...supported P2P DHCP DDNS PPPoE E Mail etc Multiple alarm trigger video loss motion detection and alarm output buzzer E Mail etc Support access and control from Android Apple phones or tablets Support...

Страница 16: ...to a USB port on the NVR 2 4 Frequently used Button Camera wireless signal indication Motion record Time record Manual record Apply Save and continue OK Save and exit Cancel Cancel Close the operatio...

Страница 17: ...walls between camera and NVR we suggest using extendable antennas to bring camera s antenna inside walls while leaving camera out or use network cable to hard wire the camera to NVR optional The Wi Fi...

Страница 18: ...ge of the power adapter to make sure it is correct Unstable power source may cause unstable working status or even damage to the NVR system If you have unstable power source in your area please use vo...

Страница 19: ...n of numbers letters or The password length must be characters long 4 2 Setup Guide When you have login to the system for the first time you will automatically enter Setup Guide The setup guide will g...

Страница 20: ...the hard drive model capacity used status and format status As default the hard drive should be formatted If the hard drive hasn t been formatted yet please select the hard drive check box on the righ...

Страница 21: ...ras within the network 5 2 2 Match Code Pairing the camera to the NVR and configure the cameras to work wirelessly The main function of Match Code is to pair the IP cameras to NVR and transfer the NVR...

Страница 22: ...to the system 4 When the system is done adding the camera click on the Exit to stop the pairing process 5 Once you are done the camera you have added should be listed at the bottom chart indicating t...

Страница 23: ...onnect to NVR once the cameras are powered on using the provided power adapters How to pair sync camera using WiFi add 1 Power on the system and the camera using the provided power adapter 2 From the...

Страница 24: ...ideo Manage 2 From the bottom chart select and delete the channel you will like to use it as wire connection 3 Connect the NVR system to the router and connect the camera to the same router network as...

Страница 25: ...to multiple channels Intelligent add Allow system to assign a new valid IP address to the camera to resolve IP address errors Such as IP conflicts IP address is not in the same segment 5 2 6 Delete De...

Страница 26: ...Air Bridge feature to boost the Wi Fi signal of Crystal Vision NVR system Air bridge only works on the firmware version listed below System Version v 2 6 3 7_21322230 or above Camera Version v 1 3 35...

Страница 27: ...s repeater and select the channel you will like to link to increase the signal For example CH 2 3 have weak signal which is located near the IPC router and the CH4 is located near the CH 1 Therefore C...

Страница 28: ...reen resolution Recording Network Notification User etc 5 3 1 General 5 3 1 1 General Auto Logout Enable Disable auto logout Key buzzer Enable Disable keyboard sound Language Change the system languag...

Страница 29: ...format System Date Set the system date System Time Set the system time Sync Time Enable to sync time via internet connection Internet connection requires Time Format Select time display format 12h 24...

Страница 30: ...to bring up the main menu and go to system setup General Hard Drive 2 Check the hard drive list and check the box right of the hard drive 3 After you have check the hard drive click format and yes for...

Страница 31: ...end E mail notification with error information Tip To use the E mail notification you must first setup the E mail under the network e mail 5 3 2 Record 5 3 2 1 Recording Plan Function Record enable yo...

Страница 32: ...tting to other channels Different recording mode will show in different color at the time bar below the schedule You can combine different recording mode and record motion in day time and continuous a...

Страница 33: ...ystem is connected to the internet the network status will display healthy network If you have an issue with automatic DHCP you can disable the DHCP and manually configure the IP address Please refer...

Страница 34: ...ssword Enter password of your e mail address Sendee 1 Enter the receiver s e mail address Sendee 2 Enter the 2nd receiver s e mail optional Subject Title of the e mail sent Interval The delay between...

Страница 35: ...i Fi Channel Current Wi Fi channel information Region Wi Fi Channel Region setup Default FCC Connect Information Display current camera connection strength Note Change the Wi Fi information such as ES...

Страница 36: ...ng are fix and not changeable 5 3 4 2 PTZ Function Allow to add optional PTZ Speed dome camera into the system Pre Requirement Make sure the PTZ Speed dome camera is connected to the system or same ne...

Страница 37: ...n the camera titles such as Cam1 Front Door Back yard etc 4 Enable or disable the Status Display Connection Quality 5 Click apply to save the setting and repeat steps 2 5 to change the title or status...

Страница 38: ...ation notification via IP Pro 6 When you are done click Apply to save and repeat the steps 2 6 to enable the setting for different channel camera Note Motion Plan Allow user to set a schedule to send...

Страница 39: ...ick to bring up the main menu and go to System setup System System log 2 Select the event type from the drop down menu and set the time rage and click search 3 Log information will be displayed on the...

Страница 40: ...tem setup System User Log in to Admin or Super User 2 Click on Add user and type in new username and password Password must be 0 8 characters long 3 For full access to the system Check the box for All...

Страница 41: ...ntil disable System setup Configuration of system setup Split screen Adjustment of single view or mulit view Channel adjust Adjustment of camera image brightness color tone saturation and contrast Set...

Страница 42: ...e list occupy 4 Add the cameras by Clicking Auto Add on the list back into the system 5 Click Yes on the Popup box with Auto Add will perhaps modify IP of IPC Are You Sure to Continue Message 6 Click...

Страница 43: ...mat Make sure the upgrade firmware file rom is located at the root directory of the USB flash drive and not in the folder DO NOT unplug the system power during the upgrade or the camera may get damage...

Страница 44: ...ct the date time and weekday to setup a schedule 4 Click Apply to save the setting Config Export Export current setting to USB flash drive Config Import Import setting from the USB flash drive Note Wi...

Страница 45: ...e frame at the bottom 4 The time frame shows the recording as bars from 0 to 24 hours 5 Use the player control to Rewind Pause Play and Fast Forward Tip The highlighted dates indicates that there is r...

Страница 46: ...e start time end time for search 5 Click Search to load the recorded video files 6 Find the channel and time frame of all of the files you will like to back up and Check the Box on the right 7 Once yo...

Страница 47: ...ange Hue Brightness Saturation and Contrast 4 When you are done click Ok to save exit 5 7 PTZ Control Requires PTZ camera Function Allow user to control PTZ camera Operation Steps 1 Right click to bri...

Страница 48: ...Ok to save exit Tip Selected channels will enable the manual recording and overwriting any recording plan Deselecting the channel will disable the manual recording and go back to regular recording mo...

Страница 49: ...nfig 5 11 Exit System Function Allow user to Log out System Reboot Close Screen Display System Shudown 5 11 1 Log Out Function Allow user to lock the system by login out Operation Steps 1 Right click...

Страница 50: ...n is still ON If you like to turn off the screen please use the Screen button located font of the NVR system 5 11 4 System Shutdown Function Allow user to power down the system Operation Steps 1 Right...

Страница 51: ...49 6 Remote view Note Before setting up the remote view for the smartphone or PC please make sure the NVR system is connected to the internet router modem via Ethernet cable and make sure it is Online...

Страница 52: ...to the application tap at the top right corner then tap Add device by ID Android or Cloud ID iOS 4 From add device enter in the following information Cloud ID NVR systems Cloud ID number Descriptions...

Страница 53: ...rd blank no password 4 After you have log in to the system go to Device management 5 Enter in your Cloud ID NVR s Username NVR s Password and Note ex home office 6 With the information entered click A...

Страница 54: ...al conditions including normal atmospheric moisture and humidity conditions Except as otherwise prohibited by law this warranty is in lieu of other warranties express or implied and Crystal Vision nei...

Страница 55: ...53...

Страница 56: ......

Отзывы: