6 - 5
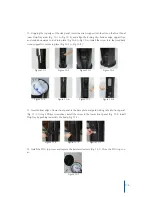
13. Using the brush attachment, vacuum the condenser and all accessible areas to remove dirt, lint and
debris (fig. 13-1 to 13-9) (the use of the crevasse tool attachment may also be used). Use a scrub brush
to remove dirt and debris from the condenser (fig. 13-5). Use an air hose to remove debris from inac-
cessible areas (do not exceed 100 PSI) (fig. 13-6 to 13-8). Use a damp cloth to wipe down condenser
(fig. 13-9). For excessively dirty coolers, the back condenser may be moved back 4”- 6” by removing
the screws that secure the condenser to the back panel (fig. 13-10 to 13-13). Use a damp cloth to wipe
down the complete back panel, the Styrofoam insulation and the compressor (fig. 13-14 to 13-16). Re-
place screws in condenser when cleaning of back panel is complete.
CAUTION: DO NOT CLEAN USING PRESSURE WASHER OR ANY DIRECT WATER CONTACT.
CAUTION: DO NOT MOVE CONDENSER MORE THAN 6 INCHES.
Figure 13-1 Figure 13-2 Figure 13-3 Figure 13-4
Figure 13-5 Figure 13-6 Figure 13-7 Figure 13-8
Figure 13-9 Figure 13-10 Figure 13-11 Figure 13-12
Figure 13-13 Figure 13-14 Figure 13-15 Figure 13-16
Содержание Everest Elite
Страница 1: ...Service Manual 100 115VAC EVEREST ELITE ...
Страница 21: ...Models Everest Elite Hot Cold 110V 5 3 ...


