background image

Chapter 4—Programming and Customizing the UCommand-616 

Making LCD adjustments 49 

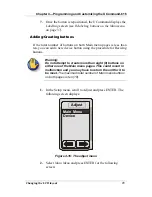
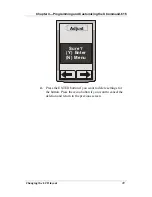
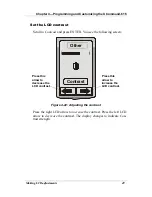
Set the LCD contrast 

Scroll to 

Contrast 

and press ENTER. You see the following screen: 
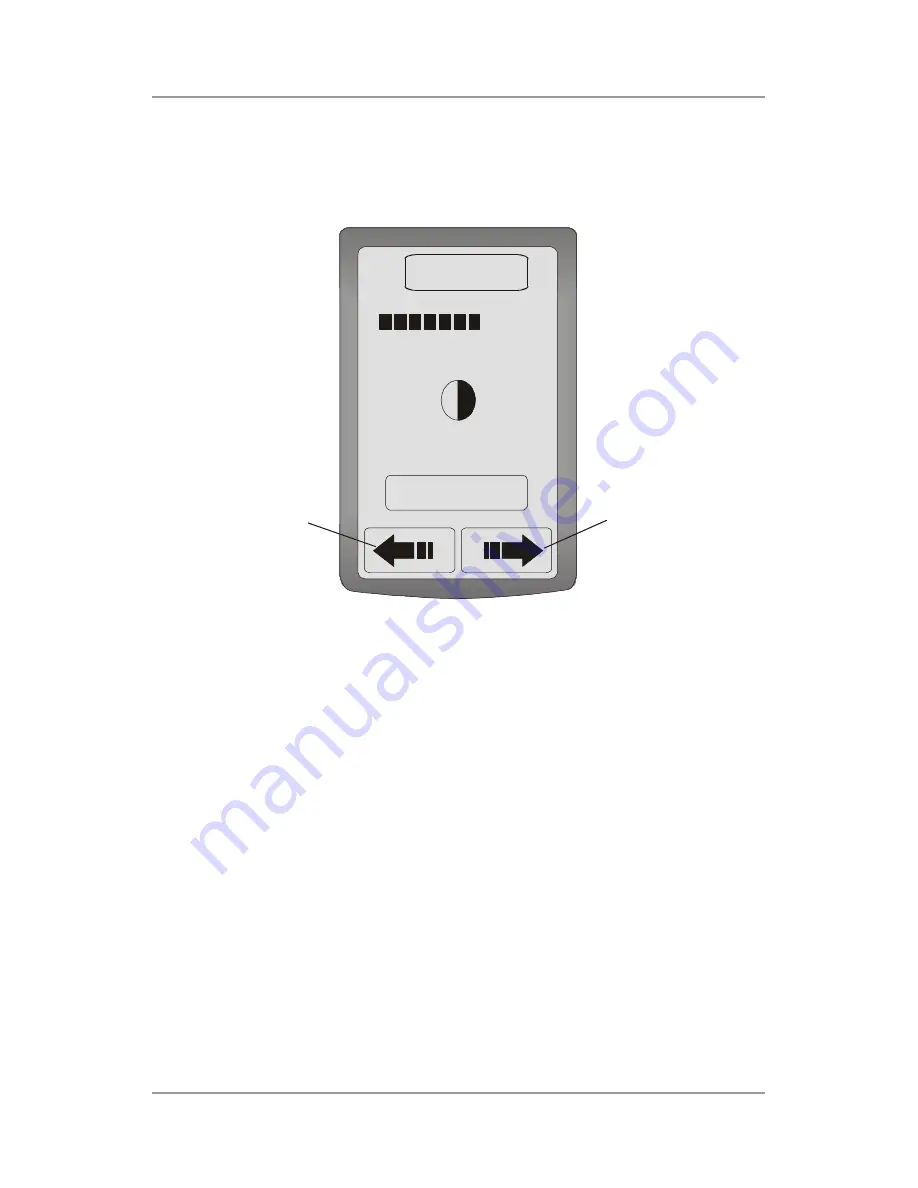
Other

Contrast

(                            )

Press this
arrow to 
decrease the
LCD contrast.

Press this
arrow to 
increase the
LCD contrast.


Figure 4-22: Adjusting the contrast 

Press the right LCD arrow to 

increase

 the contrast. Press the left LCD 

arrow to 

decrease

 the contrast. The display changes to indicate Con-

trast strength. 

Содержание UCommand 616

Страница 1: ...User s Manual For QUICK START see page 2 inside...

Страница 2: ...UCommand 616 Universal Remote Control User s Manual...

Страница 3: ...This document contains proprietary information protected by copyright All rights are reserved No part of this manual may be reproduced by any mechanical electronic or other means in any form without...

Страница 4: ...nual ii PREFACE Contact Technical support for Crisp Solutions products is available via e mail and on the Web E mail support crispsolutions com Web www crispsolutions com Crisp Solutions LLC 2530 Berr...

Страница 5: ...ponents 5 CHAPTER 2 9 Getting Started 9 Power supply 9 Inserting batteries 10 Power supply precautions 11 Power supply tips 11 Battery low icon 11 Battery life and backlight function 11 The LCD 12 Tur...

Страница 6: ...a device 30 Clearing all devices 31 Changing the LCD layout 31 Resizing buttons on the Main menu 32 Adding Creating buttons 35 Relabeling buttons on the Main menu 37 Deleting buttons from the Main men...

Страница 7: ...gure 4 4 Setting up timer options 24 Figure 4 4 Setting up timer options 25 Figure 4 5 The program submenu 26 Figure 4 6 Using the Learning eye 27 Figure 4 7 Programming devices 28 Figure 4 8 Programm...

Страница 8: ...UCommand 616 Universal Remote Control User s Manual vi LIST OF FIGURES Figure 4 21 The other menu 48 Figure 4 22 Adjusting the contrast 49 Figure 4 23 Adjusting the backlight 50...

Страница 9: ...so easily edit the device list make changes to the buttons on any screen and adjust other settings In addition with the Macro function you can initiate a chain of up to 25 commands with the touch of a...

Страница 10: ...g any hard button 2 Press and hold the menu button until the Setup menu appears 3 Scroll down to the Program item using the CH and CH buttons and select it by pushing the mute button Pressing menu alw...

Страница 11: ...een at any time 11 You do not have to program all available buttons To pro gram the next device in your system press the menu button at any time to back out until you can select another device 12 To C...

Страница 12: ...en depending on the button sizes you select Mix and match button sizes on each screen Virtual keyboard for labeling your buttons Macro function stores 12 macros each macro can store 25 commands Macros...

Страница 13: ...llowing illustrations to identify the com ponents of the UCommand 616 Refer to Chapter 4 Customizing the UCommand 616 for a detailed description on operating and getting the most from these features M...

Страница 14: ...e selected device This may be programmed as a discrete power button 4 Device direct access buttons These buttons function differently depending on the device selected Use them to change channels raise...

Страница 15: ...ew 8 IR port Point the IR port end at the IR receiver of your device 9 Connector for battery charger option Optional universal adapter port to charge Ni MH batteries 10 Battery cover Remove this cover...

Страница 16: ...Chapter 1 Introducing the UCommand 616 Identifying components 8...

Страница 17: ...rst or may cause leakage which might damage the interior of the unit Be sure to only use the cor rect type of alkaline or rechargeable Ni MH batteries with the UCommand 616 Power supply The UCommand 6...

Страница 18: ...ert the batteries according to the marking inside the battery case Connector for Battery charger Figure 2 1 Inserting the batteries 1 Locate the battery bay cover at the back of the UCommand 616 2 Put...

Страница 19: ...to replace rechargeable batteries if they have been used for longer than two years or have been recharged over 500 times extended use can lead to a danger of leakage Battery low icon When the battery...

Страница 20: ...your UCommand 616 with the touch of a finger Turning the UCommand 616 on To turn the UCommand 616 on simply press the Hardware Access Button with your finger off PLAY STOP ENTER CH CH VOL VOL menu mut...

Страница 21: ...ap the screen to avoid damaging the surface You can use a blunt object such as a pencil eraser or the cap of a pen Keep the touch screen dry Wipe off any spills immediately The UCommand 616 is not wat...

Страница 22: ...the previous screen Press this arrow to scroll to the next screen Press this icon to enable or disable the beep signal Indicates battery charge level Figure 2 3 The Information Screen If you want to...

Страница 23: ...ons and touch screen buttons Direct access buttons The direct access buttons provide you with easy access to often used functions such as volume and channel control fast forward and fast reverse play...

Страница 24: ...d with your remote control set up macros and configure the LCD panel the way you want off PLA Y STO P ENTE R CH CH VOL VOL men u mut e Main AU X1 AU X2 TUNE R TAPE CD Figure 2 5 Touch screen buttons U...

Страница 25: ...menu displays a list of the devices currently available on the UCommand 616 You can delete rename and configure these devices us ing the Learning function see page 26 Using the Learning function Main...

Страница 26: ...ates menu page number Device Header Press this header to return to the Main Menu Figure 3 2 The TV device menu You can easily configure all device commands using the Learning function Refer to page 26...

Страница 27: ...To scroll through the items on the setup menu use the hardware chan nel up CH and channel down CH buttons Press the enter mute mute button to enter an item submenu Press the menu menu button to return...

Страница 28: ...UCommand 616 Universal Remote Control User s Manual 20 The setup menu...

Страница 29: ...nu The functions shown are covered in detail in this chapter Clock Enables you to set the date and time Timer Enables you to set a timer to run a device at a specified time Program Enables you to tran...

Страница 30: ...ollowing screen Clock 1999 01 01 03 23 Friday 1 Blinking cursor 0 1 2 3 4 5 6 7 8 9 Figure 4 1 The clock menu Change the number under the blinking cursor by pressing 0 to 9 on the LCD panel After you...

Страница 31: ...ed times In the Setup menu scroll to Timer and press ENTER You see a list of timers Timer Timer 01 Timer 02 Timer 03 Timer 04 Figure 4 2 Timer list Use the channel up or channel down to scroll through...

Страница 32: ...appears Timer 03 23 0 0 1 2 3 4 5 6 7 8 9 Daily Press here to select which day or days you want the timer to run Press these numbers to enter the time you want the timer to run Figure 4 4 Setting up t...

Страница 33: ...t be preset in this circum stance Relabeling timers You can easily relabel the timer names as follows 1 From the Timer menu Figure 4 3 scroll to Relabel and press ENTER The following screen appears Ti...

Страница 34: ...vice or clear the configuration for All devices Program Clr Key Learning Clr Device Clr All Figure 4 5 The program submenu Using the Learning function This section describes the UCommand 616 Learning...

Страница 35: ...the Program menu 27 Main M 1999 01 01 03 23 Friday off PLAY STOP ENTER CH CH VOL VOL menu mute REMOTE CONTROL Learning eye 5 10 cm Figure 4 6 Using the Learning eye From the program menu Figure 4 5 s...

Страница 36: ...7 Programming devices Press the button of the device that you want to program The following screen displays Learn Figure 4 8 Programming the direct access buttons The buttons on the LCD screen corres...

Страница 37: ...elease the Power button Refer to the following illustration OK 3 The filled circle moves corresponding to the channel up play CH direct access button 4 Map the remaining buttons the same way You can a...

Страница 38: ...menu press the key you want to clear 4 Repeat steps 1 through 3 for all other keys you want to clear Clearing a device The Clear Device function enables you to erase all the commands for a single devi...

Страница 39: ...R 2 You are prompted to press the ENTER button to delete the settings for all devices or press the menu button to cancel the changes and return to the previous screen Changing the LCD layout The Adjus...

Страница 40: ...Functions are described below Resizing buttons on the Main menu Follow the instructions below to resize buttons for the Main menu 1 Scroll to Resize Add and press ENTER for the Main menu Main Press t...

Страница 41: ...here you want to locate the upper left cor ner of the button This spot can be anywhere there is space A black square appears use a blunt pointer for accuracy Main AUX 1 AUX 2 TUNER TAPE CD Figure 4 12...

Страница 42: ...34 Changing the LCD layout 5 Touch the space between the two black squares Main AUX 1 AUX 2 TUNER TAPE CD Figure 4 14 Completing the adjustment 6 The button assumes the new size and location Main AUX...

Страница 43: ...add a new device button using the procedure for Resizing buttons Warning Do not attempt to create more than eight 8 buttons on either one of the Main menu pages This could result in malfunction and yo...

Страница 44: ...eated the UCommand displays the La belling screen see next section The Labelling procedure also allows you to generate a set of default buttons for spe cific devices eg DVD Amp Satellite dish Note the...

Страница 45: ...De vice list Note the T icon in the upper right corner of the screen Pressing this icon provides a shortcut that switches the mode into the Resize Create function 3 Select a Device to relabel from th...

Страница 46: ...cessing your relabeled button the menus will be the same as the device that you select here Deleting buttons from the Main menu You can easily delete buttons from the Main menu Follow these instructio...

Страница 47: ...ng the UCommand 616 Changing the LCD layout 39 Adjust Sure Y Enter N Menu 4 Press the ENTER button if you want to delete settings for the button Press the menu button if you want to cancel the deletio...

Страница 48: ...Relabel Delete Recall Resize Add Figure 4 18 Adjusting buttons on the device menu The procedures for resizing and deleting buttons on the device menu are the same as those for resizing and deleting bu...

Страница 49: ...ollow these instructions 1 From the Adjust menu Figure 4 9 select Device and press ENTER 2 Scroll to Relabel and press ENTER again You see the de vice list 3 Select a device to relabel eg CD You see t...

Страница 50: ...to display a list of icons Scan icon S REC CH CH 6 Press any of the buttons shown to replace the text Scan shown here with an icon Press and to scroll between page views for more icons Using Recall Th...

Страница 51: ...cro submenu Once you have created a macro you will be able to run many commands by pushing only one button 1 From the Setup menu scroll to Macro and press ENTER You see a list of macros Macro Macro 01...

Страница 52: ...re corded into the macro 3 If necessary you can set a time delay between each com mand in the macro In the upper right corner of the screen there is an hourglass 6 icon After pressing a command press...

Страница 53: ...r of any screen then select the macro you want to run from the Macro list Relabeling a macro Follow these instructions to relabel a macro 1 In the setup menu scroll to Macro and press ENTER The list o...

Страница 54: ...ress P1 to access upper case letters P2 to access lower case letters and P3 to access numbers and special characters 5 Press ENTER when you have made your changes Deleting a macro Follow these instruc...

Страница 55: ...the macro information is deleted Macro Processing The Macro Delete function only deletes the macro recorded data it does not remove the macro name from the Macro list The Duplicate menu The Duplicate...

Страница 56: ...D adjustments The Other menu allows you to set the LCD contrast adjust the backlight calibrate your UCommand 616 From the Setup menu scroll to Other and press ENTER You see the following screen Other...

Страница 57: ...ENTER You see the following screen Other Contrast Press this arrow to decrease the LCD contrast Press this arrow to increase the LCD contrast Figure 4 22 Adjusting the contrast Press the right LCD ar...

Страница 58: ...ensor detects the ambient light level and activates according to the settings on this screen Press the ON OFF button to enable the auto backlight ON or disable OFF Level Press and hold the Hardware Ac...

Страница 59: ...ve your changes and return to the Other menu Calibrating the LCD Rarely the LCD buttons lose positioning calibration When this hap pens pressing an LCD button results in the adjacent button activating...

Страница 60: ...UCommand 616 Universal Remote Control User s Manual 52 Making LCD adjustments...

Страница 61: ...ns with real time clock and calendar Remote capability 10 devices with 4 pages each 10 12 but tons per page 420 buttons max Transmission range Up to 33 feet 10m under typical conditions 35 45 Learning...

Страница 62: ...rsal Remote Control User s Manual 54 Specifications Optional accessories Power adapter DC 5V 1A Rechargeable AAA Ni MH Batteries Docking Station with charging function PC Interface RS232 Serial Port a...

Страница 63: ...ons between the UCOMMAND 616 and the device Make sure to learn every single button func tion you want to use It is not sufficient to just learn a few buttons of the other remote Repeat the learning fu...

Страница 64: ...cessary You see an error display during opera tion The button that you pressed has not been properly configured Configure the button again using the learning procedure page 26 Problems with two way re...

Страница 65: ...bleshooting 57 If none of these solutions seems to help go to our website at www crispsolutions com or contact support crispsolutions com Crisp Solutions LLC 2530 Berryessa Rd 148 San Jose CA 95132 Fa...

Страница 66: ...UCommand UC 616 Touch Screen Remote Control User s Manual 8 12 00 UG 616 Printed in Taiwan...

Отзывы: