background image

4

FU55-0001

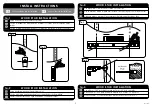
1b-2

drill depth

65mm / 2.5”

drill diameter

10mm

3/8”

Level wall plate, then mark 4 hole locations.

Nivele la placa de pared, a continuación, marque la ubicación de 4 agujeros.

Niveau de la plaque murale, puis marquer l’emplacement des quatre trous.

MASONRY BLOCK & CONCRETE INSTALLATION

1b-1

Use 10 mm-3/8“ drill bit to drill 65mm - 2.5” holes on marks.

Utilice un 

10 mm-3/8“

 para perforar la madera poco 65mm - 2.5” agujeros.

Utilisez un 

10 mm-3/8“

 bits de forage pour percer 65mm - 2.5” po.

1b-2

MASONRY BLOCK & CONCRETE INSTALLATION

2-1

Fasten wall plate to wall using screw (A).  Hand tools only.

Fije la placa de pared a pared con el tornillo (A). Herramientas de mano solamente.

Fixer la plaque murale au mur avec la vis (A). Outils à main seulement.

INSTALL WALL PLATE MASONRY

2-2

Fasten wall plate to wall using screw (A).  Hand tools only.

Fije la placa de pared a pared con el tornillo (A). Herramientas de mano solamente.

Fixer la plaque murale au mur avec la vis (A). Outils à main seulement.

INSTALL WALL PLATE WOOD

2-1

2-2

1b-3

Insert (B) into both holes.  Use a hammer to tap in if necessary.

Insertar (B) en ambos orificios. Utilice un martillo para golpear en caso de necesidad.

Insérer (B) dans les deux trous. Utilisez un marteau pour enfoncer dans le cas échéant.

1b-3

MASONRY BLOCK & CONCRETE INSTALLATION

B

A

C

A

C

1b-1

Содержание FU55

Страница 1: ...ne alguna duda sobre la seguridad de la instalaci n contacte con Crimson AV o llame a un operario cualificado Crimson AV no es responsable de da os o lesiones causados por el montaje ensamblaje o uso...

Страница 2: ...ry bit 10mm 3 8 Socket wrench 3 8 Hammer if necessary Madera poco 4mm 5 32 Mamposter a poco 10mm 3 8 3 8 llave Martillar si es necesario Peu de bois de 4 mm 5 32 peu ma onnerie 10mm 3 8 3 8 Cl douille...

Страница 3: ...l nea central Utilisez la plaque murale C pour marquer l emplacement trou dans l axe WOOD STUD INSTALLATION 1a 3 1a 4 drill depth 65mm 2 5 drill diameter 4mm 5 32 Using stud finder locate centers of...

Страница 4: ...e to wall using screw A Hand tools only Fije la placa de pared a pared con el tornillo A Herramientas de mano solamente Fixer la plaque murale au mur avec la vis A Outils main seulement INSTALL WALL P...

Страница 5: ...minate slack Si los tornillos toc fondo a continuaci n utilizar arandelas no incluidos para elimi nar la holgura Si les vis touch le fond puis utiliser des rondelles non inclus afin d liminer mou ATTA...

Страница 6: ...ickstand to angle TV from the wall and allow access to inputs on back of TV Parte superior del gancho de soporte sobre la parte superior del soporte de pared a continu aci n m s abajo y la inclinaci n...

Страница 7: ...en su poder un pro ducto fabricado con materiales resistentes basado en un dise o muy bien meditado Por ello Crimson AV LLC responde de los posibles defectos de material o fabricaci n con una garant...

Страница 8: ...ilit d utiliser des produits Crimson AV LLC Crimson AV LLC r fute galement toute responsabilit pour quelque dommage accessoire ou indirect Ceci s applique notamment aux frais de main d oeuvre pour la...

Отзывы: