background image

Product Manual — Doc. 9045A

DM-NAX-8ZSA • 57

Groups

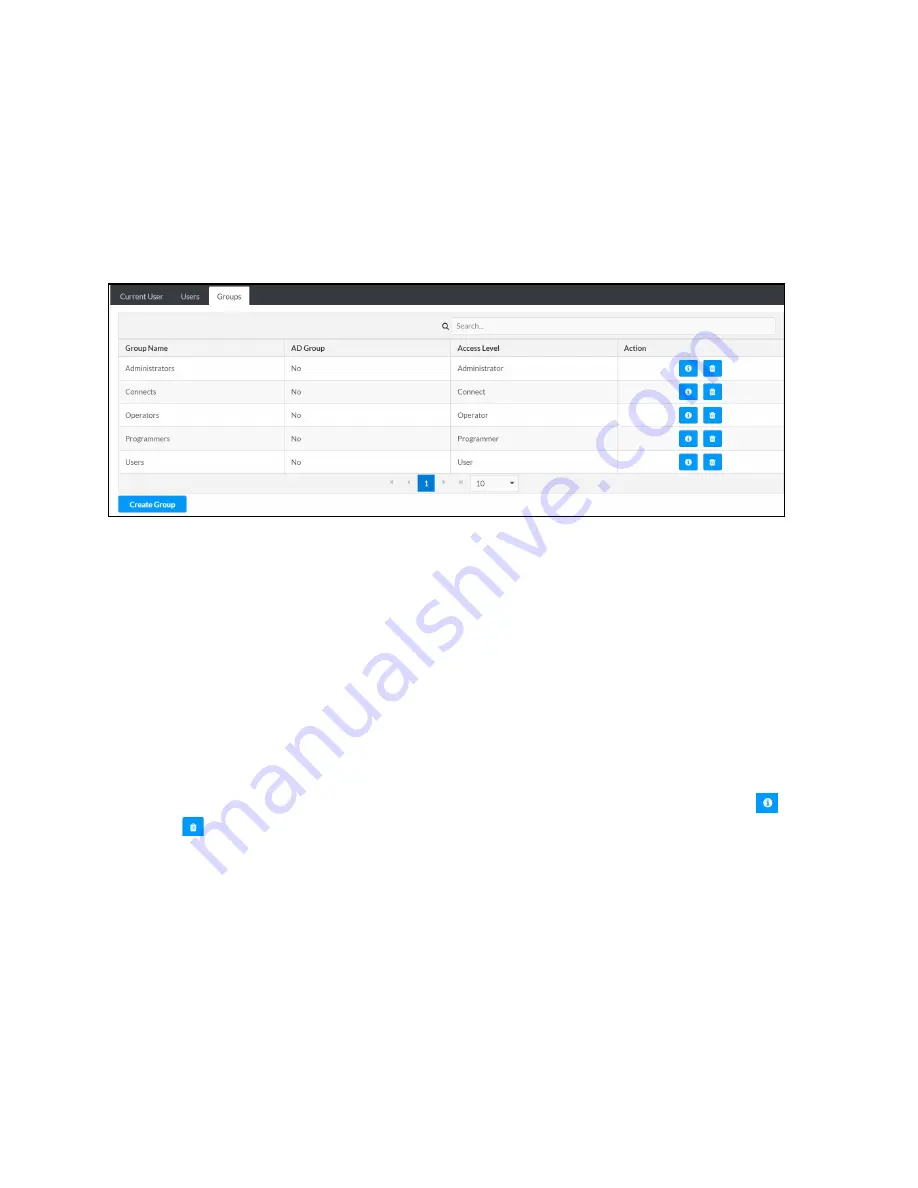
Click the Groups tab to view and edit group settings. The Groups tab can be used to add local 
and Active Directory groups, remove local and Active Directory groups, and preview information 
about a group.

Use the Search Groups field to enter search term(s) and display groups that match the search 
criteria.

If groups listed in the Groups table span across multiple pages, navigate through the groups by 
clicking a page number or by using the left or right arrows at the bottom of the Groups pane to 
move forward or backward through the pages.

Additionally, each page can be set to display 5, 10, or 20 groups by using the drop-down menu to   
the right of the navigation arrows.

Existing groups are displayed in a table and the following information is provided for each group:


l

Group Name: Displays the name of the group.


l

AD Group: Displays whether the group requires authentication using Active Directory.


l

Access Level: Displays the predefined access level assigned to the group (Administrator, 
Programmer, Operator, User, or Connect).

Click the corresponding button in the Actions column to view detailed group information (

) or 

to delete (

) selected group.

Click on the Create Group button in the Groups tab to create new group.

Содержание DM-NAX-8ZSA

Страница 1: ...DM NAX 8ZSA DM NAX 8 Zone Streaming Amplifier Product Manual Crestron Electronics Inc ...

Страница 2: ...estron Toolbox DM NAX and DM NVX are either trademarks or registered trademarks of Crestron Electronics Inc in the United States and or other countries Dante is either a trademark or a registered trademark of Audinate Pty Ltd in the United States and or other countries Active Directory is either a trademark or a registered trademark of Microsoft Corporation in the United States and or other countr...

Страница 3: ... Logs 16 Managing Certificates 17 To Add Certificates 18 To Delete Certificates 18 Save Changes 18 Revert 18 Status 19 Device 19 Network 20 Control System 21 Settings 22 System Setup 22 Date Time 23 Time Synchronization 23 Time Configuration 23 Auto Update 24 Network 25 Configure DHCP 25 Control System 26 Chimes 27 Zones 28 Zone Settings 29 Bussing 41 Configure Bussing 41 Inputs 42 Configure Input...

Страница 4: ...an Active Directory User 55 Delete User 55 View User Details 56 Update User Details 56 Groups 57 Create Local Group 58 Add Active Directory Group 58 Delete a Group 59 View Group Details 59 802 1x Configuration 60 To Configure DM NAX 8ZSA for 802 1X Authentication 61 Access the Web Interface With the Crestron Toolbox Application 62 ii Contents Product Manual Doc 9045A ...

Страница 5: ...lable on the line and speaker outputs DM NAX is built on AES67 standards with the additional ease of configuration via a web interface SIMPL Windows C and or a RESTful API It is compatible with DM NVX endpoints through an AES67 secondary audio stream and also with third party AES67 solutions and Dante audio networking via the compatibility mode enabled in Dante Controller Voltage triggers correspo...

Страница 6: ...with a valid IP address and off when the device is not connected to a network or the IP address is invalid NAX 1 LED Illuminates white when the AoIP is ready to pass and the unit s PTP clock is synced and off when there is no AoIP is passing to or from an amplifier and or PTP is not synced SOURCE 8 LEDs illuminate white when a signal is detected on the specified input source red when there is clip...

Страница 7: ... Level 150 Watts single ended at 8 Ohms 300 Watts single ended at 4 Ohms with zones bridgeable up to 500 Watts at 8 Ohms LINE OUTPUTS 8 RCA connectors female Comprise 4 unbalanced line level stereo audio outputs mirror corresponding speaker outputs pair 1 4 Output Impedance 100 Ohms Maximum Output Level 2 Vrms 2 5 pin 3 5mm detachable terminal blocks Balanced stereo line level audio outputs mirror...

Страница 8: ...olding the SETUP button for 15 seconds with power supplied clears Network Settings and restores the default DHCP Mode Press and hold the SETUP button with power disconnected then connect the power supply and continue to hold SETUP button for 15 seconds will perform a factory restore 1 LED illuminates red when the button is pressed flashes red when reset has been initiated CONSOLE 1 Standard USB 2 ...

Страница 9: ...m shows the following setup l Up to 8 zones of amplification and audio distribution l Local line level input l Local line level output to an Audio Video Receiver AVR mirroring a zone of amplification l Available NVX audio streams to route audio from video sources to non video zones l Available music streaming services on up to 8 NAX zones ...

Страница 10: ...plification and audio distribution l Local line level input l Local line level output to an AVR mirroring a zone of amplification l Available music streaming services on up to 8 NAX zones l The DM NAX 16AIN is used to carry audio from the DM chassis video sources to the NAX network for routing to non video zones ...

Страница 11: ...ation 2 1 Bridged sub comprises four speaker outputs two left and right and two for the bridged sub NOTE This configuration is only applicable when enough subsequently numbered zones are available on the amplifier For example the 2 1 Bridged sub cannot be used on Zone 8 as there is no speaker output pair 9 l The right configuration Bridged 2 1 comprises six speaker outputs two for the bridged left...

Страница 12: ...three zones worth of speaker outputs on its own This application diagram shows the following setup l Mirrored zones Zone 1 and Zone 2 each have two rooms receiving the same audio signal l Parallel wiring of low impedance speakers in two Locker Room areas NOTE This is a parallel wiring of 8 Ohm speakers for a total supported load of 4 Ohms per channel Parallel wiring lowers the effective impedance ...

Страница 13: ...a large group of low impedance speakers with the same signal and shared controls This application diagram shows a commercial setup using casting service streaming applications For example in a hotel each room can receive a cast from a third party device The Lobby and Pool zones can exist on another DM NAX 8ZSA unit that is on the same LAN or on a separate VLAN or WAP to cast to control those zones...

Страница 14: ...he line outputs Line outputs 1 and 2 feed high impedance amplifiers driving speakers for large outdoor spaces and speaker zone outputs 5 8 feed low impedance indoor spaces without overlap of signals The LAN cloud shows that any individual applications can exist as part of a large NAX system ...

Страница 15: ... Application on page 62 The web interface is accessed from a web browser The following table lists operating systems and their corresponding supported web browsers OPERATING SYSTEM SUPPORTED WEB BROWSERS Windows operating system Chrome web browser version 31 and later Firefox web browser version 31 and later Internet Explorer web browser version 11 and later Microsoft Edge web browser macOS operat...

Страница 16: ... panel of the device to display the IP address on the connected output The IP address is displayed for 20 seconds 2 If you are creating a user account for the first time do the following otherwise skip to step 3 a Enter a username in the Username field b Enter a password in the Password field c Re enter the same password in the Confirm Password field d Click Create User The Device Administration p...

Страница 17: ...Product Manual Doc 9045A DM NAX 8ZSA 13 3 Enter the username in the Username field 4 Enter the password in the Password field 5 Click Sign In ...

Страница 18: ...Action The Action drop down menu is displayed at the top right side of the interface and provides quick access to common device functionalities l Reboot l Restore l Update Firmware l Download Logs l Manage Certificates l Save Changes l Revert ...

Страница 19: ... restore the settings of the DM NAX 8ZSA to factory defaults NOTE When settings are restored all settings including the network settings will revert to the factory default If a static IP address is set restoring the device to factory default settings will revert the IP address to the default DHCP mode 2 Click Yes in the Confirmation dialog to restore the DM NAX 8ZSA to factory settings Click No to...

Страница 20: ...selected firmware file name is displayed in the Firmware Upgrade dialog 4 Click Load and wait for the progress bar to complete and for the OK button in the message to become clickable 5 Click OK The device with new firmware can now be accessed Download Logs 1 Click Download Logs in the Actions drop down menu to download the device message logs for diagnostic purposes The log file is downloaded to ...

Страница 21: ... certificates must be self signed l Intermediate The Intermediate store holds non self signed certificates that are used to validate the authentication server These certificates will be provided by the network administrator if the network does not use self signed Root certificates l Machine The machine certificate is an encrypted PFX file that is used by the authentication server to validate the i...

Страница 22: ... add the certificate to the list box displaying the file name and expiration date The certificate is now available for selection and can be loaded to the device To Delete Certificates 1 Click the corresponding certificate tab 2 Click the trashcan button in the Actions column to delete the certificate 3 Click Yes when prompted to delete the certificate or No to cancel the deletion Save Changes Clic...

Страница 23: ...irmware Version and Serial Number current network settings such as Host Name and IP Address etc and input and output ports current status The Status tab can be accessed at any time by clicking the Status tab of the DM NAX 8ZSA interface Information displayed on the Status tab is organized into different sections Device The Device section displays the Model Firmware Version and Serial Number of the...

Страница 24: ...DM NAX 8ZSA Network The Network section displays network related information about the DM NAX 8ZSA including the Hostname Domain Name and DNS Servers NOTE By default the host name of the DM NAX 8ZSA consists of the model name followed by the MAC address of the device For example DM NAX 8ZSA 00107FB58088 ...

Страница 25: ...pter 2 option appears when the dual Ethernet ports on the DM NAX 8ZSA are set to isolate traffic Control System The Control System section displays connection information consisting of the following l Encrypt Connection ON or OFF l IP ID Reports the currently used IP ID of the DM NAX 8ZSA l IP Address Hostname IP address of the control system l Room ID Displays the room ID l Status OFFLINE or ONLI...

Страница 26: ...settings The Settings page can be accessed at any time by clicking the Settings tab of the DM NAX 8ZSA interface Information displayed on the Settings tab is organized into different sections System Setup The System Setup section displays information about the Date Time Auto Update Network and Control System ...

Страница 27: ...e NTP Time Servers enter the URL of the NTP or SNTP server 3 Click Synchronize Now to perform time synchronization between the device s internal clock and the time server Time Configuration 1 Click on the Time Zone drop down menu to select the applicable time zone 2 In the Date field enter the current date 3 In the Time 24hr Format field enter the current time in 24 hour format Click the Save Chan...

Страница 28: ...lt URL to download the updates from the Crestron server b Use a custom URL To enable a custom URL move the Custom URL slider to the right position In the Custom URL Path text box enter the path to the manifest file in the FTP or SFTP URL format 4 Set a schedule for the automatic firmware update by doing either of the following a Select the desired Day of Week and Time of Day 24 hour format values ...

Страница 29: ...ight or disabled left to specify whether the IP address of the DM NAX 8ZSA is to be assigned by a DHCP Dynamic Host Configuration Protocol server l Enabled When DHCP is enabled default setting the IP address of the DM NAX 8ZSA is automatically assigned by a DHCP server on the local area network LAN for a predetermined period of time l Disabled When DHCP is disabled manually enter information in th...

Страница 30: ...e password in the Control System Password field 4 Enter the Room ID in the Room ID field 5 Enter the IP ID of the DM NAX 8ZSA in the IP ID field 6 Enter the IP address or hostname of the control system in the IP Address Hostname field 7 Click the Save Changes button to save the new entries The Control System Save message box appears indicating that the control system settings were saved successful...

Страница 31: ...corresponding to the desired Zones for playback of that specific chime sound You can select multiple chimes for the same zone The maximum supported chime length is 10 seconds To view all available chimes use arrows or at the left of the matrix to change pages To configure the chime volume of a zone 1 Click the icon corresponding to the zone The Configure dialog appears ...

Страница 32: ... the chime volume Values range from 0 to 100 adjustable in 1 increments l Manually enter a value in the Volume field NOTE The set volume is independent of the zone volume control 3 To mute the chime sound move the Do Not Disturb slider to the right To unmute the chime sound move the Do Not Disturb slider to the left 4 Click OK to apply the new settings Zones The Zones section enables configuration...

Страница 33: ...ease the zone volume l Click the arrows to increase or decrease the zone volume Values range from 0 to 100 adjustable in 1 increments l Manually enter a value in the Volume field 3 To mute the zone sound click the Mute button To unmute the zone sound click the Muted button Zone Settings To configure zone settings click the configure button The Edit Zone window appears Click Zone to configure Tone ...

Страница 34: ...e left to decrease the treble l Click the db arrows to increase or decrease the treble Values range from 12 db to 12 db adjustable in 1 db increments l Manually enter a value in the Treble field 4 To enable loudness move the Loudness slider to the right position To disable the loudness move the slider to the left position By default Loudness is disabled 5 Select the night mode from the Night Mode ...

Страница 35: ...k the ms arrows to increase or decrease the delay Values range from 0 ms to 250 ms adjustable in 1 ms increments l Manually enter a value in the Delay field Click Output to configure Minimum Maximum Autosaved Stereo Mono Autosaved Signal Autosaved Bussing Volume Offset Autosaved Speaker Configuration Autosaved Test Tone Autosaved Speaker Faults Autosaved Line Out Autosaved and Equalizer Settings A...

Страница 36: ... or to the left to decrease the maximum volume l Click the arrows to increase or decrease the maximum volume Values range from 70 to 100 adjustable in 1 increments l Manually enter a value in the Maximum field NOTE When the minimum and maximum volume are configured the volume and default volume control reflects a percentage value of that range the range from minimum to maximum 3 To configure the d...

Страница 37: ...the Stereo Mono field 2 Select the zone configuration from the Zone Configuration drop down menu Values are Standard Bridged Bridged 2 1 Bridged Sub 2 1 and Bridged Mono NOTE The Stereo Mono field is disabled for the Bridge Mono Bridged 2 1 and Bridged Sub 2 1 zone configurations Stereo Standard Mono Standard ...

Страница 38: ...34 DM NAX 8ZSA Product Manual Doc 9045A Bridged Mono Mono Bridged ...

Страница 39: ...Product Manual Doc 9045A DM NAX 8ZSA 35 Bridged 2 1 ...

Страница 40: ...36 DM NAX 8ZSA Product Manual Doc 9045A Stereo Bridged Bridged Sub 2 1 ...

Страница 41: ... changes to Present in red l If there is no signal or clipping then the Signal status changes to Not Present in red and Clipping status changes to None in green Configure Bussing Volume Offset Autosaved 1 To configure the bussing volume offset do one of the following l Move the Bussing Volume Offset slider to the right to increase or to the left to decrease the bussing volume offset l Click the db...

Страница 42: ...justable in 1 watt increments l Manually enter a value in the Speaker Wattage field 3 Select the impedance of the speaker on a selected zone from the Impedance drop down menu Values are 4 Ohms 8 Ohms and Bridged Configure Test Tone Autosaved 1 Test Tone is used for troubleshooting connections To configure the test tone do one of the following l Move the Test Tone slider to the right to increase or...

Страница 43: ... decrease the line out volume l Click the arrows to increase or decrease the line out volume Values range from 0 to 100 adjustable in 1 increments Range in db is 80 db to 20 db l Manually enter a value in the Line Out Volume field 2 To enable the line out EQ bypass move the Line Out EQ Bypass slider to the right position To disable the line out EQ bypass move the slider to the left position By def...

Страница 44: ...ease or down to decrease the gain l Click the arrows to increase or decrease the gain Values range from 40 to 20 adjustable in 0 1 increments l Manually enter a value in the Gain field b Select the type from the Type drop down menu Values are EQ Notch TrebleShelf BassShelf LowPass and HighPass c To configure the frequency do one of the following l Click the arrows to increase or decrease the frequ...

Страница 45: ...eb user interface or click Reset to reset the band configuration Bussing Bussing assigns the selected zones to a group of zones bus Zones in a bus track the other zones volume and routing For example when the source or volume for one zone in the bus is adjusted the other zones in that bus follow You can create four bus zones on the device Configure Bussing 1 If needed edit the name of the bus in t...

Страница 46: ...of the input in the Name field 2 To configure the compensation do one of the following l Move the Compensation slider to the right to increase or to the left to decrease the compensation l Click the db arrows to increase or decrease the compensation Values range from 10 db to 10 db adjustable in 1 db increments l Manually enter a value in the Compensation field 3 To mute the signal from the corres...

Страница 47: ...Yes will be displayed in green when the local DM NAX 8ZSA is the PTP clock master and No will be displayed in red when another PTP clock on the network is operating as the master clock l Master Clock Status displays the Master Clock ID of the device on the network that acts as the Master Clock l PTP Priority This sets the priority of the device over other DM NAX devices Set a value between 1 and 2...

Страница 48: ...hether the stream is active or not When the stream has started or stopped the Status column will update accordingly 4 Click the configure button in the Actions column The Configure dialog appears 5 To enable auto initiation move the Auto Initiation slider to the right position To disable auto initiation move the slider to the left position l If Auto Initiation is enabled for the input the stream w...

Страница 49: ...he multicast address of a transmitting stream to connect the receiver in the Requested Stream Address field 2 Click the configure button in the Actions column The Configure dialog appears 3 To enable auto initiation move the Auto Initiation slider to the right position To disable auto initiation move the slider to the left position l If Auto Initiation is enabled the stream will begin automaticall...

Страница 50: ...player or AES67 stream to a Zone on the DM NAX 8ZSA To route an input to the zones click the box under the name of the corresponding input The input is routed to the Zone To route inputs to zones on the device l Click the cells corresponding to the desired zone that are to be paired for routing Once a route is made appears The input that you have selected for a given row will route to the Zone cor...

Страница 51: ...en AES67 is selected as the source for a Zone l Click to display the list of streams available and select the desired stream to be routed to the specific zone l Click OK to save or click Cancel to cancel the changes l To route a single input to all the zones click on the Input icon ...

Страница 52: ... To disable end user access move the slider to the left position By default End User Access is disabled 2 Click the Add User Profile button to create a new user profile 3 Enter a name in the Profile Name field Click Save to create the User Profile Once the profile is created you have the option to either Delete the profile or add Services to it 4 Click Services on the Action column and an Edit Ser...

Страница 53: ...g Services Port Selection Port selection enables network traffic to be managed and segregated based on traffic type Internal VLANs are used to route different traffic types to specific external Ethernet ports and external Ethernet ports can then be assigned to various traffic types AES67 or Dante audio can be separated from the primary video and control network resulting in a dedicated audio netwo...

Страница 54: ...abled 2 With the port selection enabled select an Ethernet port from the Management drop down menu to assign traffic type NOTE The Management port controls your connection to the web interface Changing the port value will result in losing your connection to the device via the web interface 3 With the port selection enabled select an Ethernet port from the Audio NAX drop down menu to assign traffic...

Страница 55: ...igure security for users and groups and to allow different levels of access to the DM NAX 8ZSA functions By default security is disabled Select Encrypt and Validate Encrypt or OFF in the SSL Mode drop down menu to specify whether to use encryption By default SSL Mode is set to OFF ...

Страница 56: ...user 1 Click the Change Current User Password button to provide a new password for the current user 2 In the Change Password dialog enter the current password in the Current Password field the new password in the Password field and then re enter the same new password in the Confirm Password field 3 Click OK to save or click Cancel to cancel the changes ...

Страница 57: ...er or by using the left or right arrows at the bottom of the Users pane to move forward or backward through the pages Each page can be set to display 5 10 or 20 users by using the drop down menu to the right of the navigation arrows Information about existing users is displayed in table format and the following details are provided for each user l Username Displays the name of the user l AD User D...

Страница 58: ...name can consist of alphanumeric characters letters a z A Z numbers 0 9 and the underscore _ character b Enter a password in the Password field re enter the same password in the Confirm Password field c Assign the access level by selecting one or more groups from the Groups drop down list NOTE Make sure that the Active Directory User slider is disabled 3 Click OK to save or click Cancel to cancel ...

Страница 59: ...Enter a user name in the Name field in the format Domain UserName for example crestronlabs com JohnSmith Valid user names can contain alphanumeric characters letters a z A Z numbers 0 9 and the underscore _ character b Select one or more groups from the Groups drop down list NOTE Make sure that the Active Directory User slider is set to enabled 3 Click OK to save or click Cancel to cancel the chan...

Страница 60: ... to close the User Details dialog and to return to the Users tab Update User Details 1 Click the edit button in the Actions column to update information for the selected user 2 Enter a password in the Password field re enter the same password in the Confirm Password field 3 Select one or more groups to assign the user to from the Groups drop down list 4 Click OK to save or click Cancel to cancel t...

Страница 61: ... Groups pane to move forward or backward through the pages Additionally each page can be set to display 5 10 or 20 groups by using the drop down menu to the right of the navigation arrows Existing groups are displayed in a table and the following information is provided for each group l Group Name Displays the name of the group l AD Group Displays whether the group requires authentication using Ac...

Страница 62: ...oup slider is disabled 3 Click OK to save Click Cancel to cancel the changes Add Active Directory Group A group cannot be created or removed from the Active Directory server but access can be granted to an existing group in Active Directory Once the group is added all members of that group will have access to the DM NAX 8ZSA 1 Click the Create Group button 2 In the Create Group dialog enter the fo...

Страница 63: ...eleted users in the group are not removed from the device or Active Directory server However because a user s access level is inherited from a group s users within the deleted group will lose access rights associated with the group View Group Details Click the information button in the Actions column to view information for the selected group The Group Details dialog lists the following informatio...

Страница 64: ...1X standard an IEEE network standard designed to enhance the security of wireless and Ethernet LANs The standard relies on the exchange of messages between the device and the network s host or authentication server allowing communication with the authentication server and access to protected corporate networks ...

Страница 65: ... the Username and Password fields This method does not require the use of a machine certificate only the user name and password credentials 4 If you enabled the Enable Authentication Server Validation option this will enable the Select Trusted Certificate Authoritie s list box which contains signed Trusted Certificate Authorities CAs preloaded into the DM NAX 8ZSA Select the check box next to each...

Страница 66: ...nd listed in the device list on the left side of the screen The associated host name IP address and firmware version are also displayed NOTE If there is security software running on the computer a security alert might be displayed when the Crestron Toolbox application attempts to connect to the network Make sure to allow the connection so that the Device Discovery Tool can be used 3 In the Device ...

Страница 67: ...This page is intentionally left blank Product Manual Doc 9045A DM NAX 8ZSA 63 ...

Страница 68: ...Crestron Electronics Inc 15 Volvo Drive Rockleigh NJ 07647 Tel 888 CRESTRON Fax 201 767 7656 www crestron com Product Manual Doc 9045A 06 14 21 Specifications subject to change without notice ...

Отзывы: