background image

Hand-Held Wireless Transmitters 

Crestron 

CNRFHT-15A/30A


Viewport Method 

To set an RF ID code through Viewport, the following items are required: 

• 

PC running any version of Crestron’s Viewport utility. 

• 

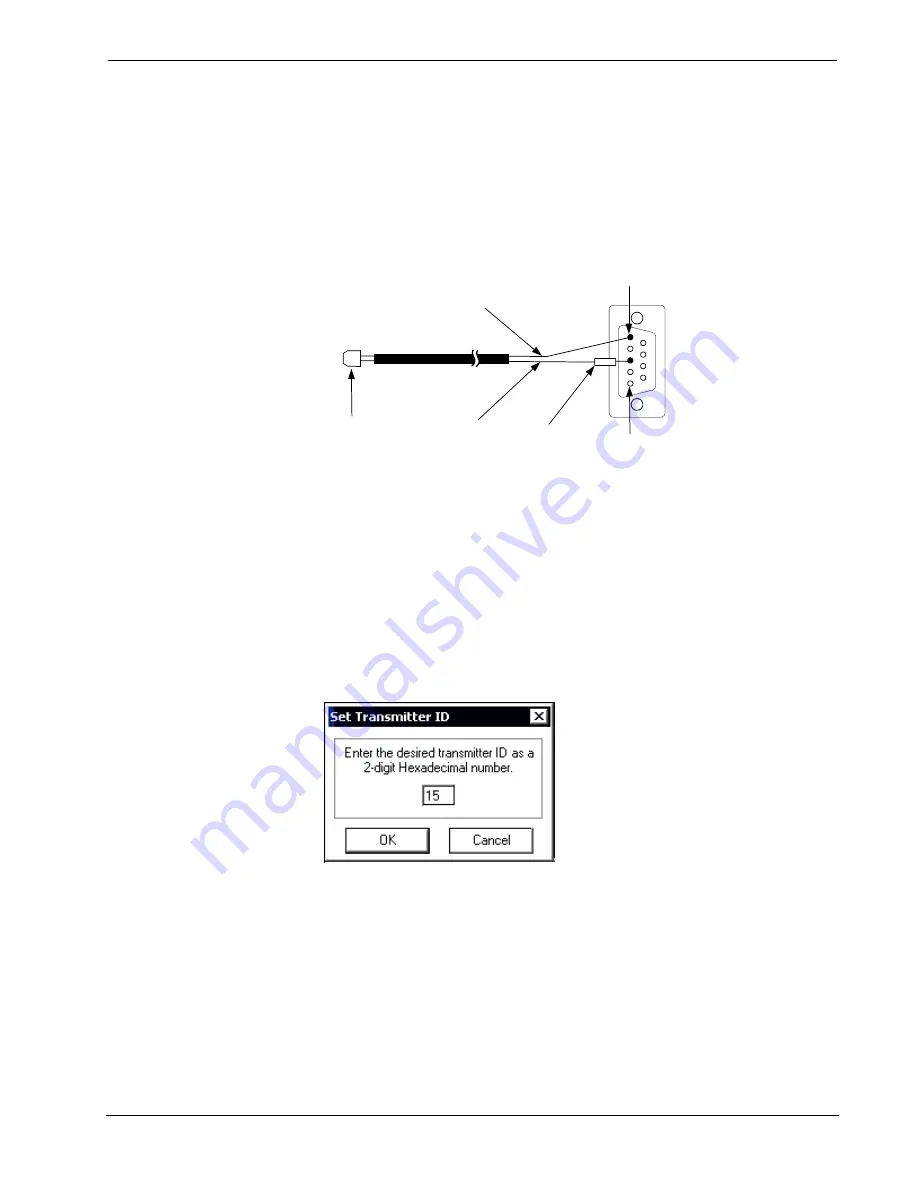
CNIDC - Identity Code Cable or equivalent. (The following drawing shows 
the wiring for an equivalent IR programming cable.) 

IR Programming Cable Wiring 

Pin 5

Pin 1

1K Ohm

¼ W Resistor

Black Wire with

White Tracer

Black Wire

DB9F connector

viewed from

solder cup side

IR Emitter


Use the following procedures to enter an RF ID into the transmitter. 

1.  Remove the transmitter’s battery cover. 

2.  Secure the IR Emitter of the IR programming cable to the IR sensor in the 

battery compartment. (Refer to the CNRFHT-15A/30A Physical Views 
drawing on page 4.) 

3.  Connect the IR programming cable’s DB9F connector to the appropriate 

COM port on the PC (typically COM-1). 

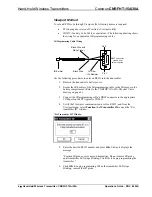
4.  Verify that Viewport communication is set for RS232, and from the 

Viewport menu, select 

Function | Set Transmitter ID

 to open the “Set 

transmitter ID” window. 

“Set Transmitter ID” Window 


5.  Enter the desired RF ID number and press 

OK

. Viewport displays the 

message: 
 
“Position IR probe over sensor on transmitter. Do not remove IR probe 
until transmitter LED stops blinking. Click OK to begin programming the 
transmitter.” 

6. Click 

OK

 to begin programming. When the transmitter LED stops 

blinking, remove the IR probe.  

6  

  Hand-Held Wireless Transmitter: CNRFHT-15A/30A 

Operations Guide – DOC. 8092A 

Содержание CNRFHT-15A

Страница 1: ...Crestron CNRFHT 15A 30A Hand Held Wireless Transmitters Operations Guide...

Страница 2: ...by the Technical Documentation department at Crestron Electronics Inc 15 Volvo Drive Rockleigh NJ 07647 1 888 CRESTRON All brand names product names and trademarks are the property of their respectiv...

Страница 3: ...pliance 5 Setup 5 Applying Power 5 RF ID 5 Programming 8 Programming with the Crestron AppBuilder 8 Programming with SIMPL Windows 8 Custom Button Panel Engraving 12 Problem Solving 13 Troubleshooting...

Страница 4: ......
Страница 5: ...ration permits use of any 15 of the 30 available buttons refer to Custom Button Panel Engraving on page 12 for details Pressing any button on the customized 15 or 30 button panel initiates an RF signa...

Страница 6: ...oblems make certain you are using the update file with the correct suffix letter e g S V W X NOTE Crestron software and any files on the website are for Authorized Crestron dealers only New users may...

Страница 7: ...Crestron CNRFHT 15A 30A Hand Held Wireless Transmitters CNRFHT 30A Transmitter with Customized 30 Button Panel Operations Guide DOC 8092A Hand Held Wireless Transmitter CNRFHT 15A 30A 3...

Страница 8: ...30 buttons for the 15A unit you can select up to 15 of the buttons for system functions for the 30A unit you can use all the buttons for system functions In the illustration above the button join num...

Страница 9: ...this equipment does cause harmful interference to radio or television reception which can be determined by turning the equipment off and on the user is encouraged to try to correct the interference b...

Страница 10: ...IR programming cable to the IR sensor in the battery compartment Refer to the CNRFHT 15A 30A Physical Views drawing on page 4 3 Connect the IR programming cable s DB9F connector to the appropriate CO...

Страница 11: ...the unit into programming mode then release the button This first button is seen as a binary 0 3 Press and release any other single function button This second button is seen as a binary 1 4 Before do...

Страница 12: ...nating rooms and specifying the control system touchpanels devices and functionality The Crestron AppBuilder then programs the system including all touchpanel projects and control system logic The CNR...

Страница 13: ...ess Receivers RF folder of the Device Library The System Views upper pane displays the CNRFGWA device icon below the PRO2 graphic The PRO2 system tree displays the CNRFGWA gateway in Slot 9 with a def...

Страница 14: ...in the following illustration C2Net Device Slot 9 Expand the system tree in the lower pane and double click the CNRFHT 30A icon to open the Device Settings window for the transmitter Select the RF IR...

Страница 15: ...E When programming a 15A unit be sure to use the appropriate buttons joins that correspond to the button panel design The following table gives functional descriptions for the transmitter outputs Symb...

Страница 16: ...er available from the Downloads Software Updates section of the Crestron website www crestron com to design a unique button panel The Help file included with the software package provides detailed ste...

Страница 17: ...ot illuminate and intermittent response during transmission occurs Refer to corrective action when LED does not illuminate and intermittent response during transmission occurs NET ID of receiver is in...

Страница 18: ...In Australia and New Zealand call Crestron Pacific at 613 9480 2999 Future Updates As Crestron improves functions adds new features and extends the capabilities of the CNRFHT 15A and 30A additional i...

Страница 19: ...ered This warranty extends to products purchased directly from CRESTRON or an authorized CRESTRON dealer Purchasers should inquire of the dealer regarding the nature and extent of the dealer s warrant...

Страница 20: ...Crestron Electronics Inc Operations Guide DOC 8092A 15 Volvo Drive Rockleigh NJ 07647 08 02 Tel 888 CRESTRON Fax 201 767 7576 Specifications subject to www crestron com change without notice...

Отзывы: