


CNX Card Cage System Crestron
CNRACKX
24
••
CNX Card Cage System: CNRACKX
Operations Guide - DOC. 8133
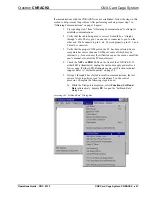
3.
Use the
Browse
button to locate the supplied .BIN file.
4.
Click the
Send Program
button to initiate program upload to the
CNRACKX. A “Transfer in Progress” dialog box appears, but no
response is required. If SIMPL+ files are present and the "SIMPL+
Program(s)" option is checked under "What to Send:", the associated
files will be transferred after the program is transferred.
NOTE:
The permanent memory image is the program stored into flash memory.
From the image, the program can be recalled automatically if power to the unit is lost
or interrupted. Contrary to their name, a permanent memory image can be
overwritten as many times as needed.
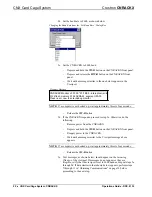
5.
When a “Query” dialog box appears to create the permanent memory
image, click
Yes
. A “Success” dialog box appears to inform you that
the permanent memory image is complete. If the “Failure” dialog box
appears, repeat steps 3 and 4. If this does not remedy the problem, call
Crestron technical support. Refer to “Further Inquiries” on page 28.
NOTE:
Clicking the
Make Permanent
button also creates a permanent memory
image but using this button is not normally required.
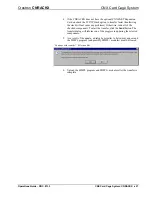
6.
After transferring the program file, click on the
Check Program
button
to ensure that the file loaded properly. The information in the
Current
Program
field of the “Cresnet Simpl Program” dialog box should
update and display the file currently loaded. If the information does not
update, repeat steps 3 through 5. If this does not remedy the problem,
call Crestron technical support. Refer to “Further Inquiries” on page 28.
Testing the Permanent Memory Image
To test the permanent memory image, complete the following steps:
1.
Select
Tools | Viewport
to open the “Crestron Viewport” dialog box.
2.
Unplug the CNRACKX and leave it unplugged for about 10 seconds.
3.
Plug the unit in and observe the statistics displayed in the Viewport
display field
. The program name uploaded into the system also appears.
4.
Verify the displayed information against what was originally loaded
when the unit was shipped.
Loading Touchpanels
The CNRACKX may include one or more touchpanels. Each panel must be set to the
proper network ID and loaded with a touchpanel
project
in order to work properly in
conjunction with the system program loaded in “Loading the System Program” on
page 23. For each panel in the system, a separate .HEX file describing the graphical
elements of the panel is required. In some cases, where two or more panels are to be
identical in usage, a single .HEX file may be used for multiple panels. To load a
touchpanel project into the panel, use the Crestron Viewport or the “Upload Project”
function in VisionTools™ Pro. For consistency, the steps that follow this paragraph
are using the viewport. To upload a .HEX file into the touchpanel, complete the
following steps in the order provided:


