background image

infiNET™ Dimmers 

Crestron 

CLW-DIM1/4RF, -DIMS1/4RF, -SLVD1RF


2. 

If load was at Preset 2 level, off, or in the process of dimming to off, dim to Preset 3. 

3. 

The dimmer will not “bounce” at the limit and dim in the opposite direction. If the button is pressed 
and held again, the dimmer will dim in the opposite direction. If other events have occurred since the 
last “cycle-dim” operation, the dimmer will dim up if the light level was < 50%. If the light level 
was 

 50%, the dimmer will dim down. 

SET 

When the mode selection switch is in the “SET” position, it is operating in the 

SET


mode. The LED will blink to indicate that the dimmer is in the 

SET

 mode. Refer to 

the following table for a list of available functions when the dimmer is operating in 
this mode. 

NOTE:

  Presets 1 and 2 cannot be programmed to be 0% (Off). Preset 3 can be set to 

0% (Off).  

NOTE:

  The 

SET

 mode is only intended for adjusting presets. Under normal 

operation, the mode selection switch should be in the “RUN” position. 

SET Mode Button Functions 

FUNCTION 

-DIM1RF/-DIMS1RF 

BUTTON PRESS 

-DIM4RF/-DIMS4RF 

BUTTON PRESS 

Press and hold the Top 
button for five seconds, 
the LED will flash HIGH 
once. Release the button 
to store the current light 
level (if > 10%).  

Press and hold Button 1 for 
five seconds, the LED will 
flash HIGH once. Release the 
button to store the current light 
level (if > 10%). 

Store Preset 1. 

NOTE:

  If the light level is greater than 0% (Off), but less 

than 10%, the saved preset level will be 10%.  
 

NOTE:

  If the current light level is equal to 0% (Off), the 

LED will not flash, since no save will occur. 

Press and hold the Top 
button for eight seconds, 
the LED will flash HIGH 
twice. Release the button 
to store the current light 
level (if > 0%). 

Press and hold Button 1 for 
eight seconds, the LED will 
flash HIGH twice. Release the 
button to store the current light 
level (if > 0%). 

Store Preset 2. 

NOTE:

  If the light level is greater than 0% (Off), but less 

than 10%, the saved preset level will be 10%. 
 

NOTE:

  If the current light level is equal to 0% (Off), the 

LED will not flash, since no save will occur. 

Store Preset 3

*

Press and hold the 
Bottom button for five 
seconds, the LED will 
flash HIGH three times. 
Release the button to 
store the current light 
level (even if the light 
level is 0%). 

Press and hold Button 1 for 11 
seconds, the LED will flash 
HIGH three times. Release the 
button to store the current light 
level (even if the light level is 
0%). 

DIM4RF/DIMS4RF Only: If the current light level = 0% (Off), the first preset to be stored will be 
Preset 3, since Presets 1 and 2 cannot be set to 0%. In this case, the LED will flash HIGH three times 
after the button is held for five seconds. 

10  

  infiNET Dimmers:  Crestron CLW-DIM1/4RF, -DIMS1/4RF, -SLVD1RF 

Operations Guide - DOC. 6396 

Содержание CLW-DIM1

Страница 1: ...Crestron CLW DIM1 4RF CLW DIMS1 4RF CLW SLVD1RF infiNET Dimmers Operations Guide ...

Страница 2: ...ectronics Inc 15 Volvo Drive Rockleigh NJ 07647 1 888 CRESTRON All brand names product names and trademarks are the property of their respective owners Windows and Windows XP are registered trademarks of Microsoft Corporation in the United States and other countries 2005 Crestron Electronics Inc ...

Страница 3: ...Code 12 Using Touch Settable ID TSID to Set MNET ID 12 Manually Setting the MNET ID in Crestron Toolbox 19 Programming Software 21 Earliest Version Software Requirements for the PC 22 Programming with D3 Pro SystemBuilder 22 Programming with SIMPL Windows 23 Uploading and Upgrading 28 Establishing Communications 28 Troubleshooting Communications 31 Uploading a SIMPL Windows Program 31 Firmware Upg...

Страница 4: ......

Страница 5: ...nterference One button and four button configurations available in white black and almond Can be ordered with custom engraved buttons Can operate as a local load control or infiNET keypad The DIM1RF and DIM4RF have three preset lighting levels that can be adjusted by the user The default preset values are 70 for Preset 1 100 for Preset 2 and 0 for Preset 3 Refer to Operation on page 9 for more inf...

Страница 6: ...anuals The CLW SLVD1RF SLVD1RF is a slave unit that when used in conjunction with the DIMS1RF or DIMS4RF acts as an additional dimmer control point in a multi dimmer single circuit application It does not connect to an infiNET system and cannot be used without a DIMS1RF or DIMS4RF The SLVD1RF does not have a mode selection switch It can only be programmed when used in conjunction with a DIMS4RF re...

Страница 7: ...3 6 oz 0 50 kg 1 The range is dependent on its placement and the building in which it is used The construction of the building obstructions and RF interference from other devices are factors determining the effective range of the unit 2 The latest software versions can be obtained from the Crestron website Refer to the NOTE following these footnotes 3 Crestron 2 Series control systems include the ...

Страница 8: ... in the middle does not do anything The function of the pushbutton is determined by the position of the mode selection switch For more information refer to Operation on page 9 Parts of CLW DIM1RF and DIMS1RF RUN SET OFF Button Mode Selection Switch CLW DIM1RF DIMS1RF Shown in White Physical View of CLW DIM1RF DIMS1RF Clockwise from Top Top Side and Front RUN SET OFF 1 75 in 4 45 cm 2 38 in 6 03 cm...

Страница 9: ... refer to Operation on page 9 Parts of CLW DIM4RF DIMS4RF Button 2 Mode Selection Switch Button 4 Button 3 Button 1 OFF SET RUN CLW DIM4RF DIMS4RF Shown in White Physical View of CLW DIM4RF DIMS4RF Clockwise from Top Top Side and Front 1 75 in 4 45 cm 2 38 in 6 03 cm 3 28 in 8 32 cm 3 81 in 9 68 cm 4 13 in 10 48 cm 1 88 in 4 77 cm 2 70 in 6 86 cm 1 50 in 3 81 cm RUN SET OFF The SLVD1RF is similar ...

Страница 10: ...ltage connections are made at the rear of the dimmer Industry Compliance These units have been manufactured to comply with UL s Standards for Safety in Canada and the United States Formal approval is pending FCC ID EROCWD1011 Compliance Statement Part 15 19 This device complies with Part 15 of the FCC Rules Operation is subject to the following two conditions 1 This device may not cause harmful in...

Страница 11: ... work as stand alone wall box dimmers without being acquired by a C2N MNETGW NOTE A dimmer can be acquired to only one gateway Acquiring the Dimmer To acquire a DIM1RF DIM4RF DIMS1RF DIMS4RF to C2N MNETGW perform the following 1 Put the C2N MNETGW in the Acquire mode from the unit itself or from Toolbox as described in the latest revision of the C2N MNETGW Operations Guide Doc 6137 which is availa...

Страница 12: ...th the control system program an MNET ID value between 03 and 20 must be assigned to the dimmer For information on assigning MNET ID values refer to Identity Code on page 12 Removing Gateway Information from a Dimmer In some rare cases it might be desirable to release a dimmer from a gateway If a dimmer is to be released from a gateway the gateway information must be cleared from the dimmer s memo...

Страница 13: ... in the RUN mode NOTE If the behavior of the DIM4RF DIMS4RF has not been changed in SIMPL Windows SystemBuilder or D3 Pro the only button that will perform any function is Button 1 All of the other buttons are programmable RUN Mode Button Functions FUNCTION DIM1RF DIMS1RF SLVD1RF BUTTON PRESS DIM4RF DIMS4RF BUTTON PRESS Dim to Preset 1 Tap the Top button Tap Button 1 The light will dim to Preset 1...

Страница 14: ... LED will flash HIGH once Release the button to store the current light level if 10 Store Preset 1 NOTE If the light level is greater than 0 Off but less than 10 the saved preset level will be 10 NOTE If the current light level is equal to 0 Off the LED will not flash since no save will occur Press and hold the Top button for eight seconds the LED will flash HIGH twice Release the button to store ...

Страница 15: ...of the dimmer or the control system program For reference the LED can be in one of three intensity levels OFF LOW and HIGH The following table describes the LED pattern in all modes of operation Dimmer Operation LED Behavior LED BEHAVIOR DEVICE STATE LOW In RUN mode operating normally HIGH Device is in the bootloader Refer to Bootloader on page 37 for more information Four brief OFF blinks every e...

Страница 16: ...r change device MNET IDs for any device on the infiNET network MNET IDs can be set with the touch settable ID TSID function or manually To use TSID to set MNET IDs continue reading Using Touch Settable ID TSID to Set MNET ID below To manually change MNET IDs refer to Manually Setting the MNET ID in Crestron Toolbox on page 19 Using Touch Settable ID TSID to Set MNET ID Each infiNET device is shipp...

Страница 17: ...t MNET ID 01 as shown in the Network Device Tree window below Network Device Tree 1 With the Network Device Tree open select Tools SMW Program Tree or click SMW Program Tree Click to Select Program 2 Click the text Click here to open program to select the SIMPL Windows program that defines the MNET IDs Select SIMPL Windows Program Operations Guide DOC 6396 infiNET Dimmers Crestron CLW DIM1 4RF DIM...

Страница 18: ...criptions such as BR Dimmer LR Dimmer and kitchen switch were created by editing each devices symbol name in the SIMPL Windows Programming Manager For information on editing a symbol name refer to the SIMPL Windows help file 3 Select Window Tile Horizontally to tile the open windows in Toolbox To simplify viewing only the SMW Program Tree and the Network Device Tree described by the SMW Program Tr...

Страница 19: ...ree to the Network Device Tree Link Instruction Window 5 Click OK The cursor will change to a target selector 6 Click on the Network Device tree that is to be linked to the SMW Program Tree A message will be displayed indicating a successful link Link Succeeded Message 7 Right click the Lighting category in the SMW Device Tree and select Setup All Lighting Setup All Lighting Operations Guide DOC 6...

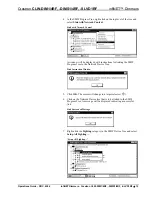
Страница 20: ...ome an installer may want to first identify a device by the entryway then a device in the hallway followed by devices in a room Devices that do not need to be identified can be removed from the list by clicking NOTE Individual devices can be set up by right clicking the device and selecting Setup this device Follow the on screen instructions to set up the device 8 Click Start to set up the devices...

Страница 21: ...ll be highlighted Touching a device may result in setting a duplicate MNET ID A warning will be displayed Duplicate MNET ID Warning Click Yes to set the device to the duplicate MNET ID the status will be listed with the comment An error occurred changing the network ID of one or more devices Clicking No will skip the setup process for that device and continue to the next device on the list If two ...

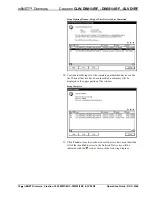
Страница 22: ... When all devices have been identified a summary will be displayed in the upper portion of the window Setup Complete 11 Click Close to close the window once all devices have been identified All of the identified devices in the Network Device tree will be indicated with the icon as shown in the following diagram 18 infiNET Dimmers Crestron CLW DIM1 4RF DIMS1 4RF SLVD1RF Operations Guide DOC 6396 ...

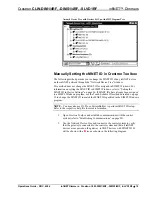
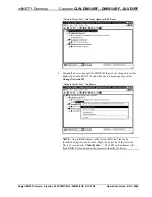
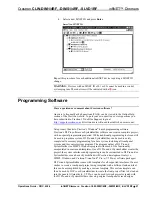
Страница 23: ...ogram use the Touch Settable ID method described on page 12 to change the MNET ID to match the MNET ID specified in the SIMPL Windows program NOTE You may also use D3 Pro or SystemBuilder to perform MNET ID setup Refer to the respective help file for more information 1 Open Crestron Toolbox and establish communications with the control system refer to Establishing Communications on page 28 2 Use t...

Страница 24: ...hen the sub menu appears select Change Network ID Network Device Tree Sub Menu NOTE Any infiNET dimmer in the Network Device Tree can be identified using Crestron Toolbox Right click a device in the Network Device Tree and select Identify this The LED on the dimmer will flash HIGH Press a button on the dimmer to identify the device 20 infiNET Dimmers Crestron CLW DIM1 4RF DIMS1 4RF SLVD1RF Operati...

Страница 25: ...D3 Pro and SystemBuilder can be used to easily complete all necessary programming for a base system including all touchpanel screens and the control system program The program output of D3 Pro and SystemBuilder is a SIMPL Windows program with much of the functionality encapsulated in macros and templates Once D3 Pro and or Systembuilder creates the project the system interfaces and program logic c...

Страница 26: ...ater Optional SystemBuilder version 2 0 or later with SystemBuilder Templates version 2 0 1or later Also requires o VisionTools Pro e 3 3 4 0 or later o Crestron Engraver 2 4 1 2 or later o CUZ 3 154 for 2 Series processors or later Programming with D3 Pro SystemBuilder The easiest method of programming but does not offer as much flexibility as SIMPL Windows D3 Pro and SystemBuilder offer automati...

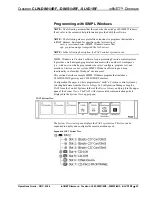
Страница 27: ...which a programmer can select configure program test and monitor a Crestron control system SIMPL Windows offers drag and drop functionality in a familiar Windows environment This section describes a sample SIMPL Windows program that includes a C2N MNETGW gateway and CLW DIM1RF dimmer Configuration Manager is where programmers build a Crestron control system by selecting hardware from the Device Li...

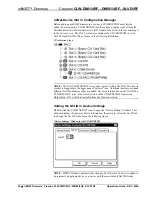
Страница 28: ...per pane of System Views Additional units are assigned different Net ID numbers as they are added For more information on the Net ID of a C2N MNETGW refer to the latest revision of the C2N MNETGW Operations Guide Doc 6137 which is available from the Crestron website Setting the Net ID in Device Settings Double click the C2N MNETGW icon to open the Device Settings window This window displays the ga...

Страница 29: ...dds the selected infiNET device with a default MNET ID Following are the default MNET IDs used by SIMPL Windows for each of the dimmer models CLW DIM1RF 03 CLW DIM4RF 05 CLW DIMS1RF 04 CLW DIMS4RF 06 NOTE The default MNET ID used by SIMPL Windows is different from the default ID that is installed on an infiNET device when it ships from the factory NOTE If the default MNET ID is already in use SIMP...

Страница 30: ...omatically changes MNET ID values of a device added to a program if a duplicate device or a device with the same default MNET ID already exists in the program Always ensure that the hardware and software settings of the MNET ID match For MNET ID hardware settings details refer to Identity Code on page 12 infiNET Dimmer Symbols in Programming Manager Programming Manager is where programmers program...

Страница 31: ...programmed in SIMPL Windows to control the electrical load or to perform another function in the control system program NOTE If a detached device restarts from either a power failure or from moving the mode selection switch from the OFF position the device will be attached to the electrical load until communication with the gateway is reestablished approximately 15 20 seconds The buttons on the di...

Страница 32: ...de via the Crestron Toolbox The following sections define how one would upload a SIMPL Windows program to the control system and upgrade the firmware of CLW DIM1RF DIMS1RF DIM4RF DIMS4RF However before attempting to upload or upgrade it is necessary to establish communications between the PC and the dimmer Establishing Communications The procedure in this section provides details for RS 232 commun...

Страница 33: ...ere should match the protocol that the control system expects The usual settings are as follows Port COM 1 through COM 8 Select the correct COM port on the PC Baud rate Auto detect Parity None Number of data bits 8 Number of stop bits 1 Hardware handshaking RTS CTS enabled Software handshaking XON XOFF not enabled Address Book Window Serial Setup 4 After setting the correct parameters click OK to ...

Страница 34: ...evice expand the network device tree by clicking Expand the network device tree until the device to be managed is selected Right click the desired MNET ID to open the sub menu This menu provides a wide range of functions including change the MNET ID change serial number update firmware etc Network Device Tree Sub Menu Functions NOTE Toolbox displays a customized list of functions depending on the ...

Страница 35: ...power and the C2N MNETGW is connected to the control system 2 Reacquire the infiNET device on the C2N MNETGW Refer to Acquiring the Dimmer on the infiNET Network on page 7 for more information Also refer to the latest version of the C2N MNETGW Operations Guide Doc 6317 which is available from the Crestron website 3 If communication still cannot be established contact Crestron customer service Uplo...

Страница 36: ... you are connected to the control system the Functions option becomes available from the menu bar 4 Select Functions SIMPL Program The SIMPL Program window contains information about the currently loaded SIMPL program if any and permits you to stop start erase retrieve and upload a SIMPL program This menu also permits you to upload to compact flash or internal flash SIMPL Program Window 32 infiNET...

Страница 37: ...T Dimmers 5 Click the button to browse for a new compiled spz program Open Window 6 Select a file and click Open When the SIMPL Program window re opens click Send Operations Guide DOC 6396 infiNET Dimmers Crestron CLW DIM1 4RF DIMS1 4RF SLVD1RF 33 ...

Страница 38: ... firmware complete the following steps 1 Verify that the procedure for Establishing Communications that begins on page 28 has been performed 2 Open Crestron Toolbox and open the Network Device Tree the firmware upgrade function is also available in the SMW Program Tree window 3 Right click on the device and select Functions Firmware Network Device Tree Window Right Click Sub Menu 4 The Firmware wi...

Страница 39: ...ndow 7 Click Open to select the file 8 The Firmware window reopens indicating the target device the new firmware version and release notes information Click View to view the release notes or click Send to upgrade the firmware Click Close after the firmware has been transferred Operations Guide DOC 6396 infiNET Dimmers Crestron CLW DIM1 4RF DIMS1 4RF SLVD1RF 35 ...

Страница 40: ...Acquire the device on infiNET network as described in Acquiring the Dimmer on the infiNET Network on page 7 If the LED flashes OFF for second two times then returns to low the MNET ID of device is not set to match the MNET ID of the SIMPL Windows program Use the Network Device Tree infiNET network in Crestron Toolbox to poll the infiNET network Verify that the MNET ID for the infiNET device is set...

Страница 41: ... to load and the signal Enable_Local_Btn_Outputs is low In the dimmer symbol of the SIMPL Windows program set the signal Enable_Local_Btn_Outputs high Dimmer does not operate as described in the manual Dimmer is detached from the load In the dimmer symbol of the SIMPL Windows program set the signal Detach_Load low Mode selection switch is in the incorrect position Set the mode selection switch to ...

Страница 42: ...ther Inquiries If you cannot locate specific information or have questions after reviewing this guide please take advantage of Crestron s award winning customer service team by calling the Crestron corporate headquarters at 1 888 CRESTRON 1 888 273 7876 For assistance in your local time zone refer to the Crestron website www crestron com for a listing of Crestron worldwide offices You can also log...

Страница 43: ...amps are not covered This warranty extends to products purchased directly from CRESTRON or an authorized CRESTRON dealer Purchasers should inquire of the dealer regarding the nature and extent of the dealer s warranty if any CRESTRON shall not be liable to honor the terms of this warranty if the product has been used in any application other than that for which it was intended or if it has been su...

Страница 44: ...Crestron Electronics Inc Operations Guide DOC 6396 15 Volvo Drive Rockleigh NJ 07647 2014133 Tel 888 CRESTRON 12 05 Fax 201 767 7576 Specifications subject to www crestron com change without notice ...

Отзывы: