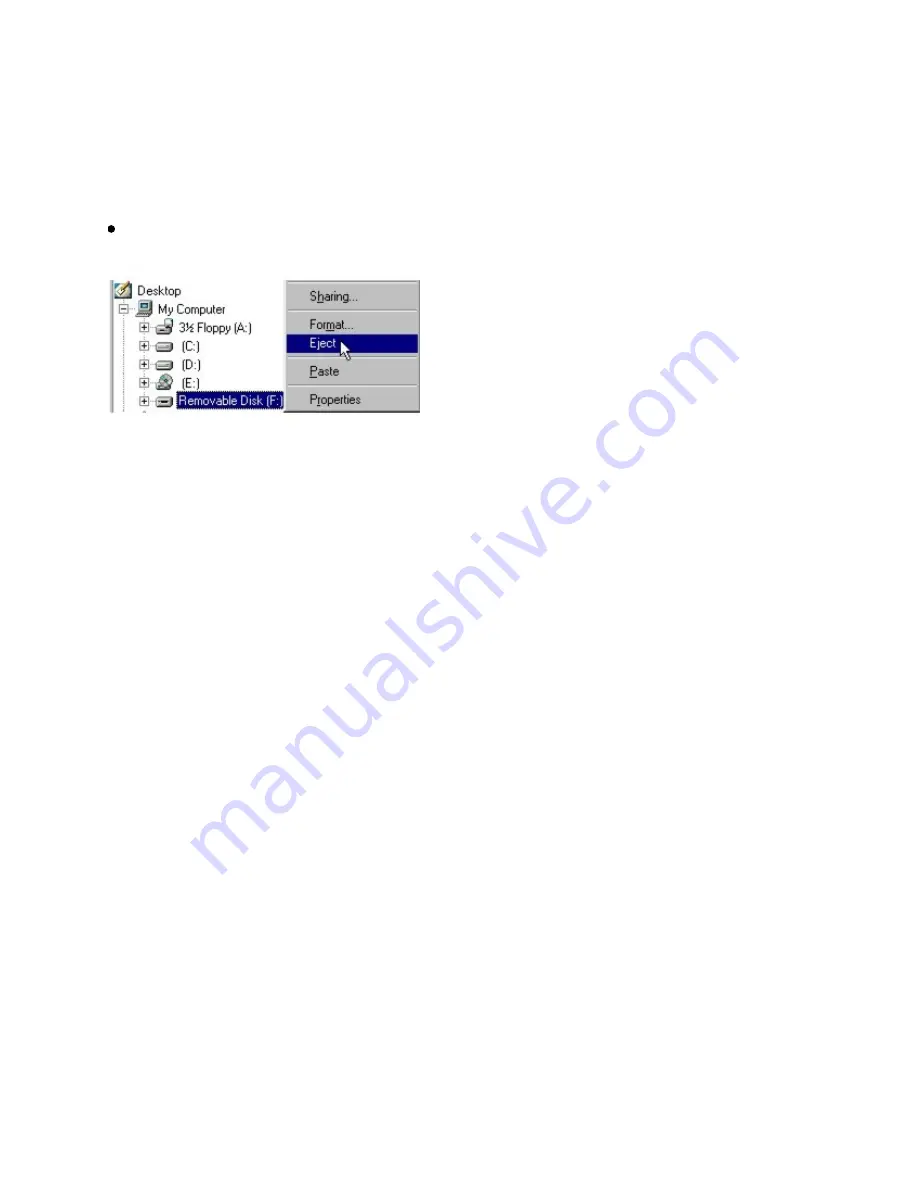
In Windows 98 SE
1. Wait at least 10 seconds after all file transfers are completed.
In Windows Explorer, right-click the
Removable Disk
icon and click
Eject
and disconnect your player when you are prompted to do so.
Страница 1: ...pic or a web site click the underlined blue text or the hand symbol whenever it appears To show a short description tooltip of an object move your mouse cursor over it A tooltip appears after a few seconds You can choose to print portions of this document 1 On the Contents tabbed page to your left click a topic heading On the menu click the Print button In the dialog box that appears click the opt...
Страница 2: ...ing Creative ZenTM Neeon Zen Neeon comes equipped with a USB 2 0 connector so you can transfer audio tracks and data quickly and easily Connect your player to external audio devices such as CD players to record CD audio tracks to your player ...
Страница 3: ...2 266 MHz 64 MB RAM 170 MB available hard disk space CD ROM DVD ROM drive USB 1 1 USB 2 0 port recommended for faster transfer speeds Internet access for Music Service Provider support optional Note The software applications on the Creative Zen Neeon CD may have higher requirements for basic functionality Refer to each application s documentation for details ...
Страница 4: ...our Player Your Player at a Glance Turning Your Player On Off Using the Scroller Learning About Player Modes Storing Tracks in Folders Locking and Unlocking Your Player Formatting Your Player Resetting Your Player ...
Страница 5: ...lects Menu options on the OLED display For more information see Using the Scroller Move and hold the Scroller in either direction to scroll up or down continuously In a menu press and hold to return to the current mode view Move and hold the Scroller towards or to move back or ahead within a track Move the Scroller towards or to go to the previous or next track In Music FM Microphone or Line In Re...
Страница 6: ...7 Microphone Records voices Select a recording format and bitrate to record WAV or MP3 files 8 Line In jack Connect your audio sources to this jack to make line in recordings Select a recording format and bitrate to record WAV or MP3 files 9 Headphone jack Connect your headphones or earphones to this jack 10 USB power adapter connector Connect your USB cable or power adapter available separately t...
Страница 7: ...the Play Pause button for one second After a while the Zen Neeon logo appears on the screen To turn off your player Press and hold the Play Pause button until the screen turns off Note If your player contains no audio tracks the message No Music appears on the screen ...
Страница 8: ... when we want you to use the Scroller to scroll to a menu option and then select it by pressing the Scroller 1 Turn the Scroller to scroll through menu options on your OLED display until the option that you want such as Play Mode is highlighted Press the Scroller to select this menu option During playback Turn the Scroller to move between tracks or turn and hold the Scroller to move within a track...
Страница 9: ...e to change the play sequence of tracks Select an equalizer EQ setting to enhance your audio Select tracks and recordings to delete In Line In Recording mode you can also Make line in recordings Browse line in recordings Adjust the bitrate quality and format WAV or MP3 of line in recordings Enable the Track Detection function This enables your player to automatically start a new recording when it ...
Страница 10: ...t In Microphone mode you can also Browse voice recordings Adjust the bitrate quality and format WAV or MP3 of voice recordings Select recordings to delete In each mode the menu options available to you differ Your player s Scroller has additional functions in each mode For more information see Your Player at a Glance ...
Страница 11: ...ibrary A Library B or Library C created by your player You can only store up to a maximum number of 500 tracks per folder If an error message appears telling you that a folder has exceeded the maximum number of allowed tracks transfer the additional tracks to another folder containing less than 500 tracks Description 1 Root folder 2 Default folders ...
Страница 12: ...nt buttons from being accidently pressed such as when your player is in your pocket or bag When you lock your player you can see the lock icon on your player s screen Locking your player Move the switch toward the icon Unlocking your player Move the switch away from the icon ...
Страница 13: ...our player to your computer s USB port using the supplied USB cable Double click the My Computer icon on your desktop Click the Zen Neeon Media Explorer icon Click the Initialize button After the formatting is complete make sure you stop your player before disconnecting it from your computer For instructions on stopping your player see Step 5 Stopping Your Player Properly Note If you are prompted ...
Страница 14: ...ny audio tracks or data files unless you were in the middle of transferring content Before resetting your player disconnect the USB cable or power adapter available separately from your player To reset the player Gently push the end of a thin object like a pin or straightened paperclip into the Reset button ...
Страница 15: ...Getting Started Step 1 Set Up Software Step 2 Turn On Player Step 3 Charge the Battery Step 4 Rip and Copy Music Step 5 Stopping Your Player Properly ...
Страница 16: ...your CD ROM DVD ROM drive Your CD should start automatically If it does not follow the steps below 1 Double click the My Computer icon Alternatively click Start My Computer Right click the CD ROM DVD ROM drive icon and then click AutoPlay Follow the instructions on the screen When prompted restart your computer When your computer restarts follow the product registration instructions on the screen ...
Страница 17: ...ur player for the first time the menu will be in English To change the language 1 Press the scroller Scroll select the Settings option Scroll select the Language option Scroll select a language After you have finished using your player press and hold the Play Pause button until the screen turns off Warning Remember to set the volume at a moderate level Listening to music at high volumes can impair...
Страница 18: ...our battery by by connecting your player to your computer s USB port using the supplied USB cable or connecting your player to a power outlet using a power adapter available separately A fully charged battery should last for about sixteen hours ...
Страница 19: ...ours to charge your player fully When charging the battery Avoid transferring files between your player and computer as this may lengthen the charging time For continuous charging Make sure your computer does not enter power conservation mode for example Standby or Hibernation For more information refer to your operating system s Help Warning For Windows 98 SE only DO NOT charge your player s batt...
Страница 20: ...d to your player s power adapter connector as shown below When appears on your player s OLED display your player is fully charged Charging your battery for the first time takes about three hours Note The amount of playback time available depends on various factors such as the type of earphones you are using For more information see Usage ...
Страница 21: ...l Charging your battery when it is 30 full may help prolong your battery s life Your player s battery is empty Charge your battery at the earliest opportunity Your player is running from external power and is charging the battery Charge the battery fully before disconnecting the player from the power outlet While charging the icon alternates between this icon and a battery state icon showing the a...
Страница 22: ... To copy audio files from your computer 1 With your player connected to your computer double click the My Computer icon on your desktop You will notice that your player is recognized as a Removable Disk Locate your audio files MP3 or WMA files on your computer and copy them to your player using the drag and drop method Note that you can also transfer data files using this drag and drop method Note...
Страница 23: ...mputer use the Windows Eject or Safely Remove Hardware icon on the Taskbar to safely disconnect your player If your player is not disconnected safely the content may become corrupted and the player will not function correctly Follow these steps below to safely disconnect your player ...
Страница 24: ...n Windows XP Windows 2000 and Windows Me 1 Click the Safely Remove Hardware icon on the Taskbar and click Safely remove USB Mass Storage Device as shown Unplug your player when you are prompted to do so ...
Страница 25: ...ndows 98 SE 1 Wait at least 10 seconds after all file transfers are completed In Windows Explorer right click the Removable Disk icon and click Eject and disconnect your player when you are prompted to do so ...
Страница 26: ...Using Your Player Playing Audio Tracks Deleting Audio Tracks Managing Audio Tracks Using Playlists Listening to FM Radio Making Recordings Playing Recordings Settings and Preferences ...
Страница 27: ...k Press the Play Pause button Press the button again to continue playback To play an album or a collection of tracks 1 Create a playlist with Zen Neeon Media Explorer or Creative MediaSource Transfer the playlist to your player Play the playlist For more information see Play Modes To play all tracks in random order 1 Press the Scroller Scroll select Random Play All To adjust the volume level Press...
Страница 28: ...Overview of the Music screen Display Element 1 Music mode 2 Play status icon 3 Elapsed time 4 EQ Status 5 Play mode icon 6 Lock icon 7 Battery level indicator 8 Current playing track name ...
Страница 29: ...lete a track 1 If you re not already in Music mode press the Scroller and scroll select Mode Scroll select Music Scroll to the track you want to delete Scroll select Delete Scroll select Delete The track is permanently deleted from your player Repeat steps 2 to 4 to delete more tracks ...
Страница 30: ...g Audio Tracks Zen Neeon Media Explorer and Creative MediaSource are included with your player These applications can be installed when you set up your software See Managing Music and Data for more information ...
Страница 31: ...n creating playlists see the online Help for these applications To play tracks in a playlist 1 In Music mode press the Scroller Scroll select Playlists Scroll select a playlist Press the Play Pause button to start playback Note To ensure proper playback of a playlist add only tracks that are from the same Library folder for example Root Library or Library A ...
Страница 32: ...radio presets FM Radio has two views Tuning and Preset To manually scan for FM radio stations you have to be in the Tuning view If you have saved radio presets you can select them by switching to the Preset view You can listen to FM Radio when you connect your headphones or earphones to your player Note FM radio is only available with selected models ...
Страница 33: ...Overview of the FM Radio screen Display Element 1 FM Radio mode 2 Preset number 3 FM radio channel 4 Stereo Mono Indicator 5 Battery status Note FM radio is only available with selected models ...
Страница 34: ...Changing the FM region The FM radio broadcast frequency range in most countries is the same so your player s default FM region is International Note FM radio is only available with selected models ...
Страница 35: ...roll select Mode Scroll select FM Radio A radio frequency appears on the OLED display Press the Scroller again Scroll select Scroller Tuning or Scroller Preset to display FM Preset view 1 or Manual Scan view 2 Tip You can also press the Play Pause button to switch to the other view while playing a station Use the Autoscan function to quickly preset radio stations Note FM radio is only available wi...
Страница 36: ...er again Scroll select Autoscan The player scans and stores stations it detects At the end of the autoscan it automatically saves all stations as presets and tunes in to the first preset Note Performing an autoscan operation over writes any previously saved preset stations FM radio is only available with selected models ...
Страница 37: ...Play Pause button to switch to Manual Scan view The preset station disappears To scan for a station move the Scroller up or down and hold for one second Press the Scroller again Scroll select Save Preset Scroll select the preset number you want to store your station Repeat steps 2 to 6 to store another station Note FM radio is only available with selected models ...
Страница 38: ...Selecting a preset 1 Scroll select Mode Scroll select FM Radio A radio frequency appears on the OLED display Scroll to the preset station you want Note FM radio is only available with selected models ...
Страница 39: ...rs on the OLED display Scroll to the preset station you want Press the Scroller again Scroll select Delete Preset Scroll select Delete Preset number The preset station is deleted Note If you do not see a preset station press the Play Pause button FM radio is only available with selected models ...
Страница 40: ...recordings and have them encoded directly into WAV or MP3 file formats When recording note that the available recording time is determined by available space in your player battery power remaining in your player Note FM radio is only available with selected models ...
Страница 41: ...g bar appears onscreen Press the Play Pause button to start the recording Press the button again to pause and again to continue the recording Press the Scroller to end the recording A name is automatically assigned to your recording and it is saved in your player The naming convention used is VOC Current File Number ...
Страница 42: ...e available for recording You will also see a bar showing you the elapsed recording time Display Element 1 Microphone mode 2 Recorded track name 3 Recording status recording 4 Recording bitrate 5 Elapsed Recording Time 6 Battery status 7 Remaining time available for recording ...
Страница 43: ...oller again Select the Record FM icon A recording bar appears on the OLED display and recording starts Press the Scroller to end the recording A name is automatically assigned to your FM radio recording and the file is saved in your player The naming convention typically used is FM Current File Number Note FM radio is only available with selected models ...
Страница 44: ...cording time The FM Radio mode icon appears in the bottom left corner of the OLED display Display Element 1 FM Radio mode 2 Recorded track name 3 Recording status stopped 4 Recording bitrate 5 Elapsed Recording Time 6 Battery status 7 Remaining time available for recording Note FM radio is only available with selected models ...
Страница 45: ... the Line In Recording cable Press the Play Pause button to start the recording Begin playback on the Line In source Press the button again to pause and resume the recording Press the Scroller to end the recording A name is automatically assigned to your recording and it is saved in your player The naming convention used is LINE Current File Number Tip Use the Track Detection function to split up ...
Страница 46: ...psed recording time The Line In Recording mode icon appears in the bottom left corner of the OLED display Display Element 1 Line In Recording mode 2 Recorded track name 3 Recording status recording 4 Recording bitrate 5 Elapsed Recording Time 6 Track Detection enabled 7 Battery status 8 Remaining time available for recording ...
Страница 47: ...s a track gap two seconds of silence from the Line In source 1 From the Line In Recording screen press the Scroller Scroll select the Track Detection T D icon To activate Track Detection scroll select On Otherwise scroll select Off Note You cannot activate the Track Detection function when you have the Recording Bitrate set at 32 kbps WAV ...
Страница 48: ...cordings by selecting a bitrate setting Note FM radio is only available with selected models To change the recording quality 1 In FM Preset Manual Scan Line In Recording or Microphone view press the Scroller Scroll select Recording Bitrate Scroll select the bitrate and file format you want ...
Страница 49: ... Scroll select Music Scroll select Browse Scroll select Recorded Scroll select the track you want The track plays automatically To play a recording in FM Radio Microphone or Line In Recording modes 1 Press the Scroller Scroll select Recorded Tracks Scroll select the track you want The track plays automatically Note Filenames of recorded tracks have different naming conventions VOC microphone recor...
Страница 50: ...Settings and Preferences Settings Play Modes Enhancing Audio with EQ ...
Страница 51: ...st Adjusts the contrast of the OLED display Display Timer Adjusts how long your player remains inactive before it automatically shuts down your player s OLED display Your player however is still turned on Language Sets the default language displayed on the OLED display Screen Saver Sets the screensaver to display after your player is inactive for 15 seconds Idle shutdown Adjusts how long your play...
Страница 52: ...played back Play Modes are disabled by selecting the Normal mode The following Play Modes are available Play Mode Icon Play Mode Icon A B Track Once Repeat Track Shuffle Repeat Repeat All Shuffle Once Repeat Folder Shuffle Folder Normal Note Only one Play Mode can be enabled at a time ...
Страница 53: ... playing from the beginning of the section Repeat Track Scroll select Repeat Track The track is repeated continuously until you stop it or skip to another track Repeat All Scroll select the Repeat All icon All tracks are repeated continuously until you stop playback Track Once Scroll select the Track Once icon Playback stops once the current track ends Shuffle Repeat Scroll select the Shuffle Repe...
Страница 54: ...r icon The Shuffle Folder icon appears on the OLED display Folders are selected in random sequence and tracks in a folder are played back once in sequence Normal Scroll select Normal This disables all other play modes All tracks play back normally ...
Страница 55: ...s that can enhance the sound of your audio Select preset settings such as Rock or Jazz or customize your own setting 1 Press the Scroller Scroll select the EQ option a list appears Scroll select one of the following options Rock Jazz Classical Pop Custom EQ Normal ...
Страница 56: ...higher frequencies 62 controls the bass 250 adjusts the lower mid range 1k adjusts the the mid range 4k adjusts the upper mid range and 16k adjusts the treble Scroll select a control level Move the Scroller left or right to adjust the level Select and press the Scroller to confirm the Custom EQ setting Repeat steps 2 to 4 to adjust another control level ...
Страница 57: ...en Neeon Media Explorer and Creative MediaSource are included with your player Install and try out both applications to decide which one is more suitable for your needs About Zen Neeon Media Explorer About Creative MediaSource ...
Страница 58: ...a Explorer if you are new to MP3 and WMA ripping and want to build up a library you prefer to manage your Zen Neeon as a removable disk drive To start Zen Neeon Media Explorer Click the Zen Neeon Media Explorer icon under My Computer or on the Taskbar ...
Страница 59: ...features such as recording and audio conversion To start Creative MediaSource Double click the Creative MediaSource icon on your desktop For more information about using Creative MediaSource double click the Creative MediaSource icon on your desktop refer to the Creative MediaSource online Help which offers a comprehensive How do I section ...
Страница 60: ...Onscreen Diagram and Icon Guide Play Status Icons Menu Icons Information Diagrams ...
Страница 61: ...Play Status Icons Play status icons appear at the left side of the OLED display Icon Description Play Pause Stop Moves ahead within track Moves back within track Next track Previous track Record ...
Страница 62: ...ode menu Go to Music mode Go to Microphone mode Go to FM Radio mode FM radio is only available with selected models Start Autoscan Player scans and stores all radio stations that it can receive At the end of the autoscan it automatically saves all stations as presets and tunes in to the first preset Delete an FM radio preset FM radio is only available with selected models Save an FM radio preset F...
Страница 63: ...only available with selected models Go to Line In Recording mode Select a recording bitrate and format Enable Track Detection function This enables your player to automatically start a new recording when it detects a two second track gap from the line in source Go to recorded track folder Go to previous menu or screen ...
Страница 64: ...load the firmware or contact Customer Support Services for more assistance No memory space Delete some files to free up memory space in your player Battery flat Charge the battery Unsupported file system or corrupted file system When formatting your player choose only FAT32 as the file system Use ScanDisk to scan your player See Formatting Your Player for more information Player is unable to perfo...
Страница 65: ...ons you might have while using your player It has been divided into a few categories for your easy reference For further assistance you may wish to consult our self help tool Knowledge Base Go to www creative com select your region and then select Support ...
Страница 66: ...ss than 100 KB Sec What do I do Try formatting your player For more information refer to Formatting Your Player Can I use the player as a portable data storage device Yes You can use the supplied USB cable for speedy transfers to and from your player Use the Creative MediaSource application or Zen Neeon Media Explorer to help you manage data files I have to charge the battery quite often Is there ...
Страница 67: ...pter No The power adapter may not be compatible with your player and may even damage it You should get a replacement adapter from Creative at www creative com or your local Creative office distributor Can I transfer DRM protected WMA files to my player Yes To transfer DRM protected WMA files to your player you can use Creative MediaSource Creative AudioSync Wizard or Windows Media Player ...
Страница 68: ...pdates Where can I get official information on all Zen Neeon products Visit www creative com for updates and downloads relating to all Zen Neeon products Creative s digital audio players and accessories ...
Страница 69: ...Impedence 10K ohm Harmonic Distortion Output 0 05 Frequency Response 20 Hz 20 kHz Plug 3 5 mm 1 8 stereo minijack USB Connectivity USB 1 1 and USB 2 0 compatible Playback Formats MP3 Up to 320 kbps WMA Up to 320 kbps WMA with Digital Rights Management DRM Recording Formats Voice via built in microphone FM Radio and Line In Recording 32kbps WAV 96 128 160kbps MP3 FM radio is only available with sel...
Страница 70: ...Headphone Specifications Frequency Range 20 Hz 20 KHz Sensitivity 111 dB 5 dB I P Level 1 mW Impedance 32 ohm 15 Rated Power 3 mW Maximum Power 5 mW ...
Страница 71: ...FM Region Stereo and Mono Up to 32 preset stations FM region support International 87 5 MHz 108 0 MHz 100 kHz intervals Note FM radio is only available with selected models ...
Страница 72: ...ission of Creative Technology Ltd The Software License Agreement is found in a separate folder on the installation CD Copyright 2005 Creative Technology Ltd All rights reserved Zen Creative MediaSource and the Creative logo are trademarks or registered trademarks of Creative Technology Ltd in the United States and or other countries Microsoft and Windows are registered trademarks of Microsoft Corp...