background image

VCIOM-05044

Page 9 of 75

DIgITal EPIC-2 TEChnICal Manual

InstallatIon and operatIng InstructIons

MaXIMuM ParTIClE sIzE aNd CONCENTraTION Of sOlId CONTaMINaNTs

Class

Maximum particle size (microns)

Maximum concentration (mg/m

3

)

3

5

5

MaXIMuM OIl CONTENT

Class

Maximum concentration (mg/m

3

)

3

1

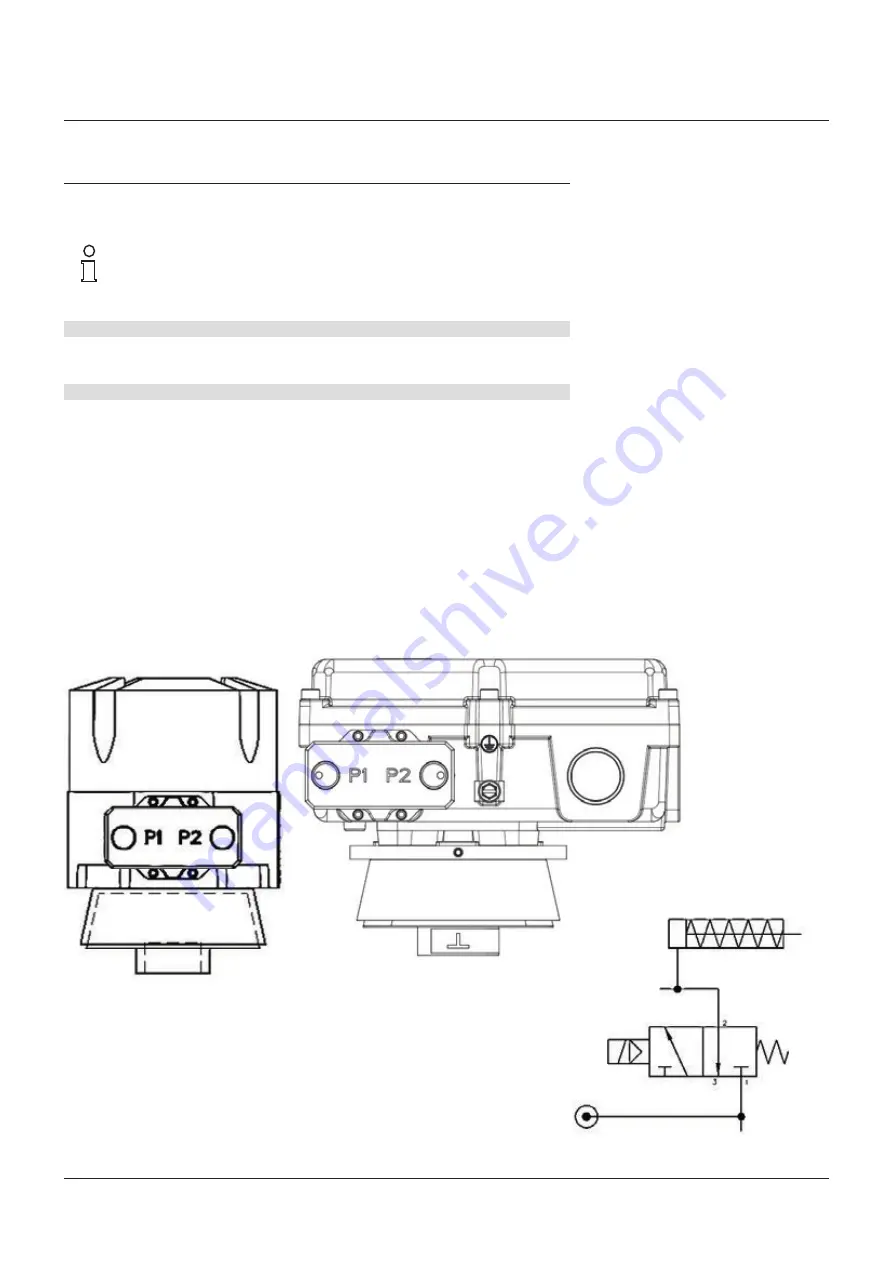
all pneumatic connections are ¼” nPT or BSP.

FIguRE 7
Figure pneumatic connections

D510/20 MODElS

D530/40/50 MODElS

Single acting cylinder

P1 port

P2 port

3 way valve

Pneumatic supply

3.5 PNEuMaTIC CONNECTIONs fOr uNITs suPPlIEd wITH Esd aNd PrEssurE PrOfIlINg 
ENablEd

Install a “T” air fitting in the air line from solenoid valve outlet port and pipe to the pressure 
sensor port “P1” and to the actuator energize port. Plug port “P2”. See Figure 7.

NOTE

air supply to the DEPIC-2 must be clean, dry, oil free instrument air per anSI/ISa-7.0.01-xxx and 
ISO 8573-1:xxx.

Copyright © Crane Co. All rights reserved.

Содержание WESTLOCK CONTROLS DIGITAL EPIC-2

Страница 1: ... functions 14 5 1 References and standards 14 5 2 DEPIC 2 ESD description 14 5 3 Designing a SIF using a DEPIC 2 ESD 14 5 3 1 Safety function 14 5 3 2 Environmental limits 14 5 3 3 Application limits 14 5 3 4 Design verification 15 5 3 5 SIL Capability 15 5 3 6 Connecting the DEPIC 2 ESD to the SIS logic solver 15 5 3 7 General requirements 16 5 4 Diagnostics 16 5 4 1 FST 16 5 4 2 PST 16 5 4 3 SOV...

Страница 2: ...40 C to 85 C enhances the reliability of the device to work in harsh environments The state of the art diagnostic functions like Emergency Shutdown ESD Partial Stroke Testing PST Solenoid Operated Valve Testing SOVT and Full Stroke Testing FST lowers the total cost of ownership by suggesting predictive maintenance of the device under operation before it fails and interrupt the process The artifici...

Страница 3: ...ination of sensor s logic solver s and final element s SOV Solenoid Operated Valve SOVT Solenoid Operated Valve Test This can be an important test in SIF applications because a solenoid can fail at any time and it is better to find it before the next PST is done and fails This also tests pressure sensor 1 in safety applications This should be done more frequently than a PST TUV Technischer Überwac...

Страница 4: ...val based upon valve speed to produce a plot showing the characteristic operation of the valve actuator in the process Note this feature is only available on devices that have the Signature option enabled from Factory and by the user 3 Installation 3 1 Rotary direct mount Step 1 Mount bracket and inner beacon coupler to actuator If actuator shaft has a tapped hole fasten using proper flat head scr...

Страница 5: ...els D510 20 Models D530 40 50 Models D530 40 50 Models Condition 1 Actuator fails in a clockwise direction Condition 2 Actuator fails in a counter clockwise direction T placed at 6 00 placed at 3 00 T placed at 9 00 placed at 6 00 Figure 2 Direct mount beacon orientation Copyright Crane Co All rights reserved ...

Страница 6: ...the inner beacon with respect to the position sensor housing while the actuator is in the fail position Figure 3 Remote mount beacon orientation Condition 1 Actuator fails in a clockwise direction Condition 2 Actuator fails in a counter clockwise direction T placed at 6 00 placed at 3 00 T placed at 9 00 placed at 6 00 Step 3 Mount the position sensor to the bracket As stated in Step 2 make sure t...

Страница 7: ...f the transmitter 1 16 is ideal See Figure 4 Figure 4 Linear mount Note For fisher actuators model 657 and 667 sizes 34 thru 70 Westlock Controls can supply a slotted mounting kit design This will allow the user to easily center the transmitter sensor between the limits of the magnet assembly s stroke Other mounting kits are available upon request Digital EPIC 2 housing assembly Digital EPIC 2 hou...

Страница 8: ...kit design to ease the mounting process This will allow the user to easily center the transmitter sensor between the limits of the magnet assembly s stroke Other mounting kits are available upon request Step 3 Mount transmitter at a remote location For wiring instructions on remote transmitter see Section 5 Figure 6 Linear remote mount To center the transmitter 1 Stroke the actuator to its upper l...

Страница 9: ...igure pneumatic connections D510 20 Models D530 40 50 Models Single acting cylinder P1 port P2 port 3 way valve Pneumatic supply 3 5 Pneumatic connections for units supplied with ESD and pressure profiling enabled Install a T air fitting in the air line from solenoid valve outlet port and pipe to the pressure sensor port P1 and to the actuator energize port Plug port P2 See Figure 7 Note Air suppl...

Страница 10: ...T system 24 VDC nominal See Figure 8 for a wiring schematic 4 Connect the solenoid coil to terminal points 3 and 4 See Figure 8 for wiring Solenoid coil is 24 V with current not to exceed 500 mA Power to activate the solenoid comes from a Safety Instrumented System logic solver 24 V output and is connected to terminals 5 and 6 See Figure 8 for wiring schematic The SIS logic solver output must be a...

Страница 11: ...kwise until the head of the screw mates with the underside of the cover See Appendix B Terminal board mounting screw Junction cover Position sensor Wiring schematic Hall effect sensor Shield Black Green Red White Remote mount enclosure Terminal board Plug two 3 pin connectors Terminal board mounting screw Terminal board Yellow Red Green Black White Junction enclosure top view no cover Junction enc...

Страница 12: ... SIS logic solver output must be able to provide sufficient current to operate the solenoid Attention Do not over tighten terminal screws Max torque 3 5 in lbs 0 4 Nm e Connect electrical ground wire to Earth screw inside the housing Note Do not connect cable shield to ground Cable shield at this end should be isolated using a shrink tubing or isolation tape f External grounding is required for al...

Страница 13: ...her end can be shortened Attention When shortening the cable please ensure that the following steps are followed a Remove shrink tubing b Cut cable to length see note above c Remove outer insulation approx 2 25 to 2 50 57 63 mm White Black Red Green Yellow Blank 5 Yellow 4 Green 3 Red 2 Black 1 White Position sensor Wiring schematic Hall effect sensor Shield Black Green Red White Remote mount encl...

Страница 14: ...validate the health of the valve and actuator assembly Configurable time based testing of the ESD valve Auto PST and Auto SOVT reduces the PFDavg by detecting dangerous failures or potential dangerous failures before they become failures thereby preventing the device from performing its safety functions on demand 5 3 Designing a SIF using a DEPIC 2 ESD The following points must be taken into consi...

Страница 15: ...PIC 2 s ESD safety critical function is maintained as a Type A Device Therefore based upon the SFF 90 when the DEPIC 2 ESD is used as the sole component in a final element subassembly a design can meet SIL 3 at HFT 0 When the final element assembly consists of many components DEPIC 2 ESD quick exhaust valve actuator isolation valve etc the SIL must be verified for the entire assembly taking into c...

Страница 16: ...presentations of the FST and PST and can be used for trending information 5 4 5 Proof test You can automatically or manually run a proof test any of above tests The objective of proof testing is to detect failures within a DEPIC 2 and ESD valve that are not detected normal operation of the system Of main concern are undetected failures that prevent the safety instrumented function from performing ...

Страница 17: ...stallation maintenance or replacement Products must be installed in compliance with all local and national codes and standards by qualified personnel using safe site work practices Personal Protective Equipment PPE must be used per safe site work practices Ensure proper use of fall protection when working at heights per safe site work practices Use appropriate safety equipment and practices to pre...

Страница 18: ... the ESD valve is de energized to go to its fail safe position fail closed or fail open The solenoid valve vents the pressure from the spring return actuator chamber to atmosphere The accumulated static energy in the actuator spring provides the necessary force to bring the valve to its closed position Because of its data monitoring capability the DEPIC 2 ESD is capable of validating the health of...

Страница 19: ... the pre configured travel limit and returns to its fully energized position It can still generate an alarm if the PST fails However more advanced PST and other tests like SOVT and FST are not available in this mode of operation 6 3 Advanced diagnostics with pressure profiling In this mode the DEPIC 2 has the pressure sensor manifold and the air is tubed to the manifold to monitor the actuator and...

Страница 20: ...t is only up to the user to set hysteresis settings in configuration as a guide for the device to know what is out of tolerance Figure 17 shows an example of a PST signature plot as they might appear displayed on a HART host using the HART DD Again there are certain critical points within these PST signature plots which are very meaningful in determining if a valve actuator is performing properly ...

Страница 21: ...o display very useful information for example position transmitter output current date time temperature other diagnostic information etc to configure the device to perform the calibration and other diagnostic tests The 3 membrane buttons keys on the DEPIC 2 board are as shown in Figure 18 Previous or up key Next or down key Select or enter key Figure 18 Local user interface The menu system can be ...

Страница 22: ...the Select key during the boot up If the device is reseting all settings to factory defaults the screen will show following messages instead of displaying the manufacturer and device name during the boot up screen After performing the factory defaults the device will return to the idle main screen However if the user has enabled the user password the feature of performing factory defaults during p...

Страница 23: ...e it display the status of last maintenance PST Each message has a priority and gets displayed based on its priority if there are multiple status messages active at a time The priority 0 is the highest and 3 is the lowest Message name Message description Priority ESD ON The device is into ESD mode 0 CAL ON The device is into calibration mode 0 SIGN ON The device is into FST mode 0 PST ON The devic...

Страница 24: ...the Rotary or Linear application Use the up down arrow key to change the selection between Rotary and Linear Press the Select key to accept the current selection Rotary For rotary actuators it should be selected as rotary as the DEPIC 2 will convert the linear position reading to angular rotary position Linear For linear actuators it should be selected as linear as the DEPIC 2 will compensate non ...

Страница 25: ...r chamber It will show all pressure 1 related hysteresis and alarm settings in the full menu later on The user must have purchased a DEPIC 2 model that has the pressure sensor 1 Disable Pressure sensor 1 is disabled The DEPIC 2 will assume the current model is NOT equipped with the pressure sensor 1 or it is not pneumatically connected to the actuator chamber It will hide all pressure 1 related hy...

Страница 26: ...r chamber The user must have purchased a DEPIC 2 model that has the pressure sensor 2 This step is dependent on the current clock configuration If the DEPIC 2 has the valid time pre configured from the factory it might skip this step to configure the clock otherwise it will display the screen Figure 29 to configure the clock on the device Use the up down arrow key and the select key to configure t...

Страница 27: ...o the Additional Documentation section to find the document for DTM User Interface 7 2 3 Emerson 475 Handheld Communicator This host is widely used in plants for mobile access to devices This will be covered in more detail in the document DD User Guide Please refer to the Additional Documentation section to find the document for DD User Interface The following information will be available on the ...

Страница 28: ...le in read only mode to the user but can be changed while logged in as factory mode Some menus or menu items will only be available on the HART DD but not on the LCD This is because either it is too complex due to limited area to implement on the LCD or it is unnecessary Some menus or menu items will not be displayed hidden depending on the other settings For example if the device doesn t have the...

Страница 29: ...not show any configuration parameters or calibration and diagnostics menu until the user logs in using the password Once logged in it is user s responsibility to log out to prevent unauthorized access using the Keypad lCD The default password is 123456 until the user configures and chooses their own password Numbers may be entered with the display or keypad With display use the arrows and click EN...

Страница 30: ...configuration menu Tag 6 alphanumeric Long tag 32 alphanumeric Descriptor 12 alphanumeric Date Final assembly number Message Polling Address 0 63 1 Loop current mode Display timeout menu Temperature display F C Position display open close Rotate LCD normal rotate LCD contrast 27 63 1 Keypad timeout 1 60 min 1 Calibration timeout 1 60 min 1 Date time menu see Section 7 3 2 4 RTC status read only Ne...

Страница 31: ...ys 1 Auto PST hour 0 24 hour 1 Signature menu Signature mode enable disable Pressure sensor 2 enable disable Pressure sensor 2 usage supply actuator chamber Dynamic basline 0 255 cycle 1 Service maintenance menu Service interval 0 365 1 Last service date Last service time Next service date Next service time Cycle alarm menu Cycle count Cycle limit Cycle alert enable disable PST alerts menu Invalid...

Страница 32: ... and determine the full address The polling address can be changed from its factory default value of 0 if the device is configured for the HART multi drop mode In this mode the loop current mode should be disabled Use the Up Down arrows to change address then press ENTER to save it Figure 34 Navigating to configuration menu Figure 35 Navigating to loop current mode menu Loop current the loop curre...

Страница 33: ...ed to login to the device as Factory level then using the Up Down arrow the current state of Enable Disable can be modified 7 3 2 3 Factory defaults sub menu This menu Figure 38 allows the user to perform the factory defaults on the device which will restore all parameters to the factory default values The user MUST re configure and re calibrate after performing the factory defaults Certain parame...

Страница 34: ... shown in Figure 42 the day of the month will be flashing use Up Down arrows to modify the day Then press ENTER to set Continue this procedure until the day and year are selected Now use the arrows to select the hour then press SELECT Continue this procedure until the minutes are selected The time should be entered in the 24 hours in HH MM SS format For example 1 30PM should be entered as 13 30 00...

Страница 35: ...l calibration where the user has to move the valve to close and open position when asked during the calibration The Partial Stroke PST function will still be available even if the device control setting is disabled Figure 44 Accessing basic configuration menu ESD this setting is ONLY available if your DEPIC 2 model has the ESD feature enabled from factory options It defines whether the DEPIC 2 sho...

Страница 36: ...ll abort the calibration It can be set in 1 minute interval from 1 to 60 minutes It is recommended to set higher value for large actuators where the valve open and close time is too long 7 3 2 6 Disp touts sub menu This menu has settings related to the display and timeout as described in Figure 45 From Basic Config menu scroll down to Disp Touts and press SELECT This will open the Display Timeouts...

Страница 37: ...ensors Signature option disabled In this case this parameter is used as a time limit for the PST If the PST doesn t finish within this time the DEPIC 2 considers the PST as a failure PST travel limit this parameter previously known as PST Set Point defines the limit DEPIC 2 cannot cross during the PST from its fully energized position For example for 25 travel limit on a fail closed valve the PST ...

Страница 38: ...nable allows Auto SOVT Note that once enable is selected this opens other selections in the SOVT Sub menu as shown in Figure 49 From Auto SOVT Sub menu if Auto SOVT is enabled scroll to Auto SOVT Day and press SELECT This allows the user to select the Auto SOVT day interval between SOVTs in the desired number of days Using the Up Down Arrow keys select the interval in number of days between Auto S...

Страница 39: ...pneumatically connected to monitor the pressure within the second chamber of the actuator Dynamic baseline the DEPIC 2 offers a way to capture the FST signature automatically without direct user intervention This setting can be used to configure automatic capture of the baseline full stroke signature on a particular valve cycle For example if the setting is configured at 5 the DEPIC 2 will capture...

Страница 40: ...nerating an alert It is used to determine the valve movement during PST and FST Close position this value represents the allowable deviation value from its baseline close position before generating an alert It is used to determine the valve movement during PST and FST Pressure 1 this value represents the allowable deviation value from its baseline break or supply pressure 1 reading before generati...

Страница 41: ...One is the Alert which is not critical but still informational and another is Alarm which is a critical failure and requires an immediate attention This alarm when enabled warns user if there is any active alert on the device It is up to the user to browse through the alert file and find out the specific alert that triggered this alarm When disabled the device will not report any active alert gene...

Страница 42: ...auto calibration Low calibration High calibration mA calibration Linear calibration PV ranging mA calibration menu 4 20 mA calibration only mA defaults mA reverse Custom mA calibration Figure 55 Calibration menu Figure 56 Accessing calibration menu PST not reached travel limit the baseline PST didn t reach to the travel limit set by the user It indicates the valve started moving but then got stuck...

Страница 43: ...tput current is not correct after this calibration it is recommended to perform the mA calibration Please follow the instruction messages displayed on the screen during this calibration to finish the calibration Figure 57 Viewing last full calibration Figure 59 Performing manual calibration close position Figure 58 Full manual calibration Figure 60 Performing manual calibration open position Refer...

Страница 44: ... This provides a warning to the user that the valve will move and erase any Baseline Signature The user has the option of selecting No or Yes by using the Down arrow key to switch Figure 61 Accessing full auto calibration Figure 63 Accessing low calibration Figure 62 Performing auto calibration 7 3 3 4 Low position calibration This calibration method allows the user to perform only the lower end o...

Страница 45: ... This calibration is useful in the case where after performing the full device user controlled calibration the user observes drift in the position for the upper end over the time due to change in temperature pressure magnets degrading or weakening actuator spring or lose valve shaft coupler The valve must be in appropriate position before starting this calibration Refer to Figure 65 From Calibrati...

Страница 46: ... the Down arrow key to switch If No it will terminate the Default mA If Yes the factory default settings are set to approximate a 4 20 mA current range Figure 68 Performing default mA calibration Figure 69 Performing reverse mA calibration Figure 67 Accessing mA calibration This is a very quick operation so the above screen will appear as 100 Done Press ENTER to exit There is no potential failure ...

Страница 47: ... mA is desired for closed position use the Up Down arrow keys to select the desired output then press ENTER Next under Meter the up down arrows will be flashing Look at the reading on the milliamp meter then use the Up Down arrow keys to adjust the output until the meter reading matches the desired output Once it matches press ENTER to proceed This calibration can be aborted by simultaneously pres...

Страница 48: ...r signature View installer signature View baseline signature View maintenance signatures Generate new signatures Start integrator signature Start installation signature Start baseline signature Start maintenance signature Compare PST menu Compare PST travel pressure parameters Compare PST timing parameters View run time data View run time summary View opening run time data View closing run time da...

Страница 49: ...ssing diagnostics menu 7 3 4 1 Fixed mA loop test This method allows user to put the device into fixed current mode instead of representing the actual valve position This is useful to the user in finding any issues related to the HART communication 4 20 mA loop The user can select the value for the fixed current mode The device will stay in fixed current mode until the user ends this test The user...

Страница 50: ...function Figure 77 Accessing Full Stroke Test FST menu 7 3 4 3 Full stroke signatures This menu Figure 77 will only be available if the factory Signature option is enabled and the user has enabled the signature setting under the configuration menu Signatures is one of the diagnostic features available to the user if he permits the movement of the valve for full storke by which the user can determi...

Страница 51: ...ally generated by the person who is integrating DEPIC 2 with valve and actuator from different manufactures The purpose of generating this signature is to make sure the whole package was tested when it was integrated at the distributor location This signature can only be generated using the keypad LCD and not from the DD DTM However the data can be viewed from the DD DTM None of the data from this...

Страница 52: ...go on to the second page shown below As shown in page 2 of the data for the Installer Signature Press the Up Arrow key to go back to the first page or press SELECT to go back to the View Sign Menu Figure 81 Viewing installer signature data Figure 82 Viewing baseline signature data View baseline signature This menu will only be available if the user has captured the baseline signature on the device...

Страница 53: ...enu Figure 85 Locking unlocking maintenance signatures menu Figure 84 Viewing maintenance signature data Lock maintenance signature This provides the means for the user to Lock or Unlock stored Maintenance Signatures A maximum of four Maintenance Signatures can be stored on the device at any time and when a new Maintenance Signature is generated it will overwrite the oldest unlocked signature whic...

Страница 54: ...e from Gen New Signature screen scroll to Start Integ and press SELECT The screen above will appear asking if you wish to continue Use the Down Arrow key to select between No or Yes and then press SELECT If No is selected it will return to the previous screen without performing the signature If Yes is selected the signature generation will start with the next screen below 7 3 4 3 1 1 Generate new ...

Страница 55: ... signature 7 3 4 3 1 1 3 Generate baseline signature The screen above will show the progress of the signature by showing x complete Once 100 is reached it will be complete and the next screen should appear Once the Installer Signature completes if successful the screen above should appear If not successful it will show an error stating the problem The problem will also be logged in the Alert File ...

Страница 56: ...gnature contain both an Open and a Close signatures this is further divided into sub menus to view either Open or close data From the FST Sign Menu scroll down to Runtime Data to view critical signature data stored on the device then press SELECT 7 3 4 3 1 2 Run time data The screen above will show the progress of the signature by showing x complete Once 100 is reached it will be complete and the ...

Страница 57: ...time Data menu Next from the Open Runtime Data Sub menu scroll down to Latest Open to view critical Latest Maintenance Opening signature data stored on the device then press SELECT This is the Page 1 of the Latest Maintenance Opening Full Stroke Signature Data Press the down arrow to go to Page 2 From the Open Runtime Data Sub menu scroll down to Base Open to view critical Baseline Opening signatu...

Страница 58: ...ime Data Sub menu scroll down to Latest Close to view critical Latest Maintenance Closing signature data stored on the device then press SELECT From the Close Runtime Data Sub menu scroll down to Base Close to view critical Baseline Closing signature data stored on the device then press SELECT This is the Page 1 of the Baseline Closing Full Stroke Signature Data Press the down arrow to go to Page ...

Страница 59: ...key to select between No or Yes then press ENTER If No is selected the PST will not be done and will return to the previous sub menu If Yes is selected the Baseline PST will start The Baseline PST should now proceed The screen will update the Done until it reaches 100 The user has the option of aborting by simultaneously pressing the Up and Down arrow keys Once the PST completes if successful the ...

Страница 60: ...ne until it reaches 100 The user has the option of aborting by simultaneously pressing the Up and Down arrow keys Once the PST completes if successful the screen above will appear If the PST failed the screen will show the failure reason on screen The reason for the failure must be resolved and perform the test again Finally press SELECT ENTER key to exit back to previous sub menu Next you will be...

Страница 61: ... SELECT 7 3 4 3 2 2 1 View baseline PST This is the Page 2 of 3 of the Baseline PST Data Press the down arrow to go to Page 3 This is the Page 3 of 3 of the Baseline PST Data From here press the Up arrow key to go back up to the Open Runtime Data menu and Up arrow again to go back to View PST sub menu This is the Page 1 of 3 of the Baseline PST Data Press the down arrow to go to Page 2 Copyright C...

Страница 62: ...ress the Up arrow key to go back up to the Open Runtime Data menu and Up arrow again to go back to View PST sub menu 7 3 4 3 3 Solenoid operated valve test The SOVT is a special test to test the solenoid without requiring any movement of the valve Signatures must be enabled The SOVT doesn t create a signature but does require the pressure sensor which is only available when signatures are enabled ...

Страница 63: ...OVT will start the test as shown on next screen If an SOVT result does not exist on the device never done the LCD will show Not Available The SOVT data is a 2 page screen SOVT Data 1 2 First page 1 of the SOVT data is displayed Press the Down arrow to go to page 2 As the test progresses the screen will show progress with x Done In general this will proceed quickly since it s not a long test On com...

Страница 64: ...o and press SELECT ENTER From the Device Information Menu select the Show Mfgr sub menu This menu has information about the manufacturer device mode hardware revision software revision etc All information in this menu is read only and cannot be changed by the user Press the Select button to exit the menu and UP key to go back to previous menu From Device Information Menu scroll to Req Preamble the...

Страница 65: ...status Calibration errors Alert file Misc device status Alert status Alert transitions Active alert count View all alerts View active alerts Delete old alerts Miscellaneous device status HART DLL statistics Factory cycle count Beacon orientation Sensor gain Open speed index Close speed index Ma out reverse Device temperature DD DTM Pressure LCD only Rotary Depic 2 May 10 2016 17 08 Open mA F 48 5 ...

Страница 66: ...ose position drift due to temperature or other factors can change the primary variable to go out of 0 to 100 range Other var out other variables Secondary Tertiary Quardanary etc are out of range Figure out which variable is out of range and try to bring the variable in its normal operating range PV saturated the analog output current is at its minimum or maximum output This could be due to abnorm...

Страница 67: ...icates that the user configurable time has elapsed notifying the user it may be time for valve actuator maintenance 3 Cycle Alarm if ON indicates that the user configurable cycle limit has been reached notifying the user it may be time for valve actuator maintenance 4 ESD Alarm if ON indicates an Emergency Shut Down has occurred indicated by a loss of SIS voltage to the solenoid Figure 93 Accessin...

Страница 68: ...eading for the pressure sensor 2 It checks if the pressure is not changing and is stable for a certain time depending on the calibration timeout setting If the pressure 2 reading isn t stable within this specified time limit it will generate this error message Calibration close position error During the calibration the device captures the reading for the close position It checks if the position is...

Страница 69: ...resis value Figure 96 Accessing alert file menu Figure 97 Viewing active alert 7 3 6 4 Alert file sub menu This menu as shown in Figure 96 shows the status of each alert active or in active on the device All alerts are enabled by default and cannot be disabled However the hysteresis of each alert can be configured as mentioned in the Alert Hysteresis under the Basic Configuration menu Refer to Fig...

Страница 70: ... error type Severe Major Minor as well as an error ID Code 1 and Code 2 which refers to the possible cause If there is more than one Error use the up Down arrow keys to scroll through the Errors 7 3 6 6 Miscellaneous device status sub menu Note most of the information that can be viewed from this sub menu is primarily for Westlock Crane CPE personnel and would not be meaningful to the user Also no...

Страница 71: ...r to Figure 102 This sub menu is similar to the Hall Sensor A D sub menu on the 475 only with additional information From Misc Device Status sub menu scroll to Calib Data sub menu and press ENTER This is a 2 page menu Initially the first page comes up showing the calibration reading for the Hall Effect Sensor position sensor for two different gain settings 0 and 1 gains 10 and 30 Calibration funct...

Страница 72: ...D530 40 50 Quick start IOM Wiring installation basic configuration and calibration VCOSI 04978 All Safety manual Tips and guidelines to use product in SIL3 applications VCIOM 05044 All Technical manual Advanced configuration PST SOVT FST diagnostics viewing alerts and alarms VCIOM 05045 All Troubleshooting guide FAQs error codes alerts and alarm messages VCIOM 05046 All DD user guide Operating dev...

Страница 73: ...Page 73 of 75 Digital EPIC 2 technical manual Installation and operating instructions 9 Appendix 9 1 Field wiring and grounding schematic Field wiring and grounding schematic Copyright Crane Co All rights reserved ...

Страница 74: ...ock 9 3 Non intrusive feature The transmitter is equipped with three magnetic sensors that can be activated externally allowing the user to calibrate and configure Epic Transmitter without removing the cover Any button function accessed internally can be completed externally The transmitter comes with a magnetic tool part number TL 30003 that is used to operate the non intrusive feature Use single...

Страница 75: ... and therefore the original English document will prevail No rights or liability can be derived from any translation Previous documents VCIOM 05044 is designed to supplement VCIOM 04592 D510 520 and VCIOM 04979 D530 540 550 series which are the quick start guides for the DEPIC 2 Warning This symbol warns the user of possible danger Failure to observe this warning may lead to personal injury or dea...

Отзывы: