background image

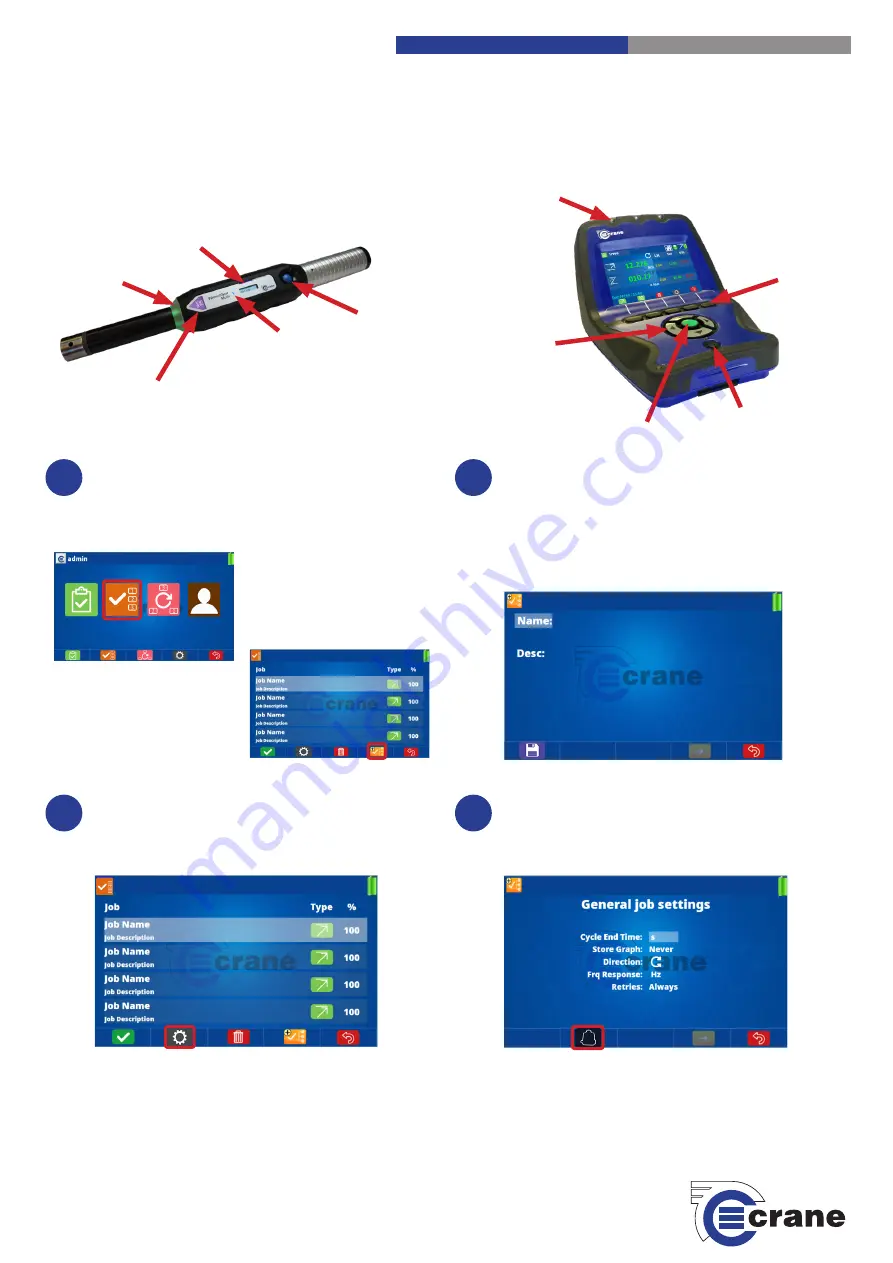
Setup of Jobs on the TorqueStar Pro

On the TorqueStar Pro Home Screen, select the ‘Jobs’ 

icon using the directional arrows and the green ‘ac-

cept’ key. Then, using the relevant function soft key, 

select the ‘Add a Job’ icon.

1

Setup of Jobs cont.

On the first screen you are required to add a job name 

and a job description. Use directional arrows and the 

green ‘accept’ key to select the relevant box and use 

the keypad to input text with the on screen keyboard. 

When completed, press the ‘Save’ function key.

2

Select Job Settings

When the saved job is highlighted on screen (using the 

directional arrow keys), press the ‘Settings’ function 

soft key to access the job settings.  

3

WrenchStar Multi

TorqueStar Pro

On/Off and   

Pairing Button

WrenchStar Multi  

Torque Limit

LED Display 

Screen

Pairing with a TorqueStar Pro Data Collector

Select ‘Transducer’

On the ‘Jobs Settings’ screen, press the ‘Transducer’ 

function soft key to access the transducer pairing 

screen. 

4

LED Light

360

o

 Status  

Light Ring

Crane Electronics Ltd

The force in torque management

LEDs

Function          

Soft Keys

Directional      

Arrow Keys 

On/Off Button

Green ‘Accept’ Key 

Содержание WrenchStar Mult

Страница 1: ... you are pairing to the TCI Multi e g if this is the first wrench to be paired select number 1 if it is the second wrench to be paired select number 2 etc 2 Pair Mode Ensure the WrenchStar Multi is in pair mode by pressing and holding down the blue pairing button on the wrench until the LED light turns purple 3 Reset Button WrenchStar Multi TCI On Off and Pairing Button WrenchStar Multi Torque Lim...

Страница 2: ...ducer 1 for Wrench 1 7 Loading Jobs to the Wrench cont Ensure that the correct Job is selected from the drop down menu and then click Load to load this selected job onto the wrench 8 Ready to Measure The WrenchStar Multi is now ready to measure torque Once the job is completed the screen display on the WrenchStar Multi will read Wait 9 TCI TCI Multi Line side Controller Our series of TCI tool cont...

Страница 3: ...tom of IQVu screen 2 Setup of Jobs on the IQVu cont You will be taken to the following screen Press unlock again and fill in the bar at the top search for joints or input new joint index Enter values into USL Target LSL and Threshold boxes relevant to your Wrench size For keypad to disappear press Next or the down arrow Lock the padlock again and then click Save to take you to the main Jobs screen...

Страница 4: ... until the LED light turns purple 5 Pairing on the IQVu cont The WrenchStar Multi LED will change from purple to blue Select the yellow highlighted row on the IQVu screen it will then turn green and say connected then it will take you straight to the job 7 Connected Wrench The sequence Green Amber Red on the WrenchStar Multi light ring will confirm an OK connection and the LED display on the Wrenc...

Страница 5: ...When completed press the Save function key 2 Select Job Settings When the saved job is highlighted on screen using the directional arrow keys press the Settings function soft key to access the job settings 3 WrenchStar Multi TorqueStar Pro On Off and Pairing Button WrenchStar Multi Torque Limit LED Display Screen Pairing with a TorqueStar Pro Data Collector Select Transducer On the Jobs Settings s...

Страница 6: ...ill turn blue Select the wrench using the green accept key 7 1 75Nm WrenchStar Multi S N 00077307 WrenchStar Multi Operators Manual For more in depth information about the WrenchStar Multi digital torque wrench why not download the complete Operators Manual online on our website The manual contains more information about the WrenchStar Multi including features and technical specifications detailed...

Отзывы: