background image

English

6

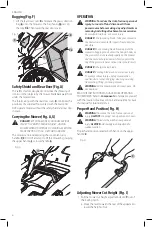
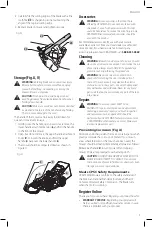
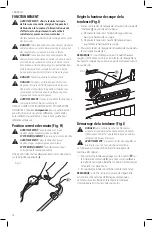
Bagging (Fig. F)

1.  Lift the rear door cover 

 9 

 and place the grass collection 

bag 

 8 

 onto the mower so the bag hooks 

 15 

 rest on 

the lugs 

 16 

. Then lower the rear door cover.

Fig. F

15

16

9

8

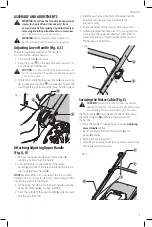
Safety Shield and Rear Door (Fig. A)

The safety shield is designed to minimize the throwing of 
stones or other objects by the mower blade backward from 
under the mower deck.
The shield, along with the rear door cover 

 9 

 minimizes the 

possibility of accidental foot contact with the blade. DO 
NOT operate mower without the safety shield and rear door 
in place.

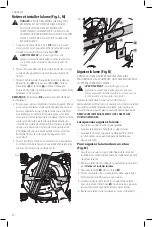
Carrying the Mower (Fig. A, G)


DANGER:

 ROTATING BLADES CAN CAUSE SERIOUS 

INJURY. TO PREVENT SERIOUS INJURY, UNPLUG 
MOWER WHEN UNATTENDED, CLEANING, SERVICING, 
TRANSPORTING, LIFTING, OR STORING MOWER.

The mower can be carried using the convenient carry 
handles 

 10 

. DO NOT attempt to lift the mower by grasping 

the upper handle 

 3 

 or lower handle 

 4 

.

Fig. G

10

OPERATION


WARNING: To reduce the risk of serious personal 
injury, turn unit off and  disconnect it from 
power source before making any adjustments or 
removing/installing attachments or accessories.


An accidental start-up  can cause injury.


DANGER:

  Sharp moving blade. Take your mower to 

the nearest service center for repair if rear door does 
not close.


DANGER:

 Sharp moving blade. Never operate the 

mower in bagging mode unless the hanger hooks on 
the grass catcher are seated properly on the mower 
and the rear discharge door rests firmly against the 
top of the grass catcher as serious injury could result.


DANGER :

 Sharp moving blade.


DANGER:

 Rotating blades can cause serious injury. 

To prevent serious injury, unplug mower when 
unattended, or when charging, cleaning, servicing, 
transporting, lifting, or storing mower.


WARNING:

 Let the mower work at its own pace. Do 

not overload.

READ THIS INSTRUCTION MANUAL BEFORE OPERATING 
YOUR MOWER. Refer to 

Components

 to familiarize yourself 

with the location of various controls and adjustments. Save 
this manual for future reference.

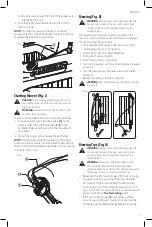
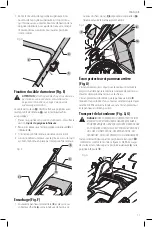
Proper Hand Position (Fig. H)


WARNING:

 To reduce the risk of serious personal 

injury, 

ALWAYS

 use proper hand position as shown.


WARNING:

 To reduce the risk of serious personal 

injury, 

ALWAYS

 hold securely in anticipation of a 

sudden reaction.

Proper hand position requires both hands on the upper 
handle 

 3 

.

Fig. H

3

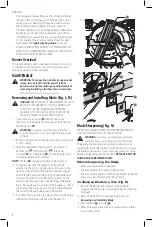
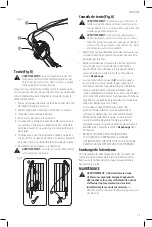
Adjusting Mower Cut Height (Fig. I)

1.  Pull the mower cut height adjustment lever 

 7 

 out of 

the locking notch.

a.  Move the lever towards the rear of the appliance to 

lower the height of cut.

Содержание CMEMW213

Страница 1: ...se à pousser Podadora de Empuje CMEMW213 INSTRUCTIONMANUAL GUIDED UTILISATION MANUALDEINSTRUCTIONES IFYOUHAVEQUESTIONSORCOMMENTS CONTACTUS POURTOUTEQUESTIONOUTOUTCOMMENTAIRE NOUSCONTACTER SITIENEDUDASOCOMENTARIOS CONTÁCTENOS 1 888 331 4569 WWW CRAFTSMAN COM ...

Страница 2: ...English original instructions 1 Français traduction de la notice d instructions originale 12 Español traducido de las instrucciones originales 24 ...

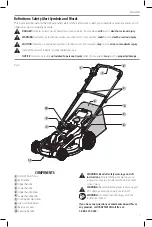
Страница 3: ...h if not avoided could result in death or serious injury CAUTION Indicates a potentially hazardous situation which if not avoided may result in minor or moderate injury Used without word Indicates a safety related message NOTICE Indicates a practice not related to personal injury which if not avoided may result in property damage WARNING Read all safety warnings and all instructions Failure to fol...

Страница 4: ...f moving parts breakage of parts mounting and any other conditions that may affect their operation A guard or other part that is damaged should be properly repaired or replaced by an authorized service center unless otherwise indicated elsewhere in this manual Repairs and service Repairs maintenance and any adjustments not specified in this manual should be performed by authorized service centers ...

Страница 5: ...ord plug in any way SAVE THESE INSTRUCTIONS Important Safe Practices for Pedestrian Controlled Mowers This machine is capable of amputating hands and feet and throwing objects Failure to observe the following safety instructions could result in serious injury or death General Information 1 Read understand and follow instructions and warnings in this manual and on the machine engine and attachments...

Страница 6: ...avel drives Additional Safety Information WARNING ALWAYS use safety glasses Everyday eyeglasses are NOT safety glasses Also use face or dust mask if cutting operation is dusty ALWAYS WEAR CERTIFIED SAFETY EQUIPMENT ANSI Z87 1 eye protection CAN CSA Z94 3 ANSI S12 6 S3 19 hearing protection NIOSH OSHA MSHA respiratory protection WARNING Some dust created by this product contains chemicals known to ...

Страница 7: ...lide the motor cable under the clip and ensure it is fully held in place by the restraint Fig E 13 14 4 3 WARNING Before assembly make sure the bail handle is released and the mower is unplugged Adjusting Lower Handle Fig A C There are 2 operating heights for the handle to accommodate multiple operators 1 Lift lower handle 4 into place 2 Align the arrow 11 on the base of the mower with 1 or 2 on t...

Страница 8: ...cause injury DANGER Sharp moving blade Take your mower to the nearest service center for repair if rear door does not close DANGER Sharp moving blade Never operate the mower in bagging mode unless the hanger hooks on the grass catcher are seated properly on the mower and the rear discharge door rests firmly against the top of the grass catcher as serious injury could result DANGER Sharp moving bla...

Страница 9: ... to use your mower as outlined in this section in order to achieve optimum results and to reduce the risk of cutting the main cable 1 Place the bulk of the cable on the lawn close to the starting point position 1 in Figure K 2 Switch the mower on as described above 3 Proceed as shown in Figure K 4 Move from position 1 to position 2 5 Turn right stepping over the cable and proceed towards position ...

Страница 10: ...ing Secure nut with the wrench Fig L 18 19 Fig M 19 23 22 21 20 Blade Sharpening Fig N KEEP BLADE SHARP FOR BEST MOWER PERFORMANCE A DULL BLADE DOES NOT CUT GRASS CLEANLY WARNING Use gloves and proper eye protection while removing sharpening and installing blade Sharpening the blade twice during a mowing season is usually sufficient under normal circumstances Sand causes the blade to dull quickly ...

Страница 11: ... WARNING Blow dirt and dust out of all air vents with clean dry air at least once a week To minimize the risk of eye injury always wear ANSI Z87 1 approved eye protection when performing this procedure WARNING Never use solvents or other harsh chemicals for cleaning the non metallic parts of the tool These chemicals may weaken the plastic materials used in these parts Use a cloth dampened only wit...

Страница 12: ...s you specific legal rights and you may have other rights which vary in certain states or provinces 90 DAY MONEY BACK GUARANTEE If you are not completely satisfied with the performance of your CRAFTSMAN Power Tool or Nailer for any reason you can return it within 90 days from the date of purchase with a receipt for a full refund no questions asked LATIN AMERICA This warranty does not apply to prod...

Страница 13: ...arpness Keep blade sharp Deck and discharge chute for clogging Cut height adjustment may be set too low for grass condition Raise cutting height Mower is too hard to push Release bail handle to turn mower off Unplug mower Raise cutting height to reduce deck drag on grass Check each wheel for free rotation Mower is abnormally noisy and vibrates Release bail handle to turn mower off Unplug mower Tur...

Страница 14: ...corporels mais qui par contre si rien n est fait pour l éviter pourrait poser des risques de dommages matériels AVERTISSEMENT lire tous les avertissements de sécurité et toutes les directives Le non respect des avertissements et des directives pourrait se solder par un choc électrique un incendie et ou une blessure grave AVERTISSEMENT ne jamais modifier l outil électrique ni aucun de ses composant...

Страница 15: ...ec la tondeuse Les connecteurs femelles sont disponibles avec une protection DDFT intégrée et peuvent être utilisés pour cette mesure de sécurité Vérifiez s il y a des pièces endommagées Avant toute utilisation ultérieure de la tondeuse un protecteur ou une autre pièce qui est endommagé doit être soigneusement vérifié afin de déterminer s il fonctionnera correctement et s il effectuera la fonction...

Страница 16: ...remplacement identiques Rallonges Utilisez seulement des rallonges à trois files ayant des files de type mise à la terre à trois broches et des prises de courant à trois pôles qui acceptent la fiche de la tondeuse à gazon Pour toutes les tondeuses à gazon à isolation double Pièces de remplacement Lorsque vous effectuez des réparations utilisez seulement des pièces de remplacement identiques Connex...

Страница 17: ...éparer 1 Gardez la machine en bon état de fonctionnement Remplacez les pièces usées ou endommagées 2 Soyez prudent lorsque vous entretenez les lames Enveloppez la les lame s ou portez des gants Remplacez les lames endommagées Ne pas réparer ou altérer la les lame s Les éléments suivants sont des explications des symboles de danger et sécurité importants sur la tondeuse L utilisateur doit litre et ...

Страница 18: ...ée de la poignée est relâchée et que la tondeuse est débranchée Ajuster la poignée inférieure Fig A C Il y a 2 hauteurs de fonctionnement pour la poignée afin de répondre aux besoins des utilisateurs multiples 1 Levez la poignée inférieure 4 en place 2 Alignez la flèche 11 à la base de la tondeuse avec 1 ou 2 à la base de la poignée ATTENTION s assurer que chaque côté de la poignée inférieure est ...

Страница 19: ...sitif de retenue Fig E 13 14 4 3 Ensachage Fig F 1 Soulever le panneau volet arrière 9 et placer le sac collecteur d herbe 8 sur la tondeuse de façon à ce que les crochets du sac 15 reposent sur les pattes 16 Abaisser ensuite le panneau volet arrière Fig F 15 16 9 8 Écran protecteur et panneau arrière Fig A L écran protecteur est conçu pour réduire au minimum la projection arrière par la lame de l...

Страница 20: ...des mains illustrée AVERTISSEMENT pour réduire tout risque de dommages corporels graves maintenir SYSTÉMATIQUEMENT l outil fermement pour anticiper toute réaction soudaine Une position des mains adéquate nécessite les deux mains sur la poignée supérieure 3 Fig H 3 Régler la hauteur de coupe de la tondeuse Fig I 1 Sortez sur le levier de réglage de la hauteur de coupe de tondeuse 7 du cran de verro...

Страница 21: ...aplomb Relâchez l anse pour éteindre la tondeuse lorsque vous croisez toute zone en gravier les pierres peuvent être projetées par la lame Réglez la tondeuse à la hauteur la plus haute lorsque vous tondez sur un sol accidenté ou des herbes hautes Retirer trop d herbes à la fois peut entraîner une surcharge et un arrêt du moteur Consultez la section Dépannage Si un sac de collecte du gazon 8 est ut...

Страница 22: ...ieurs de ce dernier Remettre l écrou le côté large s appuyant contre la rondelle 5 Pour serrer fermement positionner un morceau de bois comme le montre la figure L pour empêcher la lame de tourner Serrer l écrou à l aide de la clé Fig L 18 19 Fig M 19 23 22 21 20 Aiguiser la lame Fig N GARDEZ LA LAME AIGUISÉE POUR UNE MEILLEURE PERFORMANCE DE LA TONDEUSE UNE LAME ÉMOUSSÉE NE COUPE PAS L HERBE NETT...

Страница 23: ...au moyen d air comprimé propre et sec au moins une fois par semaine Pour minimiser le risque de blessure aux yeux toujours porter une protection oculaire conforme à la norme ANSI Z87 1 lors du nettoyage AVERTISSEMENT ne jamais utiliser de solvants ni d autres produits chimiques puissants pour nettoyer les pièces non métalliques de l outil Ces produits chimiques peuvent affaiblir les matériaux de p...

Страница 24: ...que ce soit du rendement de l outil électrique ou de la cloueuse celui ci peut le retourner accompagné d un reçu dans les 90 jours à compter de la date d achat pour obtenir un remboursement intégral sans aucun problème AMÉRIQUE LATINE cette garantie ne s applique aux produits vendus en Amérique latine Pour ceux ci veuillez consulter les informations relatives à la garantie spécifique présente dans...

Страница 25: ... aiguisée Le châssis et le conduit d éjection pour toute obstruction Le réglage de la hauteur de coupe de pourrait être trop bas pour l état de la pelouse Augment er la hauteur de coupe La tondeuse est trop difficile à pousser Relâcher l anse pour éteindre la tondeuse Débrancher la tondeuse Augmenter la hauteur de coupe pour réduire le frottement du châssis sur l herbe Vérifier que chaque roue tou...

Страница 26: ...na práctica no relacionada a lesiones corporales que de no evitarse puede resultar en daños a la propiedad ADVERTENCIA Lea todas las advertencias de seguridad e instrucciones El incumplimiento de las advertencias e instrucciones puede provocar descargas eléctricas incendios o lesiones graves ADVERTENCIA Nunca modifique la herramienta eléctrica ni tampoco ninguna de sus piezas Podría producir lesio...

Страница 27: ...parte que esté dañada para determinar si funcionará correctamente y cumplirá su función Revise la alineación de las partes móviles la unión de las partes móviles la ruptura de partes el montaje y cualquier otra condición que pueda afectar su operación Una protección u otra parte que esté dañada se debe reparar o reemplazar apropiadamente por un centro de servicio autorizado a menos que se indique ...

Страница 28: ... el enchufe Si el enchufe todavía no se inserta obtenga un cable de extensión polarizado correcto Un cable de extensión polarizado requerirá el uso de un tomacorriente polarizado Este enchufe se ajustará a un tomacorriente de pared polarizado sólo de una forma Si el enchufe no se conecta al tomacorriente de pared invierta el enchufe Si el enchufe todavía no se conecta póngase en contacto con un el...

Страница 29: ... Mantenga las manos y los pies alejados de la plataforma de poda y la abertura de descarga en todo momento Siempre asegúrese que la cuchilla se haya detenido espere a que la cuchilla deje de girar aproximadamente 3 segundos después de soltar la manija de travesaño y desenchufe la cortadora de césped antes de retirar y reemplazar el recolector de césped limpiar dar servicio transportar o levantar l...

Страница 30: ...ctos por minuto RPM revoluciones por minuto sfpm pies de superficie por minuto SPM pasadas por minuto OPM oscilaciones por minuto A amperios W vatios or AC corriente alterna or AC DC corriente alterna o directa Construcción de Clase II doble aislamiento no velocidad sin carga IPXX s ímbolo IP n velocidad nominal terminal de conexión a tierra símbolo de advertencia de seguridad radiación visible pr...

Страница 31: ... baje la cubierta de la puerta trasera Fig F 15 16 9 8 Protector de Seguridad y Puerta Trasera Fig A El protector de seguridad está diseñado para minimizar el que la hoja de la cortadora de césped arroje piedras u otros objetos hacia atrás desde debajo de la plataforma de esta El protector junto con la cubierta de la puerta trasera 9 minimizan la posibilidad de contacto accidental de los pies con ...

Страница 32: ...ave sujeteSIEMPREbienencasodequehayauna reacciónrepentina La posición de mano adecuada requiere ambas manos en la manija superior 3 Fig H 3 Ajuste de Altura de Corte de la Podadora Fig I 1 Jale la palanca de ajuste de altura de corte de la podadora 7 fuera de la muesca de bloqueo a Mueva la palanca hacia la parte trasera del aparato para bajar la altura de corte b Mueva la palanca hacia la parte d...

Страница 33: ...ualquier área de grava las piedras pueden ser arrojadas por la cuchilla Coloque la podadora a la altura de corte más alta cuando corte en terreno irregular o en malezas altas Retirar demasiada hierba a la vez puede causar que el motor se sobrecargue y se detenga Consulte la Solución de Problemas Si se usa una bolsa de recolección de hierba 8 durante la temporada de crecimiento rápido la hierba pue...

Страница 34: ...nte entre los dos soportes exteriores del aislador Vuelva a instalar la tuerca con el lado ancho contra la arandela 5 Para un ajuste firme coloque la pieza de madera para evitar que la hoja gire Ajuste la tuerca con la llave Fig L 18 19 Fig M 19 23 22 21 20 Afilado de Cuchillas Fig N MANTENGA LA HOJA AFILADA PARA OBTENER EL MEJOR RENDIMIENTO DE LA PODADORA UNA CUCHILLA SIN FILO NO CORTA LA HIERBA ...

Страница 35: ...cio de sus herramientas eléctricas favor de dirigirse al Centro de Servicio más cercano CULIACAN SIN Blvd Emiliano Zapata 5400 1 Poniente Col San Rafael 667 717 89 99 GUADALAJARA JAL Av La Paz 1779 Col Americana Sector Juárez 33 3825 6978 MEXICO D F Eje Central Lázaro Cárdenas No 18 Local D Col Obrera 55 5588 9377 MERIDA YUC Calle 63 459 A Col Centro 999 928 5038 MONTERREY N L Av Francisco I Mader...

Страница 36: ...as distintas a las enlistadas al final de este certificado Anexo encontrará una relación de sucursales de servicio de fábrica centros de servicio autorizados y franquiciados en la República Mexicana donde podrá hacer efectiva su garantía y adquirir partes refacciones y accesorios originales Solamente para propósito de México Importado por Craftsman Tool Co S A de C V Avenida Antonio Dovali Jaime 7...

Страница 37: ...limitación de daños incidentales o en consecuencia por lo que estas limitaciones pueden no aplicarse en su caso Esta garantía le da derechos legales específicos y puede tener otros derechos que varían en ciertos estados o provincias GARANTÍA DE REEMBOLSO DE SU DINERO POR 90 DÍAS Si no está completamente satisfecho con el desempeño de su máquina herramienta o clavadora CRAFTSMAN cualquiera sea el m...

Страница 38: ...bstrucciones en la plataforma o en el conducto de descarga Es posible que el ajuste de altura de corte se haya fijado demasiado bajo para el estado del césped Eleve la altura de corte La podadora es muy difícil de empujar Suelte el mango de suspensión para apagar la cortadora de césped Desenchufe la cortadora de césped Eleve la altura de corte para reducir el arrastre de la plataforma sobre el cés...

Страница 39: ......

Страница 40: ...11 18 Part No N677429 CRAFTSMAN 701 East Joppa Road Towson MD 21286 Copyright 2018 ...

Отзывы: