background image

English

6

1.  Plug the charger into an appropriate outlet before 

inserting battery pack.

2.  Connect the charger and battery pack, making sure 

the battery is fully seated. The (charging) light will 
blink continuously indicating that the charging process 
has started.

3. The completion of charge will be indicated by the light 

remaining ON continuously. The battery pack is fully 
charged and may be removed and used at this time or 

left in the charger. 

nOTE:

 To remove the battery pack, some chargers require 

the battery pack release button to be pressed.

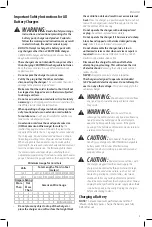
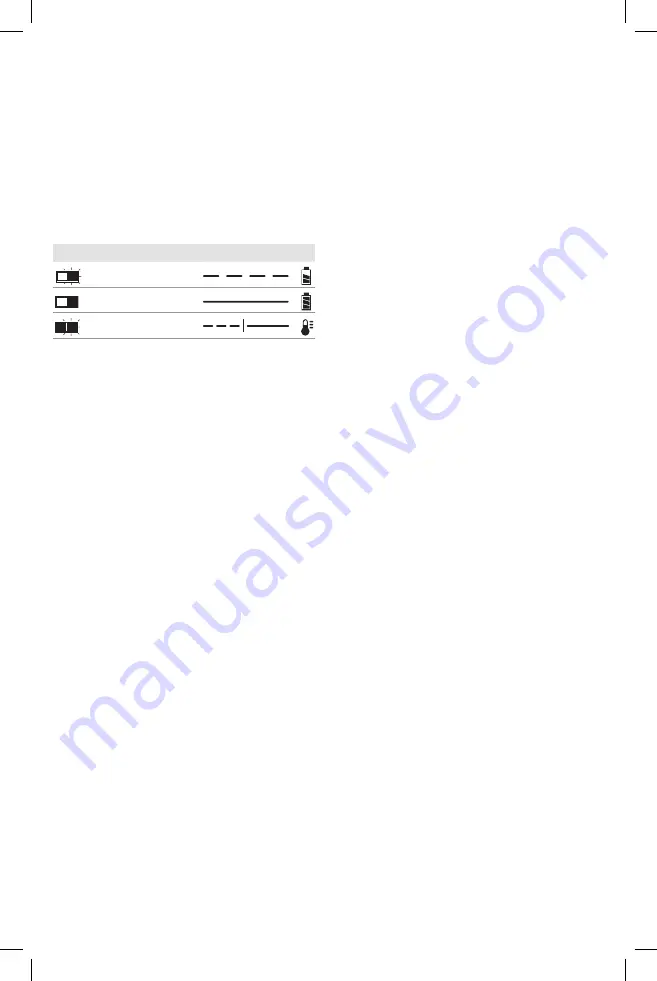
Indicators

Charging

Fully Charged

Hot/Cold Pack Delay

A charger will not charge a faulty battery pack. The charger 

refusing to light could indicate a problem with the charger.

nOTE:

 If the charger refuses to light, take the charger and 

battery pack to be tested at an authorized service center.

hot/Cold Pack Delay

When the charger detects a battery pack that is too hot 

or too cold, it automatically starts a Hot/Cold Pack Delay, 
suspending charging until the battery pack has reached an 
appropriate temperature. The charger then automatically 
switches to the pack charging mode. This feature ensures 
maximum battery pack life.
A cold battery pack may charge at a slower rate than a 

warm battery pack.

Important Charging Notes

1.  Longest life and best performance can be obtained if 

the battery pack is charged when the air temperature 
is between 65 °F – 75 °F (18 ° C– 24 °C). DO NOT charge 
when the battery pack is below +40 °F (+4.5 °C), or 

above +104 °F (+40 °C). This is important and will 
prevent serious damage to the battery pack.

2. The charger and battery pack may become warm to the 

touch while charging. This is a normal condition, and 

does not indicate a problem. To facilitate the cooling of 

the battery pack after use, avoid placing the charger or 
battery pack in a warm environment such as in a metal 

shed or an uninsulated trailer.

3.  If the battery pack does not charge properly:

a.  Check operation of receptacle by plugging in a lamp 

or other appliance;

b.  Check to see if receptacle is connected to a light 

switch which turns power off when you turn out  

the lights;

c.  Move the charger and battery pack to a location 

where the surrounding air temperature is 

approximately 65 °F – 75 °F (18 °C – 24 °C);

d.  If charging problems persist, take the tool, battery 

pack and charger to your local service center.

SAVE THESE 

INSTRUCTIONS 

FOR FUTURE USE

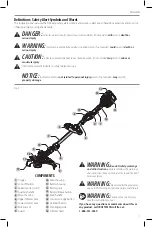
COMPONENTS (FIG. A)

Intended Use

This string trimmer is designed for household trimming and 
edging applications.

DO nOT

 use under wet conditions or in presence of 

flammable liquids or gases.

4. The battery pack should be recharged when it fails to 

produce sufficient power on jobs which were easily 
done previously. DO NOT CONTINUE to use under these 
conditions. Follow the charging procedure. You may 
also charge a partially used pack whenever you desire 
with no adverse effect on the battery pack.

5.  Foreign materials of a conductive nature such as, but 

not limited to, grinding dust, metal chips, steel wool, 
aluminum foil, or any buildup of metallic particles 
should be kept away from charger cavities. Always 
unplug the charger from the power supply when there 
is no battery pack in the cavity. Unplug the charger 

before attempting to clean.

6.  Do not freeze or immerse the charger in water or any 

other liquid.

Charger Cleaning Instructions


WARNING:


Shock hazard. Disconnect 

the charger from the AC outlet before cleaning. Dirt 

and grease may be removed from the exterior of the 
charger using a cloth or soft non-metallic brush. Do 

not use water or any cleaning solutions.

Wall Mounting

These chargers are designed to be wall mountable or to sit 

upright on a table or work surface.  If wall mounting, locate 
the charger within reach of an electrical outlet, and away 

from a corner or other obstructions which may impede 

air flow. Use the back of the charger as a template for 

the location of the mounting screws on the wall. Mount 
the charger securely using drywall screws (purchased 

separately) at least 1" (25.4  mm) long, with a screw head 
diameter of 0.28–0.35" (7–9 mm), screwed into wood to an 
optimal depth leaving approximately 7/32" (5.5 mm) of the 
screw exposed. Align the slots on the back of the charger 

with the exposed screws and fully engage them in the slots.

Versatrack™

CRAFTSMAN chargers can be mounted to the wall using 
CRAFTSMAN Versatrack™ Trackwall. Hooks and accessories 

are sold separately.  Please refer to the Versatrack™ 
Trackwall accessory sheet for further information.

Содержание CMCST910

Страница 1: ...er Taille bordure coupe bordure 20 V max Podadora Bordeadora de Cuerda 20 V Máx CMCST910 INSTRUCTIONMANUAL GUIDED UTILISATION MANUALDEINSTRUCTIONES IFYOUHAVEQUESTIONSORCOMMENTS CONTACTUS POURTOUTEQUESTIONOUTOUTCOMMENTAIRE NOUSCONTACTER SITIENEDUDASOCOMENTARIOS CONTÁCTENOS 1 888 331 4569 WWW CRAFTSMAN COM ...

Страница 2: ...English original instructions 1 Français traduction de la notice d instructions originale 13 Español traducido de las instrucciones originales 27 ...

Страница 3: ...ersonal injury which if not avoided may result in property damage WARNING Read all safety warnings and all instructions Failure to follow the warnings and instructions may result in electric shock fire and or serious injury WARNING Never modify the product or any part of it Damage or personal injury could result WARNING To reduce the risk of injury read the instruction manual If you have any quest...

Страница 4: ...eck Damaged Parts Before further use of the appliance a guard or other part that is damaged should be carefully checked to determine that it will operate properly and perform its intended function Check for alignment of moving parts binding of moving parts breakage of parts mounting and any other condition that may affect its operation A guard or other part that is damaged should be properly repai...

Страница 5: ...de it If appliance does get wet allow to dry for a minimum of 48 hours DO NOT clean with a pressure washer DO NOT store the appliance on or adjacent to fertilizers or chemicals DO NOT charge appliance in rain or in wet locations Additional Safety Information WARNING ALWAYS use safety glasses Everyday eyeglasses are NOT safety glasses Also use face or dust mask if operation is dusty ALWAYS WEAR CER...

Страница 6: ... fully charged battery pack in a cool dry place out of the charger for optimal results NOTE Battery packs should not be stored completely depleted of charge The battery pack will need to be recharged before use Battery Pack Cleaning Instructions Dirt and grease may be removed from the exterior of the battery using a cloth or soft non metallic brush Do not use water or any cleaning solutions The RB...

Страница 7: ...6 10 18 16 14 12 10 12 16 16 14 12 12 16 14 12 Not Recommended Do not place any object on top of the charger or place the charger on a soft surface that might block the ventilation slots and result in excessive internal heat Place the charger in a position away from any heat source The charger is ventilated through slots in the top and the bottom of the housing Do not operate the charger with a da...

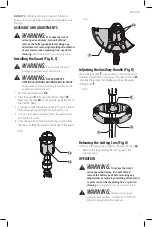
Страница 8: ... and battery pack to a location where the surrounding air temperature is approximately 65 F 75 F 18 C 24 C d If charging problems persist take the tool battery pack and charger to your local service center SAVE THESE INSTRUCTIONS FOR FUTURE USE COMPONENTS FIG A Intended Use This string trimmer is designed for household trimming and edging applications DO NOT use under wet conditions or in presence...

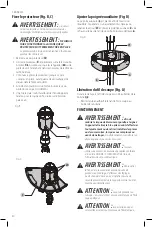
Страница 9: ...ary flip open the latch 21 and slide the auxiliary handle 4 up or down the upper trimmer pole 6 Fig D 21 4 6 Releasing the Cutting Line Fig A In transit the cutting line is taped to the spool housing 10 Remove the tape holding the cutting line to the spool housing OPERATION WARNING To reduce the risk of serious personal injury turn unit off and remove the battery pack before making any adjustments...

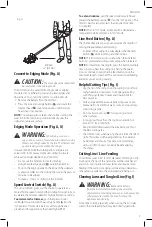
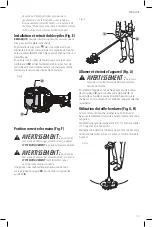
Страница 10: ...age To remove the battery pack from the tool press the release button 13 and firmly pull the battery pack out of the tool handle Insert it into the charger as described in the charger section of this manual Fig E 12 13 Proper Hand Position Fig F WARNING To reduce the risk of serious personal injury ALWAYS use proper hand position as shown WARNING Toreducetheriskofserious personalinjury ALWAYS hold...

Страница 11: ... will be decreased as compared to when trimmer is in LO mode Line Feed Button Fig A The line feed feature allows you to advance the length of cutting line available while trimming To extend the cutting line fully depress the line feed button 16 while trimming and then release NOTE The trimmer will stop cutting when the line feed button is pressed and will resume cutting when released NOTE For maxi...

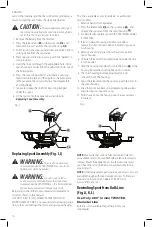
Страница 12: ...AMETER TWISTED NYLON MONOFILAMENT LINE Do not use serrated or heavier gauge line as they will overload the motor and cause overheating This line is available at your local dealer or authorized service center 1 Remove battery from appliance 2 Press the release tabs 22 on the spool cap 23 and remove the spool cap from the spool housing 10 3 For best results replace spool with CRAFTSMAN Model CMZST08...

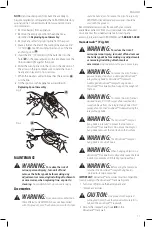
Страница 13: ...use a damaged Versatrack integral hang hook or Versatrack Trackwall A damaged Versatrack integral hang hook or Versatrack Trackwall will not support the weight of the tool WARNING To reduce the risk of serious personal injury DO NOT suspend tool overhead or suspend objects from the integral hang hook ONLY suspend tool on the Versatrack Trackwall using the integral hang hook WARNING The Versatrack ...

Страница 14: ...purchase with a receipt for a full refund no questions asked LATIN AMERICA This warranty does not apply to products sold in Latin America For products sold in Latin America see country specific warranty information contained in the packaging call the local company or see website for warranty information FREE WARNING LABEL REPLACEMENT If your warning labels become illegible or are missing call 1 88...

Страница 15: ...es matériels AVERTISSEMENT lire tous les avertissements de sécurité et toutes les directives Le non respect des avertissements et des directives pourrait se solder par un choc électrique un incendie et ou une blessure grave AVERTISSEMENT ne jamais modifier l outil électrique ni aucun de ses composants car il y a risques de dommages corporels ou matériels AVERTISSEMENT afin de réduire le risque de ...

Страница 16: ...e entreposés à l intérieur dans un endroit sec et élevé ou verrouillé hors de portée des enfants 13 Entretenez soigneusement l outil gardez bords coupants aiguisés et nettoyez pour une meilleure performance et afin de réduire le risque de blessure Pour lubrifier l outil et remplacer les accessoires suivez les directives du manuel Inspectez régulièrement la source d alimentation et si elle est endo...

Страница 17: ...tilisants des composants d insecticides d herbicides et de pesticides l arsenic et le chrome provenant du bois de construction traité chimiquement Pour réduire votre exposition à ces produits chimiques portez un équipement de sécurité approuvé comme un masque antipoussière spécialement conçu pour filtrer les particules microscopiques Limiter toute exposition prolongée avec les poussières provenant...

Страница 18: ...dans un lieu frais et sec hors du chargeur pour optimiser les résultats REMARQUE les blocs piles ne devraient pas être entreposés complètement déchargés Il sera nécessaire de recharger le bloc piles avant réutilisation Instructions d entretien du blocs pile Éliminer toute saleté ou graisse de la surface externe du blocs pile à l aide d un chiffon ou d une brosse non métallique douce N utiliser ni ...

Страница 19: ...entrer en contact avec elles et provoquer un court circuit REMARQUE il ne faut pas laisser de piles au li ion dans les bagages enregistrés Directives de sécurité importantes propres à tous les chargeurs de piles AVERTISSEMENT lisez toutes les consignes de sécurité les instructions et les symboles d avertissements du bloc piles du chargeur et du produit Tout manquement aux avertissements et instruc...

Страница 20: ...ue des blocs piles rechargeables CRAFTSMAN Tout autre type de piles pourrait exploser et causer des dommages corporels et matériels ATTENTION sous certaines conditions lorsque le chargeur est connecté au bloc d alimentation des matériaux étrangers pourraient court circuiter le chargeur Les corps étrangers conducteurs tels que mais pas limité à poussières de rectification débris métalliques laine d...

Страница 21: ...her systématiquement le chargeur avant tout entretien 6 Ne pas congeler ou immerger le chargeur dans l eau ou tout autre liquide Instructions d entretien du chargeur AVERTISSEMENT risques de chocs électriques Débrancher le chargeur de la prise de courant alternatif avant tout entretien Éliminer toute saleté ou graisse de la surface externe du chargeur à l aide d un chiffon ou d une brosse non méta...

Страница 22: ...tement est nécessaire rabattez le verrou 21 et glissez la poignée auxiliaire 4 vers le haut ou le bas de la tige du taille bordure supérieure 6 Fig D 21 4 6 Libération du fil de coupe Fig A Durant le transport le fil de coupe est collé au boîtier de la bobine 10 Retirer le ruban adhésif retenant le fil de coupe au boîtier de la bobine FONCTIONNEMENT AVERTISSEMENT afin de réduire le risque de bless...

Страница 23: ...que de dommages corporels graves adopter SYSTÉMATIQUEMENT la position des mains illustrée AVERTISSEMENT pour réduire tout risque de dommages corporels graves maintenir SYSTÉMATIQUEMENT l outil fermement pour anticiper toute réaction soudaine Une position des mains adéquate nécessite une main sur la poignée principale 14 et une main sur la poignée auxiliaire 4 Fig F 4 14 Allumer et éteindre l appar...

Страница 24: ...couper dansune croissance plus dense et pour des applications ayant besoin d un tr min plus élevé Pour prolonger la durée d exécution tirez sur le bouton de réglage de la vitesse vers le boîtier de la pile 11 en position LO Ce mode est le meilleur pour les projets plus gros qui nécessite plus de temps pour se terminer REMARQUE En mode HI la durée d opération sera diminuée par rapport à quand le ta...

Страница 25: ... vers le bas et la tourner jusqu à ce qu elle se mette en position puis l enclencher Une fois en position la bobine tournera librement de quelques degrés à gauche et à droite 7 Faire attention à ce que le fil ne se prenne pas sous la bobine 8 Ajuster la bobine sur l outil comme le décrit la section Remplacer l assemblage de la bobine Fig I 22 23 10 Remplacer l assemblage de la bobine Fig I J AVERT...

Страница 26: ... des fentes d ancrage 26 5 Insérez l extrémité du fil en vrac de 19 mm 3 4 po dans le trou 27 dans la bobine adjacente à la fente Assurez vous que le fil est bien serré contre la bobine 6 Enroulez le fil de coupe sur la bobine dans le sens de la flèche sur la bobine S assurer de bobiner le fil de façon ordonnée une couche après l autre Ne pas entrecroiser 7 Lorsque le fil de coupe enroulé atteint ...

Страница 27: ...suspension intégré 29 sur le rail mural VersatrackMC REMARQUE les accessoires VersatrackMC pour utilisation avec cet outil sont disponibles à un coût supplémentaire chez votre détaillant local ou dans un centre de services autorisé Si vous avez besoin d aide pour trouver un accessoire veuillez contacter CRAFTSMAN appelez au 1 888 331 4569 Registre en ligne Merci pour votre achat Enregistrez dès ma...

Страница 28: ...rantie de se produit sera annulée si le bloc piles a été altéré de quelque façon que ce soit CRAFTSMAN ne peut être tenu responsable de tout dommage corporel causé par l altération du produit et pourra poursuivre toute fraude en matière de garantie dans toute l étendue permise par la loi GARANTIE DE REMBOURSEMENT DE 90 JOURS Si l acheteur n est pas entièrement satisfait pour quelque raison que ce ...

Страница 29: ... lesiones graves ADVERTENCIA Indica una situación de peligro potencial que si no se evita podría provocar la muerte o lesiones graves ATENCIÓN Indica una situación de peligro potencial que si no se evita posiblemente provocaría lesiones leves o moderadas Utilizado sin palabras indica un mensaje de seguridad relacionado AVISO Se refiere a una práctica no relacionada a lesiones corporales que de no ...

Страница 30: ...a obtener el mejor desempeño y reducir el riesgo de lesiones Siga las instrucciones para lubricar y cambiar los accesorios Revise la fuente de energía del aparato periódicamente y si está dañada pida que lo reparen en instalaciones de servicio autorizadas Mantenga las manijas secas limpias y libres de aceite y grasa 14 Revise las partes dañadas Antes de utilizar el aparato se debe revisar cuidados...

Страница 31: ...as actividades de construcción Vista ropas protectoras y lave las áreas de la piel expuestas con agua y jabón Si permite que el polvo se introduzca en la boca u ojos o quede sobre la piel puede favorecer la absorción de productos químicos peligrosos ADVERTENCIA La utilización de esta herramienta puede generar polvo o dispersarlo lo que podría causar daños graves y permanentes al sistema respirator...

Страница 32: ...uede explotar si se quema Cuando se queman unidades de batería de iones de litio se producen gases y materiales tóxicos Si el contenido de la batería entra en contacto con la piel lave el área de inmediato con agua y un jabón suave Si el líquido de la batería entra en contacto con sus ojos enjuáguelos con agua y los ojos abiertos por 15 minutos o hasta que cese la irritación Si se requiere de asis...

Страница 33: ...ra que podría ser pisado causar que alguien tropiece con él o ser expuesto a otro tipo de daños y desgastes No use un alargador a menos que sea absolutamente necesario El uso de un alargador incorrecto podría producir riesgo de incendios descargas eléctricas o electrocución Cuando opere un cargador al exterior hágalo siempre en un lugar seco y use un alargador apropiado para uso al exterior El uso...

Страница 34: ... cargue la batería por completo antes del primer uso 1 Conecte el cargador en un tomacorriente apropiado antes de insertar el paquete de batería 2 Conecte el cargador y el paquete de baterías asegurándose que la batería esté completamente asentada La luz carga parpadeará continuamente indicando que el proceso de carga ha comenzado 3 La terminación de la carga se indicará por la luz que permanece e...

Страница 35: ...o tornillos para muro seco comprados por separado de un mínimo de 25 4 mm 1 de largo con una cabeza de un diámetro de 7 9 mm 0 28 0 35 atornillados en madera hasta una profundidad óptima dejando el tornillo expuesto aproximadamente 5 5 mm 7 32 Alinee las ranuras en la parte trasera del cargador con los tornillos expuestos e introdúzcalos totalmente en las ranuras Versatrack Los cargadores CRAFTSMA...

Страница 36: ...r cualquier ensamblaje ajuste o cambio de accesorios desconecte el enchufe de la fuente de alimentación Dichas medidas de seguridad preventiva reducen el riesgo de encender la herramienta en forma accidenta ATENCIÓN Antes de comenzar a podar asegúrese de utilizar únicamente el tipo adecuado de cuerda de corte ATENCIÓN Inspeccione el área por cortar y saque los alambres cables u objetos similares a...

Страница 37: ...ulo y muévala de lado a lado como se muestra en la Figura G Mantenga un ángulo de corte de 5 a 10 No exceda los 10 Corte con la punta de la cuerda Mantenga una distancia mínima de 610 mm 24 entre el protector y sus pies como se muestra en la Figura H Fig G Fig H Mínimo 610 mm 24 Conversión al Modo de Bordeado Fig A ATENCIÓN La guía del borde del cable sólo debe usarse cuando se encuentre en el mod...

Страница 38: ...l Botón de alimentación de línea una vez que se alcanza la longitud máxima Esto ocasionará una sobrealimentación y consumirá la cuerda rápidamente Consejos Útiles para Cortar Fig I Utilice la punta de la cuerda para hacer el corte no fuerce la cabeza de la cuerda en césped sin cortar Use la guía de borde a lo largo de cosas como cercas casas y jardineras como una mejor práctica Los cercos de alamb...

Страница 39: ...a línea está disponible en su distribuidor local o centro de servicio autorizado 1 Retire la batería del aparato 2 Presione las lengüetas de liberación 22 en la tapa del carrete 23 y retire la tapa del carrete del alojamiento del carrete 10 3 Para obtener los mejores resultados reemplace el carrete con CRAFTSMAN Modelo CMZST080 4 Si la palanca en la base del alojamiento se desprende vuelva a coloc...

Страница 40: ...e producto deben usarse sólo los accesorios recomendados por CRAFTSMAN Los accesorios que se recomiendan para utilizar con la herramienta están disponibles a un costo adicional en su distribuidor local o en un centro de mantenimiento autorizado Si necesita ayuda para localizar algún accesorio póngase en contacto conCRAFTSMAN o visite nuestro sitio web 1 888 331 4569 cualquier ajuste o retirar inst...

Страница 41: ...ra encontrar cualquier accesorio comuníquese con CRAFTSMAN llame al 1 888 331 4569 Fig M 29 Reparaciones El Cargador y las unidades de batería no pueden ser reparados El cargador y la unidad de batería no contienen piezas reparables ADVERTENCIA Para asegurar la SEGURIDAD y la CONFIABILIDAD del producto las reparaciones el mantenimiento y los ajustes inclusive la inspección y el cambio de las escob...

Страница 42: ...ecto debido a materiales o mano de obra defectuosos por tres años desde la fecha de compra dos años para las baterías Esta garantía no cubre falla de partes debido al desgaste normal o abuso de la herramienta Para detalles adicionales de la cobertura de la garantía e información de reparación de garantía visite www craftsman com o llame al 1 888 331 4569 Esta garantía no se aplica a accesorios o d...

Страница 43: ...tos que se venden en América Latina debe consultar la información de la garantía específica del país que viene en el empaque llamar a la compañía local o visitar el sitio Web a fin de obtener esa información REEMPLAZO GRATUITO DE LAS ETIQUETAS DE ADVERTENCIAS Si sus etiquetas de advertencia se vuelven ilegibles o faltan llame al 1 888 331 4569 para que se le reemplacen gratuitamente ...

Страница 44: ...cific information C indique que le bloc piles est compatible avec ce chargeur Lire le manuel d utilisation pour obtenir des renseignements plus précis Una C indica que el paquete de baterías es compatible con ese determinado cargador Lea el manual de instrucciones para obtener información más precisa Maximum initial battery voltage measured without a workload is 20 volts Nominal voltage is 18 La t...

Отзывы: