Craftsman 316.79248 Скачать руководство пользователя страница 7

7

OPERATING INSTRUCTIONS

OPERATING TIPS

• Avoid blade thrust.  Blade thrust can result in severe injury or

death. 

• Do not operate the bladed pruner while in a tree, on a ladder or

any other unstable work surface, or in any awkward position. You
may lose control of the bladed pruner causing severe injury.

• Do not extend your arms above shoulders when using the bladed

pruner. 

• Seek professional help if you are facing conditions beyond your

ability.

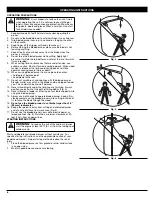
• Trimming a tree is the process of cutting limbs from a living tree.

Make sure your footing is firm. Keep your feet apart. Divide your
weight evenly on both feet.

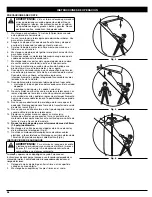
To trim a limb (pruning):
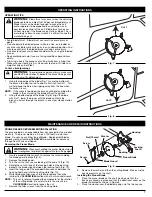
1.

Using the top edge of the blade (Fig. 7), score the bottom of
the branch to a depth of up to about a half inch for Cut 1.  This
will help keep the bark from ripping away from the tree when
the branch is cut.

NOTE:

If the score is too deep, the branch will bend and bind the
blade in the cut making the blade difficult to pull out.

2.

Using the bottom edge of the blade (Fig. 8), align the blade
with Cut 1, lower the pruner until the blade contacts the
branch, and cut through the branch in one slow, steady motion
(Cut 2).

Fig. 7

Cut 1

WARNING: 

Blade thrust may occur when the spinning

blade contacts an object that it does not immediately cut.
Blade thrust can be violent enough to cause the unit
and/or operator to be propelled in any direction, and
possibly lose control of the unit. Blade thrust can occur
without warning if the blade snags, stalls or binds. This is
more likely to occur in areas where it is difficult to see the
material being cut.

WARNING: 

To avoid serious personal injury, make sure

you NEVER stand directly beneath the branch being cut or
in the arc of its detachment.

Fig. 8

Cut 2

MAINTENANCE AND REPAIR INSTRUCTIONS

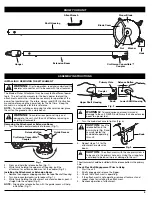
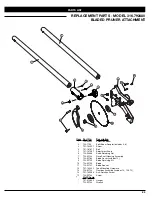
PRUNER BLADE REPLACEMENT/INSTALLATION

The pruner blade is an expendable item not covered by the product
warranty.  The pruner blade is a 5.5-inch 100-tooth circular saw
blade.  Do not use any other type of blade.  Replacement blades
(replacement part number 

753-05740

) are available for purchase

through Sears Parts and Repair.

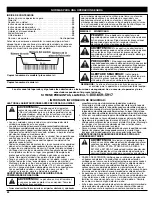
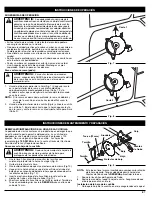
Removing the Pruner Blade

1.

Use the provided Allen wrench to remove the screws holding
the blade guard in place (Fig. 9).

2.

Remove the blade guard.

3.  Turn the unit so that you are looking at the end of it (Fig. 10).
4.

Rotate the nut until one of the locking holes on the bushing
beneath the blade aligns between the locking teeth (Fig. 10).

5.

Insert the long end of the provided Allen wrench between the
Locking Teeth and into the Locking Hole (Fig. 10).

6.

While holding the Allen wrench in the hole, remove the nut by
turning it in a 

CLOCKWISE

direction with a 13 mm socket wrench.

NOTE:

This nut is reverse-threaded to compensate for the rotation
of the cutting blade.  Be careful to turn the wrench in a

CLOCKWISE

direction to loosen the nut.

7.

Remove the Allen wrench from the Locking Hole.

WARNING: 

Whenever handling the pruner blade, always

wear work gloves for protection against sharp cutting edges.

Fig. 9

Screw

Screw

Blade Guard

Nut (13 mm)

Washer

Housing

Bushing

8.

Remove the washer and then the cutting blade.  Make sure the
bushing remains on the shaft.

Installing the Pruner Blade

1.

Place the pruner blade on the shaft making sure that the
bushing is already in place and that the directional arrow on the
blade is oriented as shown in Figure 9.

2.

Place the washer over the blade making sure the the convex

Pruner Blade

Locking

Teeth

Содержание 316.79248

Страница 1: ...te www sears com craftsman CAUTION Before using this product read this manual and follow all safety rules and operating instructions Operator s Manual Bladed Pruner ATTACHMENT Model No 316 792480 SAFETY ASSEMBLY OPERATION MAINTENANCE PARTS LIST ESPAÑOL P E1 769 03520A ...

Страница 2: ...w it to cool before filling the fuel tank Never remove the cap of the fuel tank or add fuel when the engine is hot Never operate the unit without the fuel cap securely in place Loosen the fuel tank cap slowly to relieve any pressure in the tank IMPORTANT SAFETY INSTRUCTIONS Read the Operator s Manual and follow all warnings and safety instructions Failure to do so can result in serious injury to t...

Страница 3: ...ld be carefully checked to determine that it will operate properly and perform its intended function Check for alignment of moving parts binding of moving parts breakage of parts mounting and any other conditions that may affect its operation A guard or other part that is damaged should be properly repaired or replaced by an authorized service center unless otherwise indicated in this instruction ...

Страница 4: ...s Contact with a power line may cause serious injury or damage to the unit Maintain a clearance of at least 50 ft 15 m between the bladed pruner including any branches it is contacting and any electrical line USE BOTH HANDS Always use both hands while operating the bladed pruner Never use only one hand to operate the unit SAFETY ALERT SYMBOL Indicates danger warning or caution May be used in conju...

Страница 5: ...ing the release button with the guide recess will help installation Fig 1 WARNING Prior to operation read and understand the operator s manual for unit to be used with this attachment WARNING To avoid serious personal injury and damage to the unit shut the unit off before removing or installing attachments Fig 1 Release Button Guide Recess Knob 4 Turn the knob clockwise to tighten Fig 3 5 Repeat s...

Страница 6: ...ion yourself out of the path of falling debris Fig 4 13 Never stand on a ladder or other type of unstable support while using the bladed pruner 14 Always use both hands to operate bladed pruner Keep a firm steady pressure on the bladed pruner while cutting but do not try to force the blade through the wood 15 Do not use the bladed pruner to cut limbs larger than 1 5 38 mm in diameter 16 Keep other...

Страница 7: ...njury make sure you NEVER stand directly beneath the branch being cut or in the arc of its detachment Fig 8 Cut 2 MAINTENANCE AND REPAIR INSTRUCTIONS PRUNER BLADE REPLACEMENT INSTALLATION The pruner blade is an expendable item not covered by the product warranty The pruner blade is a 5 5 inch 100 tooth circular saw blade Do not use any other type of blade Replacement blades replacement part number...

Страница 8: ...ench Replacing the Pruner Blade If you need to replace the pruner blade you can replace it with a 5 5 inch 100 tooth circular saw blade CLEANING Use a small brush to clean off the outside of the unit Do not use strong detergents Household cleaners that contain aromatic oils such as pine and lemon and solvents such as kerosene can damage plastic housing or handle Wipe off any moisture with a soft c...

Страница 9: ...man PRECAUCIÓN Antes de utilizar este producto lea este manual y siga todas las reglas de seguridad y las instrucciones de funcionamiento Manual del Operador Accesorio de PODADORA CON CUCHILLA CIRCULAR Modélo No 316 792480 SEGURIDAD MONTAJE FUNCIONAMIENTO MANTENIMIENTO LISTADO DE PIEZAS 769 03520A ...

Страница 10: ...y la conexión de la unidad a la corriente Revise con cuidado para ver si hay deterioros cortes o grietas en el aislamiento Inspeccione también las conexiones para ver si han sufrido daños Cambie los cables si observa algún defecto o daño Evite la desconexión del cable de extensión del cabezal motorizado de la cortadora de setos durante el funcionamiento utilizando un retenedor de enchufe receptácu...

Страница 11: ...odadora de sierra circular cuando esté cansado Cuando el motor esté funcionando mantenga todas las partes del cuerpo alejadas de la cuchilla Antes de arrancar la cuchilla asegúrese de que la hoja de la cuchilla no haga contacto con ningún objeto Desconecte la podadora de sierra circular cuando no la use antes de dar mantenimiento y cuando cambie las cuchillas Compruebe las piezas dañadas Antes de ...

Страница 12: ... estar caliente Asegúrese de que la cuchilla esté bien apretada Inspeccione visualmente la cuchilla para ver si está dañada Repare el daño antes de volver a arrancar y hacer funcionar la unidad No corte cerca de cables ni líneas eléctricas No utilice la podadora de sierra circular para cortar un árbol Use una sierra de cadenas estándar para esta tarea MANTENIMIENTO Y ALMACENAJE Deje que el motor s...

Страница 13: ... línea recta en el acoplador Fig 2 ADVERTENCIA Lea y comprenda el manual del operador de los accesorios antes de su operación ADVERTENCIA Para evitar graves lesiones personales apague la unidad antes de sacar o instalar accesorios Fig 1 Acoplador de Craftsman Convertible Botón de desconexión Hueco de Guía Botón NOTA La alineación del botón de desconexión con la guía ayuda en la instalación Fig 1 4...

Страница 14: ...que pierda el balance 12 Nunca se pare directamente por debajo de la rama que esta podando Siempre posicionese fuera de la trayectoria de caida de dichas ramas Fig 4 13 Nunca se pare en una escalera o otro tipo de soporte inestable cuando utilice la motosierra telescopica 14 Siempre use ambas manos al operar su motosierra telescopica Mantenga una presion firme y constante en la motosierra telescop...

Страница 15: ...stá cortando ADVERTENCIA Para evitar lesiones personales graves asegúrese de NUNCA pararse directamente detrás de la rama que se está cortando o en el arco de su esprendimiento Fig 8 Corte 2 INSTRUCCIONES DE OPERACIÓN INSTRUCCIONES DE MANTENIMIENTO Y REPARACIÓN REEMPLAZO INSTALACIÓN DE LA HOJA DE LA CUCHILLA La podadora de sierra circular es un producto que se desgasta que no está cubierto por la ...

Страница 16: ...ista Remplazo de la hoja de la cuchilla Si necesita sustituir la hoja puede reemplazarla por una de 5 5 pulgadas y 100 diente hoja circular LIMPIEZA Use un cepillo pequeño para limpiar la parte exterior de la unidad No utilice detergentes fuertes Los limpiadores caseros que contienen aceites aromáticos como el pino y limón y los disolventes como el queroseno pueden dañar la caja de plástico o la m...

Страница 17: ... Adjustment Knob 6 753 04386 Knob Retaining Nut 7 753 05724 Drive Shaft Housing Assembly 8 753 05763 Blade Cover includes 15 9 753 05739 Blade Retaining Kit 10 753 05740 Blade 11 753 05741 Blade Spacer 12 791 182425 Tube Mounting Hardware 13 753 05742 Gearbox Assembly includes 12 14 15 14 791 180288 Anti Rotation Screw 15 753 05743 Screw Not Shown 791 612605 Hanger 753 05744 Wrench 1 13 14 10 11 8...

Страница 18: ...E10 NOTES ...

Страница 19: ...E11 NOTES ...

Страница 20: ...that you need to do it yourself For Sears professional installation of home appliances and items like garage door openers and water heaters 1 800 4 MY HOME 1 800 469 4663 Call anytime day or night U S A and Canada www sears com www sears ca Our Home For repair of carry in items like vacuums lawn equipment and electronics call anytime for the location of your nearest Sears Parts Repair Service Cent...

Отзывы: