background image


4


ALWAYS

 read and understand the 

user manual before operating the 
grinder. 


MAKE SURE 

you are wearing safety 

glasses while operating the grinder. 
The small particles becoming airborne 
during grinding operation can seriously 
damage your eyes. 


ALWAYS 

wear a dust mask or a 

respirator while grinding. The dust 
produced during grinding process can 
lead to serious respiratory problems if 
inhaled. 


MAKE SURE 

before making any 

adjustments, servicing or installing 
parts, the switch is in the “OFF” 
position, and the cord is un-plugged 
from the power source. 


MAKE SURE 

the RPM of the wheel 

you are installing on the grinder is 
equal to or higher than the speed of 
the grinder. Operating wheels at a 
higher speed than rated for may cause 
the wheel to lie apart, fly or break. 


MAKE SURE 

to keep your hands at a 

safe distance from the wheel. 


NEVER LEAVE 

the grinder unattended 

while it is running. 


MAKE SURE

 to do a test on the 

grinding wheels before installation. 
Wheels that do not pass the test are not 
safe to use. See page-8 for details. 


ALWAYS

 stand to the side of the 

grinder when turning it ON and let the 
wheel reach full speed. Stand at least 
one minute to the side of the grinder 
after startup. A damaged wheel can 
break apart and fly shortly after starting 
the grinder. 


DO NOT

 grind on the side of the wheel, 

unless the wheel is rated for side 
grinding. 


ALWAYS 

keep the tool rest within 1/8” 

distance from the wheel while operating 
the grinder. 


MAKE SURE 

you have read and 

understood all the safety instructions in 
the manual and you are familiar with 
your grinder, before operating it. If you 
fail to follow the instructions given in this 
user manual, serious injury could occur.
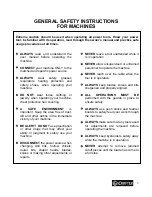
 

WARNING 

The safety instructions given above can not be complete because the environment in 
every shop is different. Always consider safety first as it applies to your individual 
working conditions

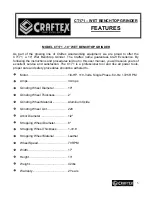
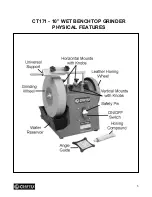
CT171 - 10” WET BENCHTOP GRINDER 

SPECIFIC SAFETY INSTRUCTIONS


Содержание CT171

Страница 1: ...CT171 10 WET BENCHTOP GRINDER User Manual ...

Страница 2: ...tures 6 Proper Grounding 7 Un Packing 8 Grinding Wheel 8 Grinding Surface 8 Test Run 9 Water Reservoir 9 Universal Support 10 Grinding with the Rotation of the Wheel 10 Grinding Against the Rotation of the Wheel 10 Angle Guide 11 Honing Compound 11 Replacing the Grinding Wheel 12 Parts Breakdown 13 Parts List 14 Warranty 15 ...

Страница 3: ...O NOT use prescription or other drugs that may affect your ability or judgment to safely use your machine DISCONNECT the power source when changing drill bits hollow chisels router bits shaper heads blades knives or making other adjustments or repairs NEVER leave a tool unattended while it is in operation NEVER allow unsupervised or untrained personnel to operate the machine NEVER reach over the t...

Страница 4: ...hile it is running MAKE SURE to do a test on the grinding wheels before installation Wheels that do not pass the test are not safe to use See page 8 for details ALWAYS stand to the side of the grinder when turning it ON and let the wheel reach full speed Stand at least one minute to the side of the grinder after startup A damaged wheel can break apart and fly shortly after starting the grinder DO ...

Страница 5: ...d satisfaction The C171 is a professional tool and like all power tools proper care and safety procedures should be adhered to Motor 1 4 HP 110 Volts Single Phase 60 Hz 1725 RPM Amps 3 Amps Grinding Wheel Diameter 10 Grinding Wheel Thickness 2 Grinding Wheel Material Aluminum Oxide Grinding Wheel Grit 220 Arbor Diameter 1 2 Stropping Wheel Diameter 8 Stropping Wheel Thickness 1 3 16 Stropping Whee...

Страница 6: ...6 CT171 10 WET BENCHTOP GRINDER PHYSICAL FEATURES ...

Страница 7: ...ttached to the metal screw of the receptacle Figure 1 110 Volts outlet for CT171 It is strongly recommended not to use extension cords with your CT171 Always try to position your machine close to the power source so that you do not need to use extension cords In case if you really find it necessary to use an extension cord make sure the extension cord does not exceed 50 feet in length and the cord...

Страница 8: ...rnal damages Take the wheel up with a finger through the hole located in the middle of the wheel and tap it using a wooden mallet or a light non metallic object as shown in figure 2 Figure 2 Tapping locations on the grinding stone when inspecting for internal damage Tapping the wheel with the mallet will create a sound based on which you will be able to know if the wheel is damaged or not If the w...

Страница 9: ...oir Do no attempt to perform grinding on this machine without water If the grinder is used without water it will either damage the grinding wheel or the tool you are grinding The water reservoir is equipped with mounting tabs used to hook to the slots on the grinder body The water reservoir can be attached to the lower slots of the grinder body when the grinder is not in use while it is attached t...

Страница 10: ... knobs properly as shown in figure 5 Figure 5 Installing the universal support horizontally for grinding with the rotation of the wheel GRINDING AGAINST THE ROTATION OF THE WHEEL Grinding against the rotation of the wheel removes a large amount of material in a very short time and finally the result will not be very smooth Coarse tools are sharpened against the rotation of the wheel To set the uni...

Страница 11: ... wheel with the side having the best fit measuring notch as shown in figure 8 Figure 8 Using angle guide Adjust the universal support or the tool so that the sharpened edge of the tool is flat against the grinding wheel and the angle guide HONING COMPOUND The CT171 comes with honing compound used on the leather honing wheel to give smooth and razor sharp edge results when sharpening tools Make sur...

Страница 12: ... in the OFF position and the cord is disconnected from the power sourc Loosen the nut shown in figure 10 securing the grinding wheel by holding the wheel with one hand Remove the nut washer and grinding wheel and replace the wheel with a new one Make sure to inspect the new grinding wheel properly before installation For details see GRINDING WHEEL on page 8 Figure 10 Nut and washer holding the whe...

Страница 13: ...13 ...

Страница 14: ...14 ...

Страница 15: ... handy All returned merchandise will be subject to a minimum charge of 15 for re stocking and handling with the following qualifications Returns must be pre authorized by us in writing We do not accept collect shipments Items returned for warranty purposes must be insured and shipped pre paid to the nearest warehouse Returns must be accompanied with a copy of your original invoice as proof of purc...

Отзывы: