background image

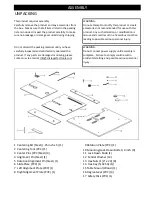
UNPACKING

This product requires assembly
Carefully remove the product and any accessories from 
the box.  Makes sure that all items listed in the packing 
list are included. Inspect the product carefully to make 
sure no breakage or damage occurred during shipping

Do not discard the packing material until you have 
carefully inspected and satisfactorily operated the 
product. If any parts are damaged or missing, please 
contact us via email at [email protected].

1  Centering Bit (Steel) ( .25 inch x 5) (1)

  9 Rotation Plate (PVC) (1)

2  Centering Tool (PVC) (1)
3  Center Pins (PVC/Steel) (3)

11  Lock Down Knob (1)

4  Alignment Pin (Steel) (1)

12  Fender Washer (12)

5  Rotation Alignment Pin (Steel) (1)

13  Hex Nuts (1/4" x 20) (8)

6  Slide Plate (PVC) (1)

14  Hex Key (5/32 SA) (1))

7  Left Alignment Plate (PVC) (1)

15 Table Mount (Wood) (1)

8  Right Alignment Plate (PVC) (1)

16 Degree Gear (PVC) (4)
17  Safety Disk (PVC) (1)

10 Mounting/Lock Down Bolts-1/4 inch (9)

ASSEMBLY

WARNING:
Do not attempt to modify this product or create 
accessories not recommended for use with this 
product. Any such alteration or modification is 
misuse and could result in a hazardous condition 
leading to possible serious personal injury.

WARNING:                                                                       
Do not connect power supply until assembly is 
complete.  Failure to comply could result in 
accidental starting and possible serious personal 
injury. 

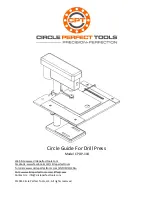
Содержание CPDP-104

Страница 1: ...e www circleperfecttools com Facebook www facebook com circleperfecttools Tutorials www circleperfecttools com VIDEOS c20ku FAQ www circleperfecttools com faq cavw Contact Us info circleperfecttools com 2014 Circle Perfect Tools LLC All rights reserved ...

Страница 2: ... 9 USING THE RIGHT TOOL Do not force tool or attachments to do a job for which it was not designed 10 USE PROPER EXTENSION CORD Make sure your extension cord is in condition 11 DRESS PROPERLY Do not wear loose clothing neckties or jewelry that can get caught and draw you into moving parts Wear protective hair covering to contain long hair 12 ALWAYS WEAR SAFETY GLASSES WITH SIDE SHIELDS Everyday ey...

Страница 3: ...Center Pins PVC Steel 3 11 Lock Down Knob 1 4 Alignment Pin Steel 1 12 Fender Washer 12 5 Rotation Alignment Pin Steel 1 13 Hex Nuts 1 4 x 20 8 6 Slide Plate PVC 1 14 Hex Key 5 32 SA 1 7 Left Alignment Plate PVC 1 15 Table Mount Wood 1 8 Right Alignment Plate PVC 1 16 Degree Gear PVC 4 17 Safety Disk PVC 1 10 Mounting Lock Down Bolts 1 4 inch 9 ASSEMBLY WARNING Do not attempt to modify this produc...

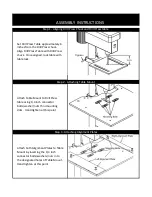
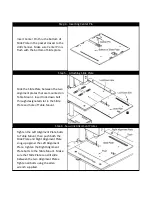
Страница 4: ...nt to Drill Press table using 1 4 inch connector bolts washer nuts thru mounting slots Hand tighten at this point Attach both Alignment Plates to Table Mount by inserting the 1 4 inch connector bolts washers nuts into the designated holes of Table Mount Hand tighten at this point Step 1 Aligning Drill Press Chuck and Drill Press table Step 2 Attaching Table Mount Step 3 Attaching Alignment Plates ...

Страница 5: ...two alignment plates that are mounted on Table Mount Insert lock down bolt through designated slot in the Slide Plate and hole of Table Mount Tighten the Left Alignment Plate bolts to Table Mount then push both the Slide Plate and Right Alignment Plate snug up against the Left Alignment Plate tighten the Right Alignment Plate bolts to the Table Mount Make sure that Slide Plate can still slide betw...

Страница 6: ...nt Pin into the Left Alignment Plate at the For Black Scale position Slide the Slide Plate to the 5 inch mark of the Left Alignment Plate Seat the Alignment Pin into the Slide Plate Secure Slide Plate into place by tightening the Lock Down bolt Step 7 Inserting Alignment Pin and securing Slide Plate Step 8 Centering Circle Guide to Drill Press Bit Step 9 Attaching Rotation Plate for use with Degre...

Страница 7: ...res the rotation of material around a Center Pin Please perform these basic steps before drilling to prepare your material Drill a 1 8 English or 3mm Metric hole in material which will be the center point of your circle Drill the hole as perpendicular as possible to ensure precise rotation around the Center Pins Move the Slide Plate into desired position in order to set the radial distance If usin...

Страница 8: ...proceed to drilling a hole Release the Rotation Alignment Pin and rotate material when drill bit is raised Lock into next Degree Gear slot and drill another hole Continue this process to drill holes in a circular pattern at the current radial distance Repeat steps as needed Attach the desired Degree Gear by first placing the material onto the Center Pin using 1 8 English or 3mm Metric hole bottom ...

Страница 9: ...e any abrasive particles and or spurs from face of material before rotating to prevent damage to the surface of the Circle Guide tool When using large drill bits or Forstner bits do not drill hole all the way through the material First start by drilling a pilot hole half way through the material then flip over material and finish drilling This will also prevent drilling holes through the Circle Gu...

Страница 10: ......

Отзывы: