background image

Use and Care Manual

10/11

Note: 

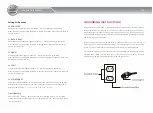
 Ensure sufficient space around the chair. When backrest reclining and footrest is being 

raised, the minimum 31.5 inches space must be ensured both at the front and the back of chair.

Bottom of the chair may damage the tatami mattress or floor. It is recommended to spread a 

mat under the chair.

CHAIR INSTALLATION & MOVING

• 


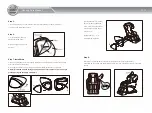
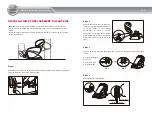
Carefully remove seat base from box.  Remove the bolt and retaining clip from the backrest 

actuator and set aside.

Step 1:

• 


Remove the backrest from the box and attach it to the seat base. 

DO NOT rest it on the 

floor vertically otherwise damage to the backrest bracket will occur.

 Make sure that the seat 

is at its most upright position when resting the pivot pins to the cradle point on the seat base. 

Step 2:

• 


 Use the bolt to attach the backrest bracket to the actuator and secure with the retaining clip.

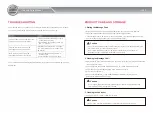
A: Connecting rod

B: Fork

C: Flat head rivet

D: Split pin

Step 3:

• 


Connect backrest air hoses.

Step 4:

Wellness for Home

at lease 31.5

at lease 31.5

Содержание EC-670

Страница 1: ...CA 91746 Tel 1 877 977 0656 Fax 1 800 521 4712 Email service cozziausa com WWW COZZIAUSA COM See more product update at WWW COZZIAUSA COM See more product update at Wellness for Home Wellness for Hom...

Страница 2: ...k shoulder arm back seat and legs Speakers for music and LED lighting surround you to create a relaxing and comfortable massage experience Unique and effective roller massage at soles Additional lumba...

Страница 3: ...t Use this massage chair only for its intent use as described in this manual Never operate this massage chair if it has a damaged cord or plug if is not working properly if it has been dropped or dama...

Страница 4: ...impairment have joint dysfunction such as rheumatism hammertoe or gout have a pacemaker or other electronic medical devices may be pregnant have phlebitis or thrombosis have an increased risk for bloo...

Страница 5: ...ssionally serviced or repaired Do not attempt to disassemble or repair the massage chair by yourself 5 Assembly and Repair of the Massage Chair Check that the Alternating Current AC voltage correspond...

Страница 6: ...anels carton 28 7 x 13 8 x 39 6 Weight Gross weight Seat Base 148lbs Backrest 110lbs Side Panels 50 8lbs Net weight Seat Base 130lbs Backrest 95lbs Side Panels 44lbs Length of wiring Controller wiring...

Страница 7: ...e bolt and retaining clip from the backrest actuator and set aside Step 1 Remove the backrest from the box and attach it to the seat base DO NOT rest it on the floor vertically otherwise damage to the...

Страница 8: ...t from arm panel to the air tube G at the side of seat base Carefully route the air hose through the frame and securely attach so that it won t get pinched during the assembly of the arms 3 Attach the...

Страница 9: ...ver this lessens the strength of the massage Step 10 1 Restore the footrest to its original position 2 Recline the chair to tilt approximately 45 degrees Move the chair using the wheels as the fulcrum...

Страница 10: ...ctivated the timer is preset at 15 minutes Every single press on this button will change the timer interval in the sequence of 20 25 30 5 10 15 20 minutes 2 TIMER Press this button once to halt curren...

Страница 11: ...p Control Button Press this button to activate full body twisting massage by air squeezing located on back and seat Press this button again to stop the ZIG ZAG function 17 ZIG ZAG Press this button to...

Страница 12: ...function is engaged every single press on this button will change the massage width interval in the sequence of Narrow Medium Wide in cycle 27 WIDTH The Speed Adjustment Button for Tapping Clapping S...

Страница 13: ...ton 5 levels of intensity to be adjusted Press this button once to activate rhythmic air massage at shoulder Press this button again to stop the function 30 SHOULDER Back and Seat Air Squeeze Massage...

Страница 14: ...are not functioning This massage chair is controlled by a microcomputer and is thus susceptible to power surges of 10 to 15 The following situations may arise in the event of a power surge If you con...

Страница 15: ...nd does not constitute a defect under this warranty Fading wear and piling of fabric occurs naturally and does not constitute a defect under this warranty Natural markings grain and dye variations in...

Страница 16: ...injury medical problems even if the other party has been advised of the possibility of such damages or possible problems Warranties are non transferable and shall be in lieu of any other warranty exp...

Страница 17: ...ED pour musique relaxante et ambiance de massage plus douce et confortable Le fauteuil comporte des rouleaux de massage uniques et efficaces au niveau de la plante des pieds Vous pouvez vous pr valoir...

Страница 18: ...e fonctionne pas correctement s il a t chapp ou endommag ou encore s il est tomb dans l eau Dans ces cas communiquez avec le service la client le Tenez la fiche d alimentation lectrique loin des surfa...

Страница 19: ...ns une pi ce froide n augmentez pas brusquement la temp rature de la pi ce On vous recommande d augmenter graduellement la temp rature jusqu l atteinte de la temp rature souhait e Si vous entreposez l...

Страница 20: ...onter ou de r parer le fauteuil de massage par vous m me 5 Assemblage et r paration du fauteuil de massage Assurez vous que la tension du courant alternatif c a correspond aux sp cifications indiqu es...

Страница 21: ...largeur x hauteur Si ge 52 4 x 30 4 x 25 8 Dossier 56 3 x 30 x 22 6 Panneau lat ral 28 7 x 13 8 x 39 6 Poids Poids brut Si ge 148lbs Dossier 110lbs Panneau lat ral 50 8lbs Poids net Si ge 130lbs Doss...

Страница 22: ...er la moquette ou le plancher On recommande donc de placer un tapis sous le fauteuil au moins 31 5 in au moins 31 5 in B A A B Retirez le dossier de la bo te et attachez le la base du si ge NE LE D PO...

Страница 23: ...partir du dossier avec la prise correspondante sur la bo te de commande lectrique ensuite relevez le dossier du si ge tape 5 Fixez le coussin du dossier sur le dossier gr ce la fermeture clair Alignez...

Страница 24: ...housse Vous obtiendrez ainsi un massage moins en profondeur tape 10 Coussin de contr le d intensit du massage pour le dos D placer le fauteuil 1 Replacez l appui pieds sa position originale 2 Incline...

Страница 25: ...Enfoncez ce bouton pour faire appara tre l indication ON sur l cran ACL Enfoncez par la suite toute fonction de massage pour faire d marrer le massage La minuterie d marrera alors Enfoncez de nouveau...

Страница 26: ...nouveau le bouton pour arr ter la fonction de massage en zigzag 17 MASSAGE EN ZIG ZAG ZIG ZAG Il s agit du bouton de contr le de la mise en marche et de l arr t de la fonction de massage par roulemen...

Страница 27: ...a mise en marche et de l arr t de la fonction de roulement du fauteuil 3 largeurs Lorsque le mode 2 de massage par claquade est activ enfoncez ce bouton pour activer la fonction de massage par rouleme...

Страница 28: ...it Enfoncez ce bouton pour activer la fonction de massage l air pour les paules Enfoncez de nouveau le bouton pour arr ter la fonction 30 PAULES SHOULDER Il s agit du bouton de contr le de la mise en...

Страница 29: ...ectrique est d branch e de la source d alimentation lectrique Enlevez la poussi re et la salet du fauteuil de massage au moyen d un chiffon sec doux et propre apr s l usage Vous pouvez nettoyer ce pro...

Страница 30: ...si que la preuve d achat dat e re u de vente s ils communiquent avec le service la client le de COZZIA au sujet de r parations Les repr sentants du service la client le de COZZIA pourront r pondre la...

Страница 31: ...lit de tels dommages ou d autres probl mes Les garanties ne sont pas transf rables et ont priorit sur toute autre garantie expresse ou tacite y compris sans toutefois s y limiter toute garantie tacite...

Страница 32: ...WWW COZZIAUSA COM Obtenez davantage de mises jour au sujet du produit sur le site Wellness for Home Manuel d instructions et d entretien EC 670 Fauteuil de massage...

Отзывы: