Covert EZ-CLOCKDV Скачать руководство пользователя страница 3


EZ-CLOCKDVR – Covert Clock Radio Digital Video Recorder Manual 


Product Description 


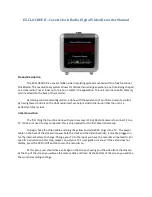
The EZ-CLOCKDVR is a covert hidden video recording system mounted within a fully functional 

Clock Radio. This revolutionary system allows for discreet monitoring anywhere, any time. Being shaped 
as a clock radio it never looks out of place, no matter the application. The unit records to an SD Memory 
card inserted into the back of the recorder. 


Recording control and configuration is done with the assistance of an infrared remote control; 

by having fewer controls on the clock radio itself, we help maintain the illusion that the unit is a 
perfectly ordinary clock. 

 
Initial Connection 


The first thing that must be done with your new covert Clock Radio Camera is to connect it to a 

TV. It does not need to stay connected, this is only needed for the first-time initial setup. 


To begin, Take the Video cable and plug the yellow and white RCA plugs into a TV.  The power 

cable on the back of the clock will power both the clock and the Video Recorder, it must be plugged in 
for the internal battery to charge. Change your TV to the input you have the recorder connected to. For 
specific instructions on this step, please consult your TV’s user guide or manual. If the video does not 
display, press the VR On/Off button to turn the recorder on. 


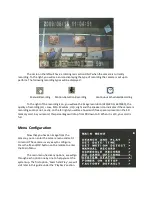
At this point, you should have an image on the screen showing you the video from the camera. 

At the top of the screen you will see the camera date and time. At the bottom of the screen you will see 
the current recording settings. 

Содержание EZ-CLOCKDV

Страница 1: ...ck of the Radio 3 Plug the camera in to a TV Monitor or other device using the RCA video inputs on the camera cable Switch your TV Monitor to the video input you ve plugged it into You should now see the camera image on the screen 4 Open the camera menu by pressing the menu button on the Infrared Remote Go down to the schedule menu and press enter to open it up 5 Using the up down and left right b...

Страница 2: ...g the VR On Off button on the top of the Clock Radio 2 Ensure that a SD memory card has been inserted into the back of the Radio 3 Plug the camera in to a TV Monitor or other device using the RCA video inputs on the camera cable Switch your TV Monitor to the video input you ve plugged it into You should now see the camera image on the screen 4 Open the camera menu by pressing the menu button on th...

Страница 3: ...first thing that must be done with your new covert Clock Radio Camera is to connect it to a TV It does not need to stay connected this is only needed for the first time initial setup To begin Take the Video cable and plug the yellow and white RCA plugs into a TV The power cable on the back of the clock will power both the clock and the Video Recorder it must be plugged in for the internal battery ...

Страница 4: ...and the speaker icon indicates if the camera is recording audio or not Lastly on the far right you will see how much free space is present on the SD memory card As you record this percentage will drop from 99 down to 0 When it is at 0 your card is full Menu Configuration Now that you have an image from the camera you can enter the camera menu and set it to record The camera is very easy to configu...

Страница 5: ... between red and white Del Block This option allows you to delete Change to white an entire block at a time Move the cursor to one corner of the block and press Menu OK Now move the cursor to another corner of the block You will see the block turn blue Press Menu OK to delete the entire blue area and change it all to white Del All This option allows you to delete Change to white the entire screen ...

Страница 6: ...a records during certain times of day Use the up down arrows to select which hour of the day to adjust Use the left right arrows to adjust whether the camera records using Continuous recording Motion Recording Alarm Recording All or None When set to All the camera will follow whatever settings are chosen for Continuous recording until motion is seen at which time the Motion Recording settings are ...

Страница 7: ...atting cannot be undone so do not use this option if there are any images you wish to keep If you wish to format press the Menu OK button Otherwise press the Return Stop button SYSTEM STATUS This screen shows you the status of the system including what the card full action to take is and the recording settings for all recording types Manual Alarm Motion Detection Continuous There are no settings o...

Страница 8: ...amera has recorded and how many files were recorded on that date Below that you will see up to 9 icons each icon represents one file and the type of icon Finger Man Clock represents the type of recording that was made Manual Motion Detection and Continuous recording Respectively The Time field at the bottom shows you the time of day the highlighted clip was recorded To play back a clip use the up ...

Страница 9: ...sure the power supply is snugly connected to the power connection on the cable The Power Supply may have a damaged fuse or connection Contact technical support or replace with 12V 500mA Unit Image is Distorted Ensure the TV Output is set correctly Most units in North America require NTSC Ensure the outlet that the power supply is connected to is properly grounded Proximity to large amounts of othe...

Отзывы: