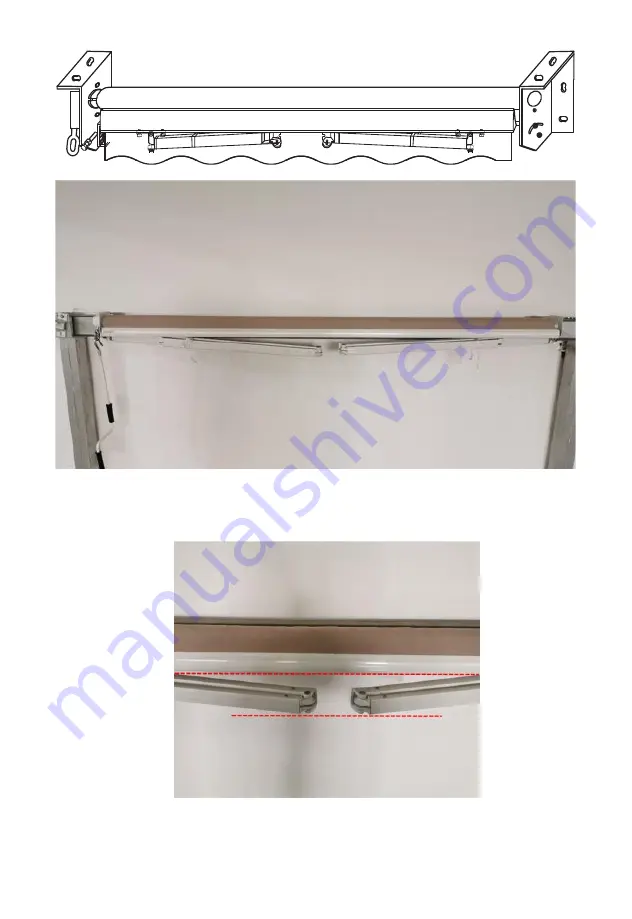
D
C1
C2
When we have completed all the above steps, the product
installation is complete.
Please note: C1 and C2 arms are basically on the same parallel plane in
their natural state
1
8
Страница 1: ...Retractable Awning OP70368 USER S MANUAL THIS INSTRUCTION BOOKLET CONTAINS IMPORTANT SAFETY INFORMATION PLEASE READ AND KEEP FOR FUTURE REFERENCE ...
Страница 2: ...e proper order We recommend that where possible all items are assembled near to the area in which they will be placed in use to avoid moving the product unnecessarily once assembled Always place the product on a flat steady and stable surface Keep all small parts and packaging materials for this product away from babies and children as they potentially pose a serious choking hazard 02 ...
Страница 3: ...x1 A A1 A2 x1 C C1 C2 I 1 I 2 1pc for backup 1pc for backup 2pcs for backup x1 E x1 G x1 I x2 K x3 M x4 N x1 O x5 J x10 L x1 F x3 H x1 D D1 D2 x1 B B1 B2 03 ...
Страница 4: ...ench wrenches of M17 and M14 Please prepare below tools before assembly Not included Preparing Your Work Space 1 Before you begin it is best to lay out all necessary tools to make setup smoother Refer to the required tools section for the list of necessary tools 04 A1 A2 L E F C2 J D1 D2 J K L G I 1 I 2 O J J K M M B1 B2 N C1 ...
Страница 5: ...he parts diagram for detailed information regarding parts 4 Open the small inner box that contains the small parts and lay them out as well 5 It is recommended that at least 2 people install 1 Gather the two long silver tubes B1 B2 and lay them in a line 2 Insert the roller tube B2 into the interior end of the roller tube B1 If insertion is difficult use a mallet to tap it gently into place 3 Once...
Страница 6: ...necting Front Bars 1 Insert the front bar D2 into the interior end of the front bar D1 If insertion is difficult use a mallet to tap it into place 2 Once inserted fix it into place with screws L and tighten the screw nut on the bar 06 ...
Страница 7: ... awning fabric F as well as the valance G 5 Once the liners are threaded through the fabric find the roller tube Thread the fabric and its liner through the slot in the roller tube all the way to the end Note the fabric has a front and a back side The back side has a hem and should face downwards Then thread the other end of the awning fabric through the slot in the front bar Wedge shaped piece Th...
Страница 8: ...Roll the awning fabric counter clockwise around the roller tubes as tightly and evenly as possible B D F 08 7 Fix the bolt J on the hole of the roller bar B1 B2 on the left right side Screw it tightly J J ...
Страница 9: ... fabric inserted fix the bar end with a plastic cover I 2 Then tighten the screw on the bolt 09 8 Slide arm bar link K into the groove of the front bar on the left side Put the bolt J for fabric inserted fix the bar end with a plastic cover I 1 Then tighten the screw on the bolt K I 1 I 2 K J ...
Страница 10: ...einforced concrete brick We recommend a professional installer for the safest and most secure installation Never attempt to secure the wall brackets to loose wall stones or any surfaces that are not absolutely firm Product name Retractable awning Please see details on the package Material and surface treatment Materials Steel tube aluminum alloy plastic parts polyester fabric Service treatment Tub...
Страница 11: ...k the position 1 Insert part O into A2 A2 4 After measuring the distance seprarte A1 and A2 3 Measure the distance of product installation 2 Connect A1 and A2 on the left and right side of the roller bar 11 3 937inch 10cm 114 37inch 290 5cm ...
Страница 12: ...gainst horizontal line X X X Wall bracket Level horizontal line Ground 2 5 3m X X Wall bracket XX X Wall bracket Wall bracket Level horizontal line Ground Wall bracket leveled against horizontal line X X X X Ground 2 m X X X X 6 Drilling the bolt holes 12 ...
Страница 13: ...rill bit drill the first bolt hole approximately 8 cm deep as shown in the diagram This must be drilled through solid brick or concrete to offer the necessary support for the awning All bolt holes must be aligned vertically and horizontally to ensure that the awning hangs straight Double check alignment before drilling if you are not certain The diameter and depth of your mounting holes must be th...
Страница 14: ...t them stick out of the wall approximately 2 5 cm or less enough that the wall bracket can be installed onto them Firmly tighten the bolts with a 19 mm hex key It is best to use the hex key with a closed end rather than an open end to avoid damaging the nut should it slip 14 Bolt M10X80MM 7 Please assemble the A1 on the wall by first tighten the bolts by wrench And assemble the A2 on the wall but ...
Страница 15: ...Assemble arm C1 on the wall bracket A1 s arm holes 2 Tighten the arm screws 3 Assemble arm C2 on the wall bracket A2 s arm holes 4 Tighten the arm screws STEP 5 Assemble Arms Don t cut off the rope on the arm 15 ...
Страница 16: ...16 K M 6 Installation notes Push C1 arms slightly in the direction of the fold and hold it Move K to suitable position make sure the K and the hole on the arm in the same vertical line Then insert the arm bar links to the holes on the end of both arms K 16 ...
Страница 17: ...n the two screws and nuts with a wrench K 8 Installation notes Push C2 arms slightly in the direction of the fold and hold it Move K to suitable position make sure the K and the hole on the arm in the vertical line Then insert the arm bar links to the holes on the end of both arms Then repeat step 7 17 ...
Страница 18: ...D C1 C2 When we have completed all the above steps the product installation is complete Please note C1 and C2 arms are basically on the same parallel plane in their natural state 18 ...
Страница 19: ... you find that the cloth surface has fallen down Please retract the cloth surface 3 5cm to ensure that the cloth surface is in a tight state 19 9 Please cut the straps on arms carefully while making sure that the cloth is completely tightened ...
Страница 20: ...h to support the weight of the product 7 Close your awning during the winter in case the snow increases its loads When we fully unfold the awning we may find that the left and right sides of the awning are unbalanced At this time we need to adjust the inclination of the awning so that the left and right sides of the awning can be on the same horizontal line Tips You can adjust only the left side o...
Страница 21: ...ion of arrow b the angle of the awning will rise upward After adjusting the screw3 please check if the awning has been adjusted to the proper angle if not please repeat the above installation steps 2 until the angle is suitable The inclination of the awning is set by adjusting the screw when adjusting the awning inclination please expand the awning completely C1 a b 3 hold up arm Step3 Don t forge...
Страница 22: ...the awning will go down If you turn the screw in the direction of arrow b the angle of the awning will rise upward After adjusting the screw3 please check if the awning has been adjusted to the proper angle if not please repeat the above installation steps 2 until the angle is suitable Step3 Don t forget to tighten the screws 1 2 after adjusting the inclination of the awning If you don t tighten t...
Страница 23: ...nt for help first Replacements for missing or damaged parts will be shipped ASAP Contact Us Do NOT return this item US office Fontana UK office Ipswich AU office Truganina DE office Hamburg FR office Saint Vigor d Ymonville PL office Gdańsk US cs us costway com UK cs uk costway com AU cs au costway com ...