11
ASSEMBLY INSTRUCTIONS |
IV. ASSEMBLY INSTRUCTIONS
ATTENTION:
It is strongly recommended that this machine is assembled by 2 or more adults to avoid injury.
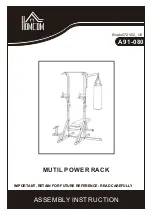
1. Slide the 2x cushions (#59) onto the guide rods (#3).
2. Insert the guide rods (#3) into the 2x holes on ground piece (#2).
a. Use 2x pan head screws M10x25mm (#33) and 2x
Φ
10 washers (#17) to attach the guide rod (#3) to
ground piece (#2).
3. Connect ground piece (#32) and ground piece (#2) to ground piece (#1).
a. Use 2x screw carriage M10x90mm (#34), 2x
Φ
10 washers (#17) and 2x M10mm lock-nut (#23).
4. Connect the vertical beam (5#) and fixed plate (#25) to ground piece (#1) from the bottom.
a. Use 2x screw carriage M10x70mm (35#), 2x
Φ
10 washers (#17) and 2x M10mm lock-nut (#23).
5. Connect mat reinforcement pipe (#6), fixed plate (#25) to ground piece (1#) from the bottom.
a. Use 2x screw carriage M10x70mm (#35), 2x
Φ
10 washers (#17) and 2x M10mm lock-nut (#23).
STEP 1
#17
Φ
10 6pcs
#23 M10 6pcs
#33 M10X25 2pcs
#34 M10x90 2pcs
#35 M10x70 4pcs
5
3
59
34
34
2
17
17
17
17
6
17
17
17
23
23
23
23
23
23
35
35
35
35
25
25
1
33
32
Содержание SS2
Страница 2: ......
Страница 10: ...10 PARTS LIST 81 86 82 87 83 88 84 89 85 90 ...
Страница 24: ......
Страница 25: ......
Страница 26: ...WWW LIFESPANFITNESS COM AU ...