background image


31 

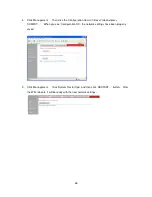
Before the third party answers, you may drop the call by pressing ‘End’.    The original party will 

then return as a new call.    Press ‘Answer’ to return to the conversation. 

After the connection is made, you will see the following message displayed on LCD screen.    If the 

third party refuses the conference call and hangs up, the second party will return as a new call.   

Press ‘Answer’ to resume this call.    This will also happen if you dial an invalid number for the third 

party. 


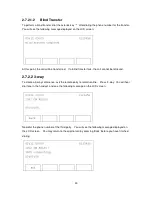
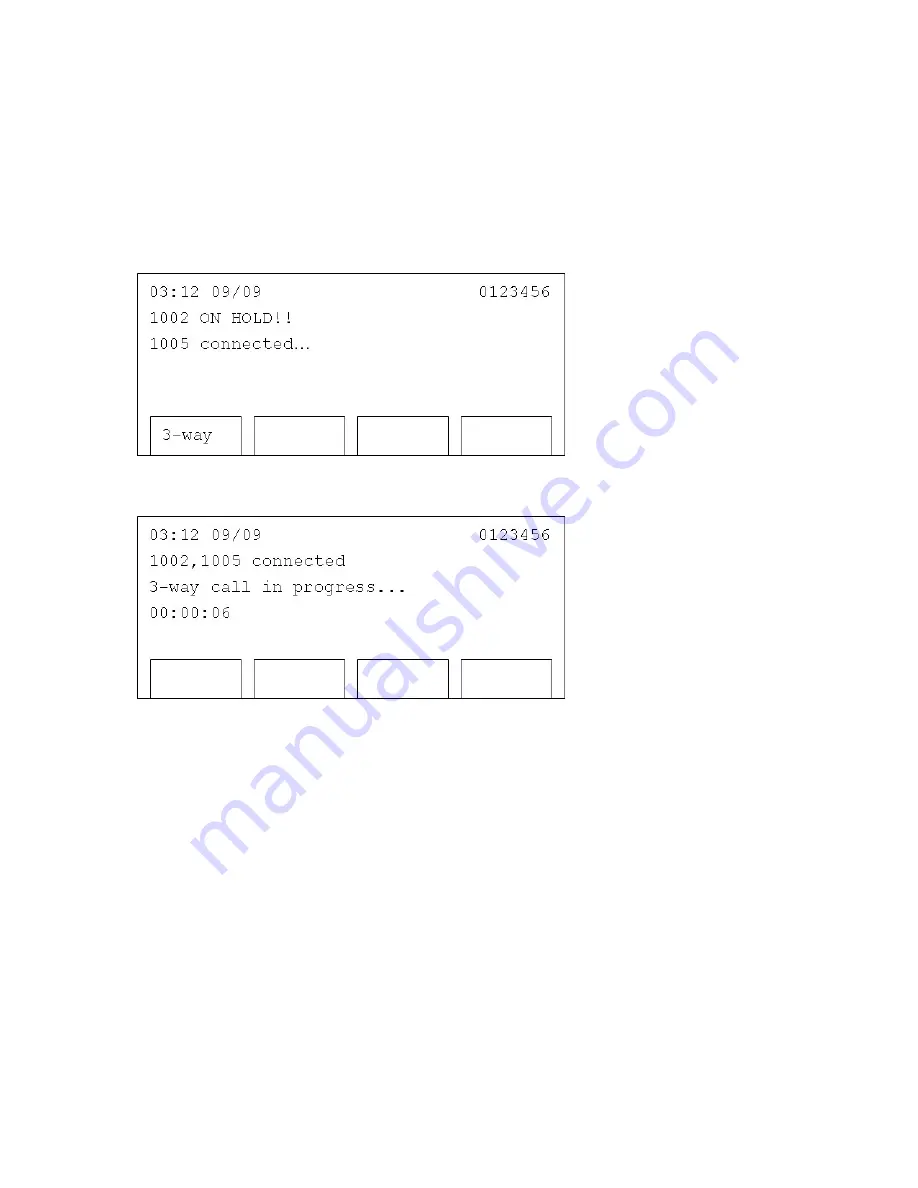
If the third party agrees to the conference, press ‘3-way’.    You will see the following message 

displayed on the LCD screen, and the 3-way conference will be established.     


Either the second or third party may drop off the conference at any time and the call between the 

originator and the other party will continue.    However, if the originator drops the call, all parties will 

be disconnected. 

Содержание 2757

Страница 1: ...Rev 1 0 2757 VoIP Phone Users Guide ...

Страница 2: ... Web Configuration 25 2 7 Accepting and Making Phone Calls 27 2 7 1 Accepting phone calls 27 2 7 2 In Call Options 28 2 7 2 1 1 Attended Transfer 29 2 7 2 1 2 Blind Transfer 30 2 7 2 2 3 way 30 2 7 2 3 Line 2 32 2 7 2 4 Hold 32 2 7 3 Making phone calls 32 2 8 Caller ID on Call Waiting 33 2 9 Calling History 34 2 9 1 Missed Calls 35 2 9 2 Received Calls 35 2 9 3 Placed Calls 35 2 9 4 Unanswered Cal...

Страница 3: ... 3 8 Ring Tone Type 39 3 3 9 Voice Codec 39 3 3 10 Forward Timer 39 3 3 11 Do Not Disturb 39 3 3 12 Set Time Zone 40 3 3 13 NTP Server Address 40 3 4 Entry of Call Forward numbers from phone 40 3 5 Phone Book Management 41 3 5 1 Web Interface 41 3 5 2 Phone Interface 42 3 6 Browse System Information 44 3 6 1 LCD screen 44 3 6 2 Web Interface 45 3 7 Change Display Language 47 3 8 Change Ringer Type...

Страница 4: ... 1 Phone Interface 53 3 11 2 Web Interface 54 3 12 Change Password for the Web Interface 55 4 Troubleshooting 56 5 Firmware Update 57 5 1 Upgrade Procedure 57 5 2 Recover from Unsuccessful Firmware Update 58 ...

Страница 5: ...mmunication and management Among the protocols supported are TFTP FTP RTP SNTP HTTP SIP DHCP PPPoE and Telnet Quality of Service QoS Support Headset and speakerphone for hands free operation Standard numeric keypad 0 9 and with built in DTMF tone generator allowing access to on line banking services voice mail systems etc Large clear display Ergonomic handset Five speed dial keys Configuration via...

Страница 6: ... that the stand can be installed in two different positions to change the angle of the phone 4 Connect one end of the handset cable to the handset Note that the handset cable is not symmetrical Connect the end with the shorter flat portion to the handset 5 Insert the other end of the handset cable to the handset jack on the phone as shown below Note that the handset cable is not symmetrical Connec...

Страница 7: ...age Waiting LED the bar shaped LED located above the LCD will light in red The phone will try to obtain an IP address for 2 to 3 minutes After this the Message Waiting LED will go out the Loading message will disappear and the phone will stop trying to obtain an IP address 7 2 If an IP address is obtained you will see screen shown below If you do not see this message please check the network cable...

Страница 8: ...8 2 Network Setup 2 1 Static IP Address 1 Press Menu 2 Press Up or Down until 3 Settings is highlighted then press Select 3 Press Up or Down until 4 System Configuration is selected then press Select ...

Страница 9: ... press Select You will be prompted to enter an IP address Use the numeric keypad to input this address Use the key to input the period For example to input the IP address 192 168 4 50 press the following keys 192 168 4 50 When entering an IP address you can erase digits by pressing Clear When you have finished entering the IP address press Save or press Cancel to discard ...

Страница 10: ...ress Select You will be prompted to input the IP address of the router on your local network 8 Setting the DNS IP Address is the last step for a static IP setup Press Up or Down until 5 DNS Server 1 Static is selected and enter the IP address of the DNS server here NOTE You can set a secondary DNS Server IP address by moving to item 6 DNS Server 2 Static At least one DNS Server is required to make...

Страница 11: ...p or Down until 20 Commit Changes is selected then press Select When Changes saved is displayed on the LCD screen all the settings are saved 11 To reboot the 2757 press Down to move to 21 Reboot System and press Select Rebooting will appear on the LCD screen After the reboot is completed the 2757 is ready for use 2 2 PPPoE When using PPPoE an IP address will be issued to your 2757 phone by your In...

Страница 12: ...ntil 3 Settings is selected then press Select 3 Press Up or Down until 4 System Configuration is selected then press Select 4 Press Select on 1 Network Setting Use Up or Down to change network setting to PPPoE Then press Save ...

Страница 13: ...2 seconds If the time period is longer than 2 seconds the cursor will move right and you can enter a new character To erase a character press Clear When you finish entering the PPPoE username press Save or press Cancel to discard You can input up to 40 characters 6 Now press Down until 8 PPPoE Password is selected and press Select You will be prompted to enter a PPPoE password Use the method descr...

Страница 14: ...ease move to Section 2 5 to enter your SIP server information 9 If you only need to change the network settings but don t need to change the SIP server information i e this is not an initial setup you must save the new network settings and reboot the 2757 To save the new network settings press Up or Down until 20 Commit Changes is selected then press Select When Changes saved is displayed on the L...

Страница 15: ...booting will appear on the LCD screen After the reboot is completed the 2757 is ready for use 2 3 DHCP When using DHCP an IP address will be issued to your IP phone by the DHCP server on your local network 1 Press Menu 2 Press Up or Down until 3 Settings is selected then press Select ...

Страница 16: ... 2 5 for SIP server setup information 6 If you only need to change the network settings but don t need to change the SIP server information i e this is not an initial setup you must save the new network settings and reboot the 2757 To save the new network settings press Up or Down until 20 Commit Changes is selected then press Select When Changes saved is displayed on the LCD screen all the settin...

Страница 17: ...ady for use 2 4 Network Setup Web Configuration You can also configure the network by using a web browser In order to do this you must first know the IP address of the 2757 If you are using PPPoE or DHCP please follow the instructions below to get the IP address 2 4 1 Display IP Address 1 Press Menu 2 Press Up or Down until 3 Settings is selected then press Select ...

Страница 18: ... three times to return to the main menu 2 4 2 Web Interface Network Configuration 1 Use a web browser to connect to the IP address of the IP Phone For example if the IP Phone s IP address is 192 168 4 50 type http 192 168 4 50 in the browser s address bar A login window will then appear The default username is admin and the password is blank do not put anything in password field ...

Страница 19: ...ck Network on the left 3 On this screen you can choose the connection mode static IP PPPoE or DHCP enter the IP address in static IP mode and enter PPPoE username and password You can also enable the VLAN function After entering the desired settings you must click Submit at the bottom of the web page To discard the settings click Cancel ...

Страница 20: ...ation Commit Reset tab Press COMMIT When the Configuration OK message appears the network settings have been saved 5 Now click Management again Then click the System Restart tab and click RESTART The 2757 will reboot After about 1 minute it will be ready for use ...

Страница 21: ... After the network setup is completed the SIP server information must be entered 1 Press Menu 2 Press Up or Down until 3 Settings is selected then press Select 3 Press Up or Down until 4 System Configuration is selected then press Select ...

Страница 22: ... discard 5 Press Down until 15 SIP PortNum is selected then press Select Enter the SIP server s port number By default this is 5060 After the Port Number is entered press Save to keep changes or Cancel to discard 6 Press Down until 16 SIP Username is selected then press Select Use the numeric keypad to enter your SIP username After the SIP Username is entered press Save to keep changes or Cancel t...

Страница 23: ...rd 8 Press Down until 18 SIP Password is selected then press Select Use the numeric keypad to enter your SIP phone number After the SIP Password is entered press Save to keep changes or Cancel to discard NOTE The SIP password is hidden by a series of when it is not being edited 9 Press Down until 19 Codec is selected then press Select Use Up or Down to select a codec Press Save key to store the se...

Страница 24: ...hanges is selected then press Select When Changes saved is displayed on the LCD screen all the settings are saved 11 Press Down to move to 21 Reboot System and press Select Rebooting will appear on the LCD screen After the reboot is completed the 2757 is ready for use ...

Страница 25: ... and passwords Please refer to Section 2 4 2 to access the web interface Then follow these instructions 1 Click SIP link on the left 2 You can enter the SIP proxy server s IP address and port here Also you can enter up to 4 sets of SIP phone number username and password 3 After all the information has been entered click Submit to store it or click Cancel to discard ...

Страница 26: ...Commit Reset tab and press COMMIT When you see Configuration OK the network settings have been properly saved 5 Click Management Click System Restart tab and then click RESTART button After the 2757 reboots it will be ready with the new network settings ...

Страница 27: ...ing phone calls Before you can receive phone calls your phone must be registered to a SIP server You will see the message below on the LCD screen when the phone is registered If the phone is not registered to a SIP server you will see Initializing SIP displayed on LCD screen If you see this message please check your network cables and settings again ...

Страница 28: ... or press Answer During the call a timer will be displayed on the LCD screen It will start from 00 00 00 and will show the total time elapsed during the call 2 7 2 In Call Options Several options are available on the soft keys below the LCD screen They are described below 2 7 2 1 Transfer Trfr Transfer current call to another phone Ask the remote party to remain online do not hang up the phone Pre...

Страница 29: ... the transfer begins the transfer and then drops off The transfer is then completed 2 7 2 1 1 Attended Transfer To use attended call transfer dial another phone number and you will see the following message on the LCD screen Once the connection is made you will see the following message Once the remote party has agreed to the transfer press Trfr and the transfer will be completed If the transfer f...

Страница 30: ...ed If a blind transfer fails the call cannot be retrieved 2 7 2 2 3 way To create a 3 way conference ask the remote party to remain online Press 3 way You will hear dial tone in the handset and see the following message on the LCD screen Now dial the phone number of the third party You will see the following message displayed on the LCD screen You may return to the original call by pressing Back b...

Страница 31: ...ond party will return as a new call Press Answer to resume this call This will also happen if you dial an invalid number for the third party If the third party agrees to the conference press 3 way You will see the following message displayed on the LCD screen and the 3 way conference will be established Either the second or third party may drop off the conference at any time and the call between t...

Страница 32: ...l place your remote party on hold so that they cannot hear anything To resume the call press Back 2 7 3 Making phone calls If you have registered multiple SIP phone numbers select one by pressing the a line key Lift the handset and dial the phone number Normally the phone will wait 5 seconds before transmitting the digits If you wish to dial immediately press the key after dialing If you dialed th...

Страница 33: ...by your ISP or VoIP PBX When you are on a call and receive another call you will hear a notification tone and the LCD will show the calling number To accept the incoming call press flash This will place the existing call on hold If you hang up the phone while you have a call waiting the waiting call will become as a new call The phone will make a tone to alert you that you have a call You can acce...

Страница 34: ...calling history database You can check for outgoing calls incoming calls and missed calls 1 Press Menu 2 Press Up or Down 2 until Call Records is selected then press Select 3 Use Up and Down to select a call record type Press Select to view them ...

Страница 35: ... You can press Dial to call the selected number Delete to delete a selected number or Exit to return to the previous menu 2 9 3 Placed Calls All dialed phone numbers will be listed here You can press Dial to call the selected number Delete to delete a selected number or Exit to return to the previous menu 2 9 4 Unanswered Calls If a call is unanswered the following message will be displayed on the...

Страница 36: ...or 3 4 If this is set all calls will forward to this number Calls can still be made when in the DND mode To deactivate DND press DND again The icon will disappear 2 11 Speakerphone and Headset Calls may also be placed using speakerphone or headset This provides a hands free phone operating environment 2 11 1 Speakerphone 2 11 1 2 Placing Calls Press SPEAKER After hearing dial tone dial the number ...

Страница 37: ...s HEADSET to make and receive calls 3 Speed Dial Advanced Phone Configuration 3 1 Speed Dial The 2757 has 5 speed dial buttons A phone number may be programmed to each speed dial button The web interface must be used to set a phone number for a speed dial button Refer to Section 2 4 to open a web connection to the 2757 1 Click the System link ...

Страница 38: ...1 Busy An incoming call will be transferred to this number if the 2757 is busy or if DND is activated 3 2 2 No Answer An incoming call will be transferred to this number if the call is not answered 3 2 3 Unconditional All incoming calls will be transferred to this number 3 2 4 DND The number to which incoming calls will be transferred when DND is activated 3 3 Advanced Settings CAUTION These setti...

Страница 39: ...ing Volume Allows adjustment of ringer level Numbers from 0 to 10 are allowed Higher numbers are louder 3 3 7 Silence Suppression When enabled the 2757 will not transfer data when there is no voice detected from the microphone This can be useful to reduce the required network bandwidth However it can cause the voice quality to degrade 3 3 8 Ring Tone Type The 2757 offers 5 different ringtones 3 3 ...

Страница 40: ...signals from a Network Time Protocol NTP server Enter a valid NTP server address here 3 4 Entry of Call Forward numbers from phone Call forwarding numbers can also be set from the phone 1 Press Menu Use Up and Down to select the third item 3 Settings Press Select key 2 Select System Configuration using Up Down and Select ...

Страница 41: ...umber using the keypad Press Save to save changes Press Clear to erase a number or press Cancel to keep the original number unchanged 3 5 Phone Book Management 3 5 1 Web Interface The web interface must be used to enter frequently dialed numbers into the phone book 1 Click Phone Book link ...

Страница 42: ...ter entering the number and the name press Add to save the entry To delete an existing entry enter the phone number in the Number field and then press Delete 3 5 2 Phone Interface Existing phone book entries can be accessed from the 2757 1 Press Menu Then press Select on the first item 1 Phone Book ...

Страница 43: ...ter selecting a phone book entry press Dial to dial the phone number or Exit to return to the previous menu 4 To delete an entry press Del Be sure you wish to delete the entry because it will be deleted immediately 5 If a call is received from someone in the phone book their phone book name will be displayed ...

Страница 44: ...mpted to press 1 or 2 key 1 for YES and 2 for NO 3 6 Browse System Information System information IP address model information firmware version etc can be displayed using either the web interface or the LCD screen 3 6 1 LCD screen 1 Press Menu 2 Press Up or Down until 3 Settings is selected then press Select ...

Страница 45: ...ss Up or Down until 5 Model Information is selected then press Select 4 All system related information will be displayed here Press Up and Down to browse and press Exit to end 3 6 2 Web Interface 1 Click Status ...

Страница 46: ...46 2 Network related system settings will be displayed 3 Click the Version Information tab and firmware related information will be displayed ...

Страница 47: ...of the 2757 is English However it can be changed to Chinese 1 Press Menu 2 Press Up or Down until 3 Settings is selected then press Select 3 1 Language should be selected when this menu is entered If not use Up or Down to select it then press Select key ...

Страница 48: ... to select the desired language and press Select Press Exit to leave this menu without making any changes 3 8 Change Ringer Type Ring tones can be changed from the LCD screen as well as from the web interface See Section 3 3 8 for web interface 1 Press Menu 2 Press Up or Down until 3 Settings is selected then press Select ...

Страница 49: ...ct 4 All available ring tones will be listed here Use Up Down and Select key to choose a ring tone Press Exit to return to the previous menu after making a selection A V will appear on the currently selected ring tone 3 9 Adjust the Contrast of LCD Screen 1 Press Menu ...

Страница 50: ...ttings is selected then press Select 3 Press Up or Down until 3 Contrast is selected then press Select 4 Press Up to make the displayed messages darker Press Down to make the displayed messages lighter Press Save keep the new settings ...

Страница 51: ...3 10 Reboot the IP Phone 3 10 1 Phone Interface 1 Press Menu 2 Press Up or Down until 3 Settings is selected then press Select 3 Press Up or Down until 4 System Configuration is selected then press Select ...

Страница 52: ...52 4 Press Up or Down until 21 Reboot System is selected and press Select Press Exit key to return to the previous menu 3 10 2 Web Interface 1 Click on Management ...

Страница 53: ...l display Phone is restarting The 2757 will be ready again in approximately 1 minute 3 11 Factory Reset All stored settings can be erased by resetting the 2757 to factory defaults 3 11 1 Phone Interface 1 Press Menu 2 Press Up or Down until 3 Settings is selected then press Select ...

Страница 54: ...on is selected Then press Select 4 Press Up or Down until 22 Factory Default is selected Then press Select to restore the default settins Press Exit key to return to the previous menu without making any changes 3 11 2 Web Interface 1 Click Management ...

Страница 55: ...Web Interface The web login password can be changed Connect to the 2757 with the web interface then follow the instructions below 1 Click Management 2 At the Password Configuration screen enter your current password and then enter the new password twice 3 Press Submit To exit without changing the password close the web browser or click another link in the configuration web page ...

Страница 56: ... cable and reconnect after 10 seconds I can not hear dialtone Replace the cord between the 2757 and the handset with a new one Press SPEAKER If dialtone is heard replace the handset Check the volume setting Try increasing it I can hear dialtone in the handset but I can not place accept phone call If busy tone is heard in the handset the remote party may be busy not online or not at the dialed numb...

Страница 57: ...ted when a newer version is available Please go to www cortelco com to check for a new version of firmware The following information will be needed to upgrade TFTP FTP server address Image file name username for FTP only password for FTP only 1 Click Management Then click Firmware Update tab ...

Страница 58: ...sful Firmware Update If the download fails the 2757 may malfunction If this happens use the following instructions to restore it to a normal state 1 Reboot the 2757 per Section 3 10 If that does not work disconnect the power cord and reconnect it after 10 seconds 2 You should see Loading on the LCD Both the headset and mute key will illuminate for 2 seconds After this press the key twice and the o...

Отзывы: