


Preliminary Checks
NOTE: Pay attention to the refrigerant system
components for evidence of oil seepage and
other potential leaks that will be checked during
subsequent diagnostic steps.
Before testing the operation of the air conditioning
system, check the following items:
1.
Inspect the drive belt and mounting fasteners for
signs of wear or looseness.
2.
Visually inspect the clutch for signs of overheat-
ing, damage, or wear. If necessary, check the
clutch gap. For instructions, see
3.
Check for road debris buildup on the condenser
coil fins. Using air pressure and a whisk broom
or a soapy spray of water, carefully clean off the
condenser. Be careful not to bend the fins.
4.
Inspect the fresh and recirculation air filter ele-
ments, and inspect the intake-air ducting for de-
bris.
5.
With the engine off, and Optimized Idle (if appli-
cable) disabled, turn the compressor drive plate
by hand to feel for grinding or harshness inside
the compressor.
Initial Inspection
1.
Connect refrigerant pressure gauges and Ser-
viceLink to the vehicle.
2.
Start the vehicle and select A/C mode and a cold
temp setting to request compressor engagement.
If the following conditions are met, the clutch
should engage.
•
The key is in the ignition ON position so
that both IGN and ACC circuits are pow-
ered.
•
Refrigerant system high side pressure is
between 20 psi (140 kPa) 450 psi (3100
kPa). Pressure reading is taken at the bi-
nary switch.
•
System voltage is between 8.5 and 17
volts.
•
Evaporator temperature is above 44°F
(6.5°C). Temperature is taken in the main
heater box, as a direct input to the front
control unit (FCU).
•
The blower feedback from the main HVAC
unit is connected.
At this point you should be seeing some indication of
a problem, either electrical or refrigerant.
Electrical—If there are any faults that affect the FCU,
or if the system requirements are being met but the
clutch is still not engaging, there may be an electrical
problem related to the FCU, or the voltage signal to
the compressor.
Refrigerant—If the low side pressure is drawing
down far below 20 psi (140 kPa), or if the high side
pressure is rising above 450 psi (3100 kPa), there is
a refrigerant-related problem.
Post-Repair Procedures
After repair work is completed, verify that the repair
resolved the problem.
1.
Verify that all of the refrigerant connections re-
moved during the service are properly sealed
using an approved refrigerant leak detector.
2.
Check for fault codes. There should be no active
fault codes that indicate the problem still exists.
3.
If there is still a problem, repeat the appropriate
tests, and make repairs as needed.
4.
Verify again.
Heater and Air Conditioner Troubleshooting
83.00
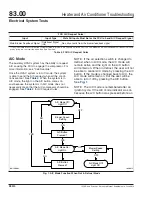
Diagnostic Process
Coronado Workshop Manual, Supplement 5, June 2012
310/1