Coronado 83.00 Скачать руководство пользователя страница 1

Diagnostic Overview

A/C cooling problems fit into two basic failure catego-
ries: refrigerant or electrical. The goal of this trouble-
shooting guide is to provide the information neces-
sary to determine what part is causing the problem.
We expect the technician to use approved tools and
shop practices, symptom-driven diagnostics, and
warranty component evaluation guides to properly
asses component failures. Refer to

www.access-

freightliner.com

for available tool information, ser-

vice training, and warranty documentation.

For system performance testing, ambient tempera-
ture must be above 70°F (21°C) to produce reliable
results. In order to quickly determine if your symp-
toms are refrigerant or electrical, two main tools
should be utilized by the technician: ServiceLink and
a refrigerant gauge set.

General Diagnostic Procedure

1.

Perform the preliminary checks.

2.

Perform an initial system inspection.

3.

Make a determination about which system is
suspected (refrigerant or electrical), and follow
the symptoms through to a suspected part.

4.

Repair the problem.

5.

Verify that all of the refrigerant connections re-
moved during the service are properly sealed
using an approved refrigerant leak detector.

6.

Verify that the problem has been resolved.
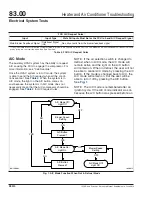
System Overview

The blend air system uses constant discharge tem-
perature control (CDTC) to regulate the temperature
in the vehicle. The CDTC is a closed-loop system
that uses the climate control panel settings and the
temperature sensors to control and maintain the out-
let temperature of the system. The blend air system
has an electronically-controlled, brushless, direct cur-
rent (BLDC) blower motor that does not require a
resistor block to control the blower speed.

In the blend air system, all air is directed through the
evaporator. The amount of air needing to be re-
heated is controlled by the temperature control door,
which directs that amount of air through the heater
core.

The cab HVAC assembly consists of a blower motor,
evaporator, heater core, CDTC sensor, evaporator
temperature sensor, and three electric actuators that
drive the air direction control doors. The doors per-
form the following functions:

temperature control door—controls how much
air is directed through or around the heater
core

air selection mode door—directs airflow to the
face, floor, or defrost outlets

recirculation door—controls the amount of out-
side air that enters the HVAC unit

The cab climate control panel (front control unit) con-
tains the microprocessor that controls the system.

The sleeper or auxiliary HVAC assembly consists of
a brushless blower motor, evaporator, heater core,
auxiliary control unit, air filter, CDTC temperature
sensor, and an electric actuator that drives the tem-
perature control door.

The refrigerant system consists of a compressor,
condenser, receiver-drier, thermal expansion valve(s),
and pressure sensors.

Heater and Air Conditioner Troubleshooting

83.00

General Information

Coronado Workshop Manual, Supplement 5, June 2012

050/1

Содержание 83.00

Страница 1: ...sed loop system that uses the climate control panel settings and the temperature sensors to control and maintain the out let temperature of the system The blend air system has an electronically contro...

Страница 2: ...nd ACC circuits are pow ered Refrigerant system high side pressure is between 20 psi 140 kPa 450 psi 3100 kPa Pressure reading is taken at the bi nary switch System voltage is between 8 5 and 17 volts...

Страница 3: ...air conditioning on blower speed switch to high temperature control switch to full cold recirculation switch off 11 On SleeperCabs set the sleeper climate control panel to the following settings or i...

Страница 4: ...rmance low low side pressures even a vacuum etc Before re placing a TXV it is important to verify that there are no contaminates in the system and that the refrige rant charge is correct by performing...

Страница 5: ...the leak rate for two Mini Statoseals should be consi dered a condemning value if it is not completely clear which seal is leaking Method IMPORTANT The refrigerant system should be warmed up from com...

Страница 6: ...350 psi 2415 kPa is achieved Denso A C Compressor Pressure Test NOTE This test is meant to be performed after a failure has been repaired which may have caused damage to the compressor due to low refr...

Страница 7: ...ower motor electronic module The electronic module monitors the blower tempera ture and enters a protection mode when normal tem perature is exceeded When the blower motor enters protection mode the b...

Страница 8: ...ed by the time between each set of three pulses Time can be viewed using an oscilloscope rpm 1 time between sets of three pulses x 60 NA Error temperature protection mode 10Hz 25 Error voltage protect...

Страница 9: ...ce the signal is active and as long as the other conditions are met the sig nal remains active until the evaporator temperature sensor reaches 37 F 3 C then becomes inactive The A C request signal doe...

Страница 10: ...in A C mode does not necessarily mean that the A C compressor should be engaged See Table 4 for A C request rules NOTE If the air selection switch is changed to defrost when in A C mode the A C mode...

Страница 11: ...ion mode prevents dusty or smoky air from entering the cab and provides better air conditioning performance since the cab air is al ready cooled and less humid than outside air Humid ity holds a lot o...

Страница 12: ...is in the fully closed position B Recirc door in the narrow partially open position C Recirc door in the widest partially open position D In non recirc mode the recirc door is in the fully open positi...

Страница 13: ...auxiliary unit until the bunk override switch is pressed in the momentary ON position again When the lower half of the bunk override switch is pressed bunk override mode turns off and the auxil iary u...

Страница 14: ...it settings The auxiliary unit uses the temperature door position setting as a starting point then it goes into constant discharge temperature control CDTC operation to maintain the new desired temper...

Страница 15: ...mode This is not how the system operates without DataLink Monitor connected to the vehicle On these early systems you will not be able to change the front settings and update the auxiliary unit with a...

Страница 16: ...e is off in the auxiliary unit If the front blower speed setting was in the off position the blower will now shut off The A C mode indicator light will turnoff Actuator Stepper Motors Temperature Reci...

Страница 17: ...he rotary switch to position 1 and note the reading on the multimeter 7 Move the toggle switch to REVERSED and note the reading on the multimeter 8 Repeat the previous three steps for the 2 3 and 4 ro...

Страница 18: ...perature Sensor General Information The evaporator temperature sensor is located on the evaporator The sensor input to the FCU is used to control the A C compressor in order to prevent evaporator free...

Страница 19: ...de actuator connector turn the ignition on measure voltage between connector pin 1 and ground For code 146 s009 05 front unit disconnect the temperature actuator connector turn the ignition on measure...

Страница 20: ...de 146 s009 05 front unit disconnect all three actuator connectors and the FCU connector At the temperature actuator connector check continuity between connector pin 3 and ground Repeat for pins 4 5 a...

Страница 21: ...Actuator f040620 07 02 2002 For code 200 s009 05 auxiliary unit disconnect the auxiliary unit temperature actuator connector and the ACU connector Check continuity between the following connector pins...

Страница 22: ...6 s006 05 146 s009 05 disconnect all three actuator connectors and the FCU connector At each actuator connector check continuity between the following connector pins A2 B1 B2 B3 FCU 3 4 5 6 Actuator f...

Страница 23: ...Check for short to ground in power wire between actuator and FCU ACU If no short is found replace FCU ACU then go to test no 9 9 Verify repair NOTE In order to check if a fault status has changed from...

Страница 24: ...When testing the evaporator temperature sensor Fig 10 the resistance will decrease as the tem perature increases as shown in Fig 11 1 Remove the sensor and place it in a cup of ice water 2 After the s...

Страница 25: ...HVAC units CDTC Temperature Sensor Test When testing the CDTC temperature sensor Fig 12 the resistance will decrease as the tem perature increases as shown in Fig 13 1 2 3 1 4 4 3 5 5 6 6 1 6 CW CCW...

Страница 26: ...earn the extreme positions of the actuator motors for the recirc door tempera ture control door and the air selection mode door Use the following procedure to recalibrate the sys tem 1 Turn the igniti...

Страница 27: ...the temperature mix door position bar graph When bunk override is initiated the front temperature mix door step count message is sent to the auxiliary unit The auxiliary unit uses this as its initial...

Страница 28: ...s this as its initial tempera ture mix door setting to match the front temperature Auxiliary CDTC Discharge Temperature The auxiliary CDTC discharge temperature bar graph indicates the temperature of...

Страница 29: ...l rules are met The A C mode annunciator has three possible condi tions ON OFF or NA ERR not available or error A C Clutch Annunciator The A C clutch annunciator indicates whether or not the signal to...

Страница 30: ...e indicated by the FCU mode annunciator The FCU mode annunciator works similarly if bunk override is turned OFF The FCU mode annunciator has three possible con ditions ON OFF or NA ERR not available o...

Страница 31: ...mode OFF test button is used to manually send a cab override OFF request to the FCU This is the same message the ACU sends to the FCU when it no longer requests A C support from the front unit The but...

Страница 32: ...ode door actuator current above normal or circuit shorted to ground See Actuator Circuit Test table in Subject 350 for diagnosis 009 05 Temperature control door current below normal or open circuit Se...

Страница 33: ...y PID PID FMI Fault Description Action 168 03 Supply voltage too high above 16 0 VDC Check vehicle charging system repair as necessary See Group 15 for more information 04 Supply voltage too low below...

Страница 34: ...eedback differs from the speed control signal being sent by the ACU See Diagnosis for Blower Speed is Not Available table in Subject 350 250 02 J1587 databus data erratic inter mittent or incorrect Ch...

Страница 35: ...cuit for diagnosis Ice formed on evaporator core Ice buildup on the evaporator core can block airflow through the evaporator thus producing little or no cooling This may occur if the compressor is not...

Страница 36: ...nts for blockage blockage may be due to moisture causing ice buildup Refrigerant charge too low Perform leak test Repair any leaks evacuate the system replace the receiver drier only if color indicate...

Страница 37: ...ature under light load or when ambient temperatures are low Temperature door not operating correctly Electrical problem with temperature actuator Check for fault codes See fault code tables in Subject...

Страница 38: ...ith mode door Check for obstructions or broken components repair as necessary NOTE The actuator has no feedback to the FCU ACU to verify position If there are no fault codes and the actuator signal ap...

Страница 39: ...See Table 11 Sleeper Climate Control Panel Circuit Diagnosis Faulty blower control potentiometer auxiliary unit only See Table 11 Sleeper Climate Control Panel Circuit Diagnosis Problem Bunk Override...

Страница 40: ...C compressor to operate the controls must be set as follows blower speed at any set ting other than off air selection in one of A C or defrost settings A C button is pressed light on engine running a...

Страница 41: ...he ambient air tempera ture Measure the resistance of the evaporator temperature sen sor and compare the reading with the value in Table 3 or Fig 1 The reading should co rrespond to a temperature ap p...

Страница 42: ...check resistance between the ground side of the relay coil PDM side and the negative battery terminal Make sure the batteries are disconnected or result may be inconclusive Less than 1 ohm Go to test...

Страница 43: ...Request Circuit Test Evaporator Temperature Sensor Temperature versus Resistance Temperature F C Resistance ohms Temperature F C Resistance ohms 20 6 7 12 814 55 12 8 4792 25 3 9 11 036 60 15 6 4209 3...

Страница 44: ...ch relay from the PDM Measure the resistance between the PDM socket that corresponds to circuit 97T and the negative battery terminal NOTE Make sure batteries are disconnected Failure to do so may giv...

Страница 45: ...drop measurements to isolate the problem then go to test no 6 Not 2 85 3 33 ohms On Denso compressors disconnect the compressor thermal cutoff switch and check it for continuity If the circuit is ope...

Страница 46: ...CU bunk override mode state is OFF or NA ERR Go to test no 2 2 Verify J1587 communication Connect ServiceLink to the vehicle Check if both the FCU MID 146 and ACU MID 200 appear in the ECU list Both E...

Страница 47: ...oblems repeat tests if necessary Bunk O R request annunciator remains in the ON state Check ACU it is not responding to the bunk override request Make sure it has power and ground andJ1587 databus com...

Страница 48: ...essure up etc The front blower should be on low speed and the A C indicator light on the A C button should be on FCU rear override mode state annunciator in ON and A C mode annunciator is ON Go to tes...

Страница 49: ...y replace FCU Go to test no 4 O R Request annunciator does not ever indicate it is in the ON state Repeat test no 3 If ambient temperature is low the auxiliary unit may not request rear override Repla...

Страница 50: ...actuator connector turn the ignition on measure voltage between connector pin 1 and ground For code 146 s009 05 front unit disconnect the temperature actuator connector turn the ignition on measure v...

Страница 51: ...e 146 s009 05 front unit disconnect all three actuator connectors and the FCU connector At the temperature actuator connector check continuity between connector pin 3 and ground Repeat for pins 4 5 an...

Страница 52: ...ctuator f040620 07 02 2002 For code 200 s009 05 auxiliary unit disconnect the auxiliary unit temperature actuator connector and the ACU connector Check continuity between the following connector pins...

Страница 53: ...s006 05 146 s009 05 disconnect all three actuator connectors and the FCU connector At each actuator connector check continuity between the following connector pins A2 B1 B2 B3 FCU 3 4 5 6 Actuator f0...

Страница 54: ...t fault may be active FMI 05 Shorted actuator motor is likely Perform Actuator Stepper Motor Electrical Test to confirm then go to test no 9 Fault still active FMI06 Check for short to ground in power...

Страница 55: ...Evaporator Temperature Sensor Circuit Test See Table 9 for the CDTC temperature sensor circuit test procedures CDTC Temperature Sensor Circuit Test Test No Test Test Procedure Test Result Action 1 Are...

Страница 56: ...Condition 2 Go to test no 2 Condition 3 Go to test no 3 Condition 4 Go to test no 4 2 Check circuits 29A and GND1 Disconnect AS2 connector Turn headlights on Measure voltage at pins A and F of the AS...

Страница 57: ...rocedure Test Result Action 1 Does the symptom involve both the blower and temperature control No affects only one of these Go to test no 4 Yes affects both Go to test no 2 2 Check the 12VDC ignition...

Страница 58: ...er speed control knob from low to high Voltage ranges from 0 5 to 12 5VDC Sleeper climate control panel circuit is not the problem Check for fault codes and see Blower Motor Diagnostics Front and Auxi...

Страница 59: ...voltage protection mode Correct voltage problem as necessary then go to test no 7 3 Check speed control signal at blower motor Disconnect the blower motor connector Turn ignition on Check voltage betw...

Страница 60: ...t replace blower motor thengo to test no 7 No Replace blower motor then go to test no 7 7 Verify repair Verify that repair resolved the problem Problem resolved Done Problem unresolved Repeat test no...

Страница 61: ...ower Motor 6 Temperature Actuator Fig 2 Cab HVAC Assembly 08 27 2002 f831539 2 3 4 1 1 CDTC Sensor 2 Temperature Actuator 3 Auxiliary Control Unit ACU 4 Blower Motor Fig 3 Auxiliary HVAC Assembly Heat...

Страница 62: ...4 3 5 5 6 6 1 6 CW CCW 08 27 2002 f831500 Fig 4 Actuator Motor Pinouts Heater and Air Conditioner Troubleshooting 83 00 Symptom Driven Diagnosis 122SD and Coronado Workshop Manual Supplement 9 June 20...

Страница 63: ...the leak can be tied to a single seal Mini Stato seals 2 when the leak cannot be tied to a single seal 0 50 oz yr and greater condemns these components Compressor shaft seal housing etc TXV Power Val...

Отзывы: