background image

1.1 Use Restrictions

1 Important Safety Information

This appliance can be used by children aged from 8 years and above and persons with reduced physical, sensory or mental 

capabilities or lack of experience and knowledge if they have been given supervision or instruction concerning use of the 

appliance in a safe way and understand the hazards involved. Children shall not play with the appliance. Cleaning and user 

maintenance shall not be made by children without supervision.
The robot must be used in accordance with the directions in this Instruction Manual. Coredy inc cannot be held liable or 

responsible for any damages or injuries caused by improper use.

Do not dispose of electrical appliances as unsorted municipal waste, use separate collection facilities. Contact your local 

authority for information regarding the collection systems available. If electrical appliances are disposed of in landfills or dumps, 

hazardous substances can leak into the groundwater and get into the food chain, damaging your health and well-being. Please 

contact your local or regional waste authority for more information on collection, reuse and recycling programs.

To reduce the risk of injury or damage, keep these safety precautions in mind when setting up, using and maintaining your 

robot:

Your robot is for indoor use only. Do not use the robot outdoor, commercial or industrial environments.
Before using this device, pick up objects like clothing, loose papers, pull cords for blinds or curtains, power cords, and any 

fragile objects. If the device passes over a power cord and drags it, there is a chance an object could be pulled or a table or 

shelf.

Read all safety and operating instructions before operating your robot.
Retain the safety and operating instructions for future reference.
Heed all warnings on your robot, battery, charging Dock and in the owner’s manual.
Follow all operating and use instructions.

The symbol on the product or its packaging indicates:

01

Содержание R300

Страница 1: ...Coredy R300 Owner s Manual ...

Страница 2: ...ing Robot s Bin 4 2 Cleaning Robot s Filter 4 3 Cleaning Robot s Water Tank and Mop Cloth Sold Separately 4 4 Cleaning Robot s Side Brush 4 5 Cleaning Robot s Cliff Sensors and Charging Contacts 4 6 Cleaning Robot s Floor Tracking Sensor 4 7 Battery and Charging Information 01 02 04 06 07 08 09 10 11 13 14 16 19 19 20 21 21 22 23 2 Product Diagram 3 Operating and Programming 4 Regular Robot Care 5...

Страница 3: ...nces are disposed of in landfills or dumps hazardous substances can leak into the groundwater and get into the food chain damaging your health and well being Please contact your local or regional waste authority for more information on collection reuse and recycling programs To reduce the risk of injury or damage keep these safety precautions in mind when setting up using and maintaining your robo...

Страница 4: ...erson responsible for their safety Children should be supervised to ensure they do not play with the robot Cleaning and maintenance shall not be performed by children without supervision Do not place anything on top of your robot Be aware that the robot moves on its own Take care when walking in the area that the robot is operating in to avoid stepping on it Do not operate the robot in areas with ...

Страница 5: ... sealed plastic bag and disposed of safely according to local environmental regula tions Before every use check the battery pack for any sign of damage or leakage Do not charge damaged or leaking battery packs If the battery pack is leaking contact Coredy Customer Service for disposal The battery pack must be removed from the robot before disposal Do not crush or dismantle battery packs Do not hea...

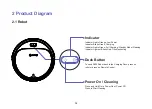
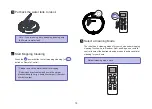
Страница 6: ... Start Cleaning To send R300 Robot back to the Charging Dock press on robot or press on Remote Control Indicator Dock Button Indicator Lights Orange Low Power Indicator Blinks Green Charging Indicator Lights Green Full Charging Standby Mode Cleaning Indicator Lights or Blinks Red Troubleshooting 04 ...

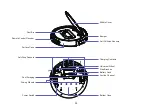
Страница 7: ...ensors Middle Cover Bumper Dust Bin Remote Control Receiver Surface Case Anti Drop Sensors Driving Wheels Dust Scraping Power Switch Charging Contacts Universal Wheel Side Brushes Battery Pack Suction Channel Bottom Case ...

Страница 8: ...x Charging Dock 1 x Adapter 1 x Remote Control with 2 x AAA batteries 1 x Dust Bin 4 x Side Brushes 1 x Cleaning Brush 1 x Mop Cloth and Holder sold separately 1 x Water tank sold separately 1 x High Efficiency Filter 06 ...

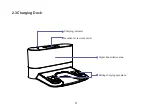
Страница 9: ...2 3 Charging Dock 07 Charging indicator Location for remote control Signal transmission area Butting charging pole piece ...

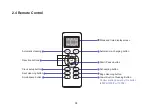
Страница 10: ... charging button Automatic cleaning Direction buttons Clock setup button Scheduling button Start Pause button Spot cleaning button Edge cleaning button Small space button Lower Suction Cleaning Button Control suction power by this button 800Pa 1200 Pa 1700Pa 08 ...

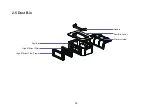
Страница 11: ...2 5 Dust Bin 09 Handle Dust Bin Cover Primary Holder Dust Bin High Efficient Filter High Efficient Filter Frame ...

Страница 12: ... cords for blinds or curtains power cords and any fragile objects If the Robot passes over a power cord and drags it there is a chance an object could be pulled off a table or shelf If the room to be cleaned contains a balcony a physical barrier should be used to prevent access to the balcony and ensure safe operation 10 ...

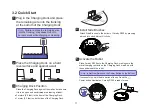
Страница 13: ...des of the Charging Dock 3 11 Attach Side Brushes to the bottom of Coredy R300 by pressing a brush into each slot until it clicks Install Side Brushes 4 Activate the Robot Place Coredy R300 onto the Charging Dock making sure the metal charging contacts on the Charging Dock match up with those underneath the robot If successful you will hear a series of tones Once the Power button illuminates Cored...

Страница 14: ...shing a cleaning cycle robot returns to the Charging Dock to recharge 6 Pause To pause the robot during a cleaning cycle press the button on robot or press the button on the Remote Control To resume the cleaning cycle press button again To send robot back to the Charging Dock press button 7 Power OFF To end the cleaning cycle and put robot in standby mode press and hold button until robot s indica...

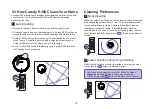
Страница 15: ...ging Dock to recharge Once Coredy R300 finishes its cleaning cycle Coredy R300 returns to the Charging Dock to recharge 1 Spot Cleaning When you select Spot Cleaning robot intensely cleans a localized area by spiraling outward about 3 feet 1 meter in diameter and then spiraling inward to where it started When Spot Cleaning robot boosts its vacuum power to provide the best cleaning possible where y...

Страница 16: ...ct this mode only when one specific room needs to be cleaned Make sure to confine Coredy R300 to the room by closing the door Press on the remote control to start cleaning in Single Room Mode 5 MAX Attach the mop cloth to the holder and fill the water tank with water 1 Remove the dust bin from the robot 2 3 4 Floor Mopping Cleaning Coredy R300 support wet mopping function Required a water tank and...

Страница 17: ... 4 Please remove the water tank after mopping Robot cannot auto detect and avoid the carpet please manually carry it down from carpet if the robot climbs to carpet The robot has 4 cleaning modes for your choice under mopping cleaning function Auto Random Spot and Edge use remote control to select the desired cleaning modes to achieve optimal cleaning for your home Select a Cleaning Mode 5 Default ...

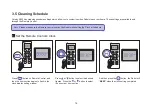
Страница 18: ...mote Control and then the hour section begins to flash in the clock display setting window Set the Remote Control s Clock 1 Press or button to select the desired figures Press the or button to select the minute or hour section And then press the button the Robot will BEEP when the clock setting completed 16 Note Please make sure the Remote Control near by the Robot while setting the Clock or Sched...

Страница 19: ... display setting window Press or button to select the desired figures Press the or button to select the minute or hour section And then press the button the Robot will BEEP when the Cleaning Schedule setting completed Press and hold button approximately 4 seconds on Remote Control the Robot will BEEP when the Cleaning Schedule process cancel completely 17 ...

Страница 20: ...isibly worn Cliff Sensors Charging Contacts Floor Tracking Sensor Front Driving Wheel Unversal Wheel Once per month Filter Once per week twice per week in homes with pets Every 2 3 Months Every 12 months Dust Bin After each use Note Coredy manufactures various replacement parts and assemblies If you think you need a replacement part please contact Coredy Customer Care for more information Every 12...

Страница 21: ... Robot s Bin Open the middle cover and remove the dust bin 1 4 2 Cleaning Robot s Filter Remove the filter 1 Shake off debris by tapping the filter against your trash container 2 Open dust bin door to empty it 2 19 ...

Страница 22: ...pen the middle cover and remove the water tank 1 Remove the cleaning mop cloth from holder wash and lay flat to dry 2 Empty the remaining water from the water tank 3 Use soft and dry cloth to wipe the outside of water tank lay flat to dry Avoid direct sunlight 4 20 ...

Страница 23: ...Cliff Sensors and Charging Contacts Remove the brush 1 Wipe Robot s Cliff Sensors with a clean dry cloth 1 Wipe the charging contacts on Robot and the Charging Base with a clean dry cloth 2 Clean the brush and the brush stand and reinstall the brush 2 21 ...

Страница 24: ...ing Sensor Use a clean dry microfiber or soft cotton cloth to wipe any debris that has accumulated in the round sensor opening on the right side of the bottom surface Do not spray cleaning solution directly into the sensor entrance 22 ...

Страница 25: ... battery or other accessories for the robot Remove the lithium ion battery from the product Place a piece of tape over the battery s metal charging contacts Reinstall the battery with the tape on it in the product and secure the battery door Package the product in its original packaging or in your own packaging that prevents any movement during transportation Ship via ground transportation only no...

Страница 26: ... and the two battery screws on the battery door then remove 1 Reinstall the battery with the battery label and tabs facing up 2 Reinstall the battery door and the two screws Take care not to pinch the side brush in the battery door when re installing the battery 3 Battery Removal 24 ...

Страница 27: ...r an audible tone signifying a successful reboot 5 Troubleshooting 25 Indicator Lighting Red Clean the front driving wheel then press the power button to restart the robot Robot s front driving wheel is stuck One beep Clean the side brush then press the power button to restart the robot Robot s side brush is stuck Two beeps Remove and empty robot s dust bin Clean robot s filter then briskly tap th...

Страница 28: ...per several times to dislodge any debris that might be trapped underneath Press robot s bumper 5 10 times to ensure bumper contracts freely Two beeps Manually take the robot on the charging dock to charge Ensure there are no obstacles in front of the charging dock or starting position wipe the charging contacts on both of the charging dock and robot with a clean dry cloth Robot s battery power lev...

Страница 29: ... and then turn it back on You cannot schedule cleanings Make sure the main power switch on the bottom of Coredy R300 is turned on Make sure the time time of day AM PM and the scheduled time have been set correctly Check if Coredy R300 s power is too low to start cleaning Suction power is weak Check if any obstructions are blocking the suction inlet Empty the dust collector Clean the filters with a...

Страница 30: ... m to the left and right side and within 6 ft 2 m of the front of the Charging Base When Coredy R300 is in the vicinity of the Charging Base distance within 26ft 8M it returns more quickly However if the Charging Base is located far away distance over 26ft 8M Coredy R300 needs more time to return Please be patient as it walks back Clean the charging contact pins Coredy R300 s movements or travel p...

Страница 31: ...er Service Website http shop coredy com E mail support coredytech com US COST FREE Tech Support 1 800 999 8470 UK COST FREE Tech Support 44 808 134 9909 coredytech CoredyOfficial coredy_robotvacuum Coredy Official ...

Страница 32: ... 6 MODEL R300 Website http shop coredy com E mail support coredytech com US COST FREE Tech Support PST Mon Sun 06 00 24 00 GMT Mon Sun 14 00 08 00 1 800 999 8470 UK COST FREE Tech Support 44 808 134 9909 ...

Отзывы: