background image

- 4 - 

Chapter 2: Getting to know your system 


System Overview 


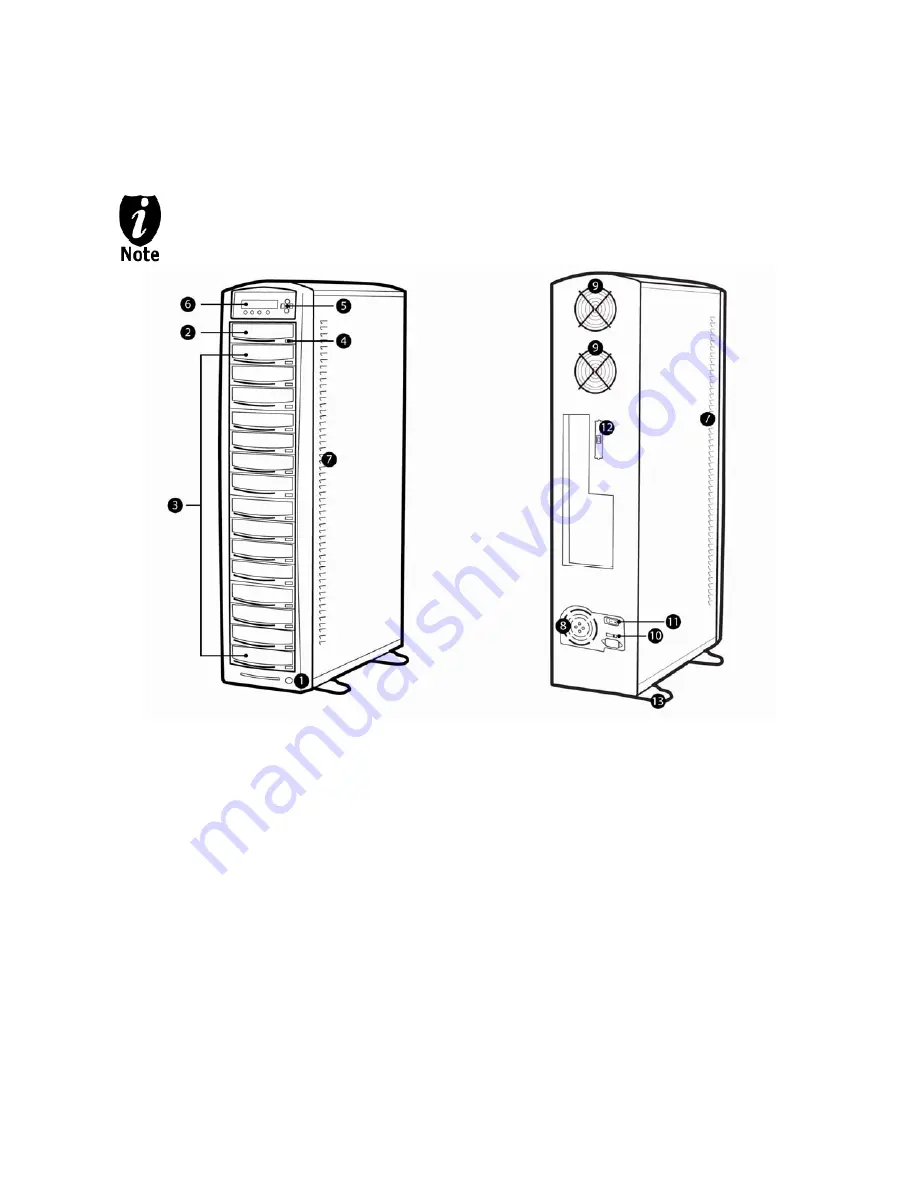
The below image is one representation of the duplicator casing. Your case’s outlook 
may vary but will have similar principles. 


Figure 1-1 System Controls and Display 


The components shown in Figure 1-1 are:


1. 

System Power On/Off Button 

2. 

Optical Disc Reader  
(Referred to as “Reader” throughout this manual) 

3. 

Optical Disc / LightScribe Label Writers 
(Referred to as “Writer” throughout this manual) 

4. 

Eject Button 

5. 

Keypad 

6. 

LCD Screen 

7. 

System Ventilation Vents  

8. 

Power Supply Fan 

9. 

Ventilation Fans 

10. 

Power Voltage Switch (110v/220v) (not available on all models) 

11. 

Power Supply On/Off Switch (not available on all models) 

12. 

USB/Firewire Connection (not available on all models) 

13. 

Stability Feet (not available on all models)


Содержание LightScribe

Страница 1: ...User Manual For LightScribe Duplicator V 3 5 4 ...

Страница 2: ... PART THEREOF OF A COPYRIGHT DISC IS STRICTLY PROHIBITED WE DISCOURAGE THE USE OF ANY SUCH ACTION THAT GIVES RISE TO CRIMINAL INTENT AND PROSECUTION THE SELLER OF THIS PRODUCT IS NOT RESOPONSIBLE FOR ANY POTENTIAL ILLEGAL ACTIONS OF THE USER DUE TO ACTIVITIES BEYOND THE SCOPE OF THE PRODUCTS INTENDED USE Copyrights and Trademarks ALL RIGHTS RESERVED NO PART OF THIS PUBLICATION MAY BE REPRODUCED IN...

Страница 3: ...y Source to the Hard Drive 14 o Section 3 Making Copies from an existing partition image of the Hard Drive 14 Design and Printing Labels 18 o Section 1 Design your labels with LightScribe Template Labeler and create a LightScribe Label CD 18 o Section 2 Selecting the Print Source of the system as the Reader 22 o Section 3 Print copies of your LightScribe label with the LightScribe Label CD you ve ...

Страница 4: ...In addition to the copy protection limitation the system cannot copy across formats This means that you cannot copy a DVD master onto a recordable CD or vice versa In addition you cannot copy the same formats if the discs have different maximum capacity limitations This means that you cannot copy a single layer DVD or Blu ray Disc onto a double dual layer DVD or Blu ray Disc or vice versa The reco...

Страница 5: ...tem Do not try to use the Air Duster to clean the system while the reader writer trays are open In doing so you may inadvertently blow dust into the recording device and damage the recording device 6 Proper Shutdown To avoid possible system failures you need to shutdown the system properly To shutdown the system you need to press the Up or Down Arrow button to 18 Shutdown then press ENT Enter and ...

Страница 6: ...r describes what every function setting does Appendix A LightScribe Software Setup Instructions This section provides easy walkthrough on how to install the LightScribe software needed to generate the label files Appendix B Optional External Device USB 2 0 Firewire 1394 Setup Guide This section describes how to enables one of many writers of your system as an external writer for your PC via system...

Страница 7: ... Button 2 Optical Disc Reader Referred to as Reader throughout this manual 3 Optical Disc LightScribe Label Writers Referred to as Writer throughout this manual 4 Eject Button 5 Keypad 6 LCD Screen 7 System Ventilation Vents 8 Power Supply Fan 9 Ventilation Fans 10 Power Voltage Switch 110v 220v not available on all models 11 Power Supply On Off Switch not available on all models 12 USB Firewire C...

Страница 8: ... Panel The below image is for reference only Your key assignment and appearance may differ Up Menu Option Scroll Up Down Menu Option Scroll Down Enter OK Execute the function Escape go back to the previous function ...

Страница 9: ...ies on page 11 For example if you want to enter a partition name of FUN1 do the following a Press the down button repeatedly until F is displayed b Press the ENT Enter button once to move the cursor to the next position c Press the down button repeatedly until U is displayed d Press the ENT Enter button once to move the cursor to the next position e Press the down button repeatedly until N is disp...

Страница 10: ...drives during the first round of the copy process Then starting from the 2nd round all copies will be made from the hard drive for enhanced performance and reliability If you prefer not to utilize this feature please change the Duplication Mode setting to On the Fly under Setup menu Please refer to page 39 for more details Section 1 Selecting the Copy Source When you turn on your system after it h...

Страница 11: ...m to count the number of copies you ve made for this job and prompt you when the desired number has been achieved The Counter feature is for your convenience only and will allow you to make more copies than the amount desired if so required You can choose not to input your desired number of copies if you prefer to copy continuously with no interruption It will still count the number of copies you ...

Страница 12: ...en you shall see the following screen By default the Auto Start setting is set to Auto Therefore if your system is not completely filled with blank discs and there is no activity within 30 seconds or if all writers are filled and the system detects this the system will start automatically Once the number of blank discs you inserted matches the number of discs detected on the screen press ENT Enter...

Страница 13: ...lank media to continue making more copies You can also press the ESC Escape button to terminate your project and go back to the main menu If you ve specified a counter value for your project and your project is completed you shall see the following screen You can then press ENT Enter to go back to main menu If you happen to have any failed discs bad copy the failed disc s will not be ejected autom...

Страница 14: ...ge files in the hard drive If your system has a Hard Drive installed a partition image will be created whenever you begin to load master disc content into the hard drive The number of images the hard drive can hold is determined by the capacity of your hard drive and the size of every master disc image you transferred into the hard drive Hard Drive Manufactures use conversion rate of 1GB 1 Billion...

Страница 15: ...ressing the up or down button to find your desired partition naming method Option 1 A new partition image Screen Shot New Partition Option 2 Overwrite one of the existing partitions images if any exists including the reserved partition image Screen Shot Overwrite Option 3 Choose Auto Generate to have the system automatically generate a partition image name for you Screen Shot Auto Gen From 1 of th...

Страница 16: ...e chosen Auto Generate Then precede to the next step Step 5 Please place your master disc into the Reader or the 1st Writer if there s no Reader installed in your system Once the system recognizes your master disc the loading progress screen will be displayed as show below Step 6 Once the loading process is completed you should see the following screen 4012MB indicates the total capacity of your m...

Страница 17: ... Source menu and you shall see a screen similar to below Step 3 Use the up or down button to locate the Hard Drive and press the ENT Enter button to select it If the hard drive has already been pre selected as the source the system will NOT respond to the ENT Enter button Please press the ESC Escape button to go back to the main menu Once the source has been selected you will be guided to the Main...

Страница 18: ...l still count the number of copies you ve made for this job but it will not notify you when to stop To do so simply press the ENT Enter button when you see the No Counter on the 2nd line of the screen below Or you can choose to enter the desired number of copies for this job by following this simple procedure a Press the up or down button to following screen b Then press the ENT Enter button to su...

Страница 19: ... is no activity within 30 seconds or if all writers are filled and the system detects this the system will start automatically Once the number of blank discs you inserted matches the number of discs detected on the screen press ENT Enter if you are not using Auto Start or wish to speed up the process to confirm and the following Processing screen will appear If the number of blank discs you insert...

Страница 20: ...our project and your project is completed you shall see the following screen You can then press ENT Enter to go back to main menu If you have any failed discs bad copy during a run the failed disc s will not be ejected automatically You need to manually eject them and throw them away if they are write once recordable disc s PASS 7 indicates that you ve just made 7 successful copies FAIL 0 indicate...

Страница 21: ...ng the software please contact Tech Support for assistance Section 1 Design your labels with LightScribe Template Labeler and create a LightScribe Label CD Step 1 Launch the LightScribe Template Labeler By clicking the shortcut icon on your desktop Or you can find the program launch shortcut in Start All Programs LightScribe Direct Disc Labeling LightScribe Template Labeler Since we use this softw...

Страница 22: ...ategories 2 Click on your Template choice to activate 3 If you prefer more advanced design capabilities instead of the pre designed templates you can do following a Design your own CD label artwork using a more advance design software like Adobe PhotoShop b Export your completed CD artwork as a picture format like bmp jpeg png etc c Choose an empty template from the Template Labeler and add the ex...

Страница 23: ...he picture you d like to use 4 Use the Zoom button or the scroll wheel of your mouse to size the picture and then drag it to position where you want it within the selection window 5 For text just click on the text field and then type the text you d like to appear within the text field Note you can enter multiple lines of text depending on the template chosen 6 Step 4 Preview and Print Label 5 4 6 ...

Страница 24: ...ation the name of the label file s you wish to generate In addition due to the system display limitation make sure the file name does not contain any foreign characters other than 26 Greek alphabets numerical digits and or some basic symbols like etc Step 6 Create a Label CD Locate the label file s lsi files on your PC Create a Data CD with the label file s via a CD DVD Creating Software like Nero...

Страница 25: ...rive and press the ENT Enter button to select it If you would like to use one of the Writers as the source use the up or down button to locate Drive 1 or up and press the ENT Enter button to select it If the drive you ve selected is the same as the original source the system will NOT respond to the ENT Enter button Please press ESC Escape button to go back to the main menu Once the source has been...

Страница 26: ... choose not to input your desired number of copies if you prefer to print continuously with no interruption It will still count the number of copies you ve made for this job but it will not notify you when to stop To do so simply press ENT Enter button when you see the No Counter on the 2nd line of the screen below Or you can choose to enter the desired number of copies for this job by following t...

Страница 27: ...stem to detect them After they have been recognized then you shall see the following screen By default the Auto Start setting is set to Auto Therefore if your system is not completely filled with LightScribe printable discs and there is no activity within 30 seconds or if all writers are filled and the system detects this the system will start automatically Once the number of LightScribe printable...

Страница 28: ...l see the following screen Step 8 Remove the successful copies and refill the trays with additional LightScribe printable discs to continue printing more copies You can also press the ESC Escape button to terminate your project and go back to the main menu If you ve specified a counter value for your project and your project is completed you shall see the following screen You can then press the EN...

Страница 29: ... Press the ENT Enter button to enter the Select Burn Speed menu and you shall see a screen similar to below Step 3 Select the Correct Speed Type There are different types of recording speed based on the disc format and source HDD CD to CD Copying to CD R RW media from a pre loaded CD partition image in the hard drive or a CD master disc in the Reader Writer HDD DVD to DVD Copying to DVD R media fr...

Страница 30: ... selection If the speed value you ve selected is the same as the current speed value the system will NOT respond to the ENT Enter button Please press the ESC Escape button to go back to the main menu Step 5 Once the speed setting has been successfully changed you shall see the following screen for 2 seconds Then you will be directed back to the main menu CD to CD Speed 16x CD to CD Speed Adjusted ...

Страница 31: ... be instructed to copy them onto a blank 80 min CD R media You can operate this function by choosing Edit Track to Hard Drive when asked This is considered a safer method to per form the mix audio tracks If any of the Audio CD tracks you wish to mix are not readable due to scratches or bad quality the blank CD R media will NOT be ruined since the blank CD R media isn t being recorded on until all ...

Страница 32: ...p or down button to display the playtime of each track on this audio CD and press the ENT Enter button to select the track you wish to be mixed Once a track is selected you shall see the symbol on the left of the track number on the 2nd line as shown in the below screen If the track you have selected will cause the total playtime of all audio tracks to be more than your blank CD R media capacity y...

Страница 33: ... will now start the mixing process as shown in the following screen Step 8 Once the mixing process is completed you will see the following screen When you re finished adding tracks you can choose to finalize the job mark the completion by performing the following steps a Press the ENT Enter button when you see Finish Mixing on the 2nd line of the screen like below b Then press the ENT Enter button...

Страница 34: ... menu Or you can choose to mix more tracks from other Audio CD s by pressing the up or down button until you see Insert Next Master on the 2nd line as in the following screen Then press the ENT Enter button to repeat Steps 3 through 8 When the whole process is complete your mixed copy will be ejected and you shall see the following Press ENT Enter button and you will be directed back to the main m...

Страница 35: ...Enter button once 10 Press down button until you see Are you done on the 2nd line 11 Press ENT Enter button once 12 Press down button until you see Insert Next Master on the 2nd line 13 Press ENT Enter button once 14 Insert CD2 DUPLICATOR 2 20 10 Mix Audio Tracks Mix Mode Directly to Blank CD Preparing Waiting for a Blank Preparing Waiting for Master Total 0 Trk 0m 00s Track 1 4m 31s Total 0 Trk 0...

Страница 36: ...2 Press ENT Enter button once 23 Press ENT Enter button once 24 Press ENT Enter button once 25 Press ENT Enter button once Total 2 Trk 9m 47s Track 3 4m 47s Total 3 Trk 14m 34s Track 3 4m 47s Total 3 Trk 14m 34s Track 4 5m 26s Total 4 Trk 20m 00s Track 4 5m 26s Total 5 Trk 24m 27s Are you done Mixing 3 0 4m 47s Mixing Complete Finish Mixing Total 4 Trk 20m 00s Track 5 4m 27s Total 5 Trk 24m 27s Tr...

Страница 37: ...1 Use the up or down arrow button to navigate to the Setup menu Step 2 Press the ENT Enter button to enter the Setup menu and you shall see a screen similar to below Step 3 Use the up or down arrow button to navigate to the Auto Start setting Step 4 Press the ENT Enter button to enter the Auto Start setting and you shall see a screen similar to below Step 5 Use the up or down arrow button to chang...

Страница 38: ...k to the main menu This change will only be effective for the current usage until you power off the system unless you perform the Save function under the Utilities menu or perform the Shutdown function under the main menu DUPLICATOR 2 20 11 Setup ...

Страница 39: ...all write once recordable discs such as DVD R CD R will be reusable The purpose of performing such simulation is to ensure error free duplication Due to the physical limitation of DVD R RW BD R RE recordable format you can not perform this procedure on these formats If you do so you will encounter a failure messages If you are using CD RW DVD RW discs as your blank media during the simulation any ...

Страница 40: ... your master disc content into the hard drive as a partition image For more information please refer to section 1 of Make Hard Drive to Disc Copies Loading Master Disc content into the Hard Drive as a partition image on page 11 11 3 Rename Partition This function will guide you to rename an existing partition image including Reserve partition image in the hard drive 11 4 Delete Partition This func...

Страница 41: ...related operations 13 MIX AUDIO TRACKS This process will guide you to mix an Audio CD from various tracks among different Audio CDs For more information please refer to Mix Audio Tracks on page 28 14 SETUP 14 1 Language This setting will allow you to choose which language you prefer be used to navigate the controller function of this system 14 2 Auto Start This setting allows you to choose Auto Fu...

Страница 42: ... allow you to choose which menu you would like to see first when you turn on the system 14 8 Screen Saver This setting will allow you to choose whether you want to enable the Screen Saver feature or not By enabling this feature a screen saver will be displayed when your system has been idle for a long period of time 14 9 Duplication Mode There are two duplication modes Load and Copy and On the Fly...

Страница 43: ...e Connections were installed Please note that system needs to be restarted when this setting is changed 15 Utility 15 1 Disc Info If you are uncertain about the type of blank recordable media you are using the system is equipped with the disc info function to help identify and notify you of the disc information encoded within This feature will identify your blank recordable media s format capacity...

Страница 44: ...feature is disabled by default Prior to activating this feature the duplicator recognizes all users as the only activated user defined as the administrator The pre defined password for this menu is 0000 16 1 View User This menu allows you to view current existing user accounts 16 2 Create User This menu allows you to create additional user accounts Each user has their own settings During this proc...

Страница 45: ...llow the system to operate the disc to disc copy function without any user inputs for ease of operation 18 Shutdown This function saves any system settings that you have entered and makes sure it is safe to turn off your system Once you see the Ready to Power OFF message then you can safely turn off the machine via the Power Switch Turning off your system without performing this function will incr...

Страница 46: ...3 or Vista Software Installation 1 Insert the LightScribe Installation Disc into the CD drive of your computer 2 Using the My Computer icon or Windows Explorer click on the CD drive 3 From the CD Drive double click the setup exe to run the setup program 4 Follow the Installation Wizard to start the installation process see screen below 5 During the installation process you will be prompted for a P...

Страница 47: ...comes with your system should be pre selected You can then click Install to continue the installation process 7 During the installation process the following applications will be installed LightScribe System Software Template Labeler 8 Upon successful installation of the above software click the Finish button to complete the installation ...

Страница 48: ...change the setting to ON 6 Press ENT Enter button to submit your selection 7 The system will either restart by itself or prompts you restart it manually by powering the system off and back on 8 Your computer should recognize a number of external devices depending on the system you purchased Above instructions are for you to turn on the USB Firewire port However if you wish to turn it off please pe...

Страница 49: ...source back to the Reader and try again 3 Buttons do not function 9 Maybe it is still busy on a task Give it sometime and press it again If it still doesn t work turn off the machine and then restart the machine after a minute 4 Copy completed but the copies are not readable executable 9 Use compare feature to check the copied disc 9 Based on our experience the quality of your media plays a big ro...

Страница 50: ... 9 Please verify that the Label CD wasn t created under Roxio s Drag to Disc Nero s InCD or Windows XP or Vista s build in burning software 9 Please verify that the correct writer was selected during the software installation 11 How do I reset my system back to default a Go to menu 15 Utilities b Press the ENT Enter button c Press down button until you see Load Default on the 2nd line d Press ENT ...

Страница 51: ...lank disc s are missing when the job has already started Possible Solution Please make sure blank discs are placed in writer trays 203 Burner Mixed or Firmware version Mixed Description The model or firmware version of all writers in the duplicator is not the same Possible Solution This typically happens when you recently replaced a writer drive Contact Tech Support 204 Targets Master Not Compatib...

Страница 52: ...ssible Solution Please go to Disc Info in Utilities to make sure every blank disc has the same media ID M Code Replace the one s that are different if necessary 208 Targets are not RW discs Description The target blank discs are not Rewritable discs Possible Solution Please go to Disc Info in Utilities to make sure every blank disc is a rewriteable disc 209 Master Disc is CSS Protected Description...

Страница 53: ...ecessary partitions images 231 Redundant Name Description The name entered has already been used in the system Possible Solution Please enter a different name or rename the existing file name which is in conflict before you re enter this name 232 Format Failed Description The system is not able to format the hard drive A detailed error code will be displayed at the end of the error message in the ...

Страница 54: ...ster or blank disc 252 Not Audio CD Description The Master Disc is not an Audio CD when preparing the mixing process Possible Solution Please verify your master disc is an Audio CD 253 Over Blank Disc Capacity Description The total size of the selected tracks is larger than the capacity of the target blank disc during the track selection process Possible Solution Try to select an alternative track...

Страница 55: ...y to re download the Firmware Update File 262 Unknown flash model Description The Firmware Update File is not meant for your system Possible Solution 1 Try to contact Tech Support for the proper Update file 263 User Abort Description A job is being aborted by user pressing the ESC Escape button for more than 5 seconds during a job run Possible Solution Restart the job when ready with the proper ma...

Страница 56: ...nt has been tested and found to comply with the limits for a Class B digital device pursuant to Part 15 of the FCC Rules These limits are designed to provide reasonable protection against harmful interference in a residential installation This equipment generates uses and can radiate radio frequency energy and if not installed and used in accordance with the instructions may cause harmful interfer...

Страница 57: ... locate the machine on a solid support surface not on plush carpet that has adequate strength to support the weight of the machine Always unplug this equipment from the electrical outlet before cleaning Do not use aerosol cleaners Aerosol cleaners can be explosive or flammable when used on electromechanical equipment Do Not Do These Never use a ground adapter plug to connect the equipment to a pow...

Страница 58: ...jects into slots or openings on the machine Electrical shock or fire may result 9 Do not obstruct ventilation openings These openings are used to provide proper cooling to the machine Electrical Supply 1 This product shall be operated from the type of electrical supply indicted on the product s data plate label If you are not sure that your electrical supply meets the requirements please consult a...

Страница 59: ...ation supplied with the product 2 Do not carry out any maintenance on this product which is not described in the customer documentation 3 Use supplies and cleaning materials only as directed in the Operator section of this manual 4 Do not remove covers or guards that are fastened with screws There are no parts behind these covers that you can maintain or service Do not use aerosol cleaners Aerosol...

Страница 60: ...member states related to low voltage equipment 2004 108 EC December 15 2004 Council Directive 2004 108 EC as amended Approximation of the laws of the member states related to electromagnetic compatibility A full declaration of conformity defining the relevant directives and referenced standards can be obtained from your Authorized local dealer In order to allow this equipment to operate in proximi...

Отзывы: