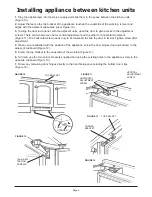
background image

Page 5

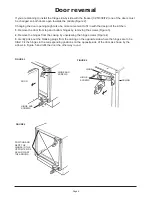
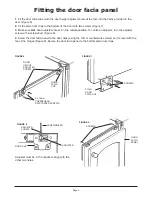
Fitting the door facia panel 

1. Fit the door facia clips (with the door height adjuster screw at the top) into the holes provided in the
door (Figure 6).

2. Fit the plain door clips to the bottom of the door with two screws (Figure 7).

3. Make sure ALL door adjusters are set in the middle position. To centre an adjuster, turn the adjuster
screw with a screwdriver (Figure 8).

4. Screw the door facia panel to the door clips (using the 12mm countersunk screws) so it is level with the
top of the hinges (Figure 9). Secure the door facia panel to the bottom plain door clips.

FIGURE 6

DOOR 
FACIA
CLIP

2 x 18mm
CHEESEHEAD 
SELF-TAPPER SCREWS

DOOR
HEIGHT
ADJUSTER
SCREW

FIGURE 7

PLAIN
DOOR
FACIA CLIP

SCREWS

FIGURE 8

SCREWDRIVER

DOOR CLIP

ADJUSTER

ADJUSTER
SCREW

FIGURE 9

DOOR
FACIA
PANEL

SCREWS

Adjuster must be in the middle to align with the
other two holes.

Содержание CZ51037IFR

Страница 1: ...CZ51037IFR Integrated Larder Fridge U US SE ER R I IN NS ST TR RU UC CT TI IO ON NS S Please read these instructions carefully before using this product and keep them safe for future reference...

Страница 2: ...10 Specification 11 Safety measures 11 After sales service 11 O Do read these instructions thoroughly before using this appliance O Do install the appliance only in the vertical position O Do stand f...

Страница 3: ...tall the fridge and the freezer side by side one of the doors on one of the appliances must be reversed to facilitate opening FIGURE 1 FIGURE 2 Figure 1 shows the dimensions and installation of fridge...

Страница 4: ...moving the screws Figure 3 2 Remove the hinges from the casing by unscrewing the hinge screws Figure 4 3 Gently prise out the blanking plugs from the casing on the opposite side where the hinges are t...

Страница 5: ...the adjuster screw with a screwdriver Figure 8 4 Screw the door facia panel to the door clips using the 12mm countersunk screws so it is level with the top of the hinges Figure 9 Secure the door faci...

Страница 6: ...orizontal screw needs only to be loosened to slide the door in its slot Tighten screw after adjustment 4 When you are satisfied with the position of the appliance screw the door hinges top and bottom...

Страница 7: ...esh food and drinks 2 Dairy products should be stored in the egg dairy produce compartments provided in the door liner 3 Cooked dishes should be stored in airtight containers and are best kept on eith...

Страница 8: ...free from dust to maintain optimum efficiency Use a soft brush or vacuum cleaner to remove the dust taking care not to damage the pipes and wiring Also remove dust from the compressor motor housing w...

Страница 9: ...thing is preventing the door from closing Airflow restricted around appliance Improve ventilation Large quantity of fresh food loaded Hot weather Frequent opening of door Avoid unnecessary opening of...

Страница 10: ...accordance with the following code Figure 20 GREEN YELLOW EARTH E BLUE NEUTRAL N BROWN LIVE L This product must be earthed As the colours of the wires in the mains lead may not correspond with the co...

Страница 11: ...off the mains lead and remove any door locks to ensure the appliance is beyond further use The appliance must be delivered to an authorised collection centre This appliance is guaranteed for a period...

Страница 12: ...wise be caused by inappropriate waste handling of this product The symbol on the product or on the documents accompanying the product the Crossed Out Wheelie Bin symbol indicates that this appliance f...

Отзывы: