background image

25

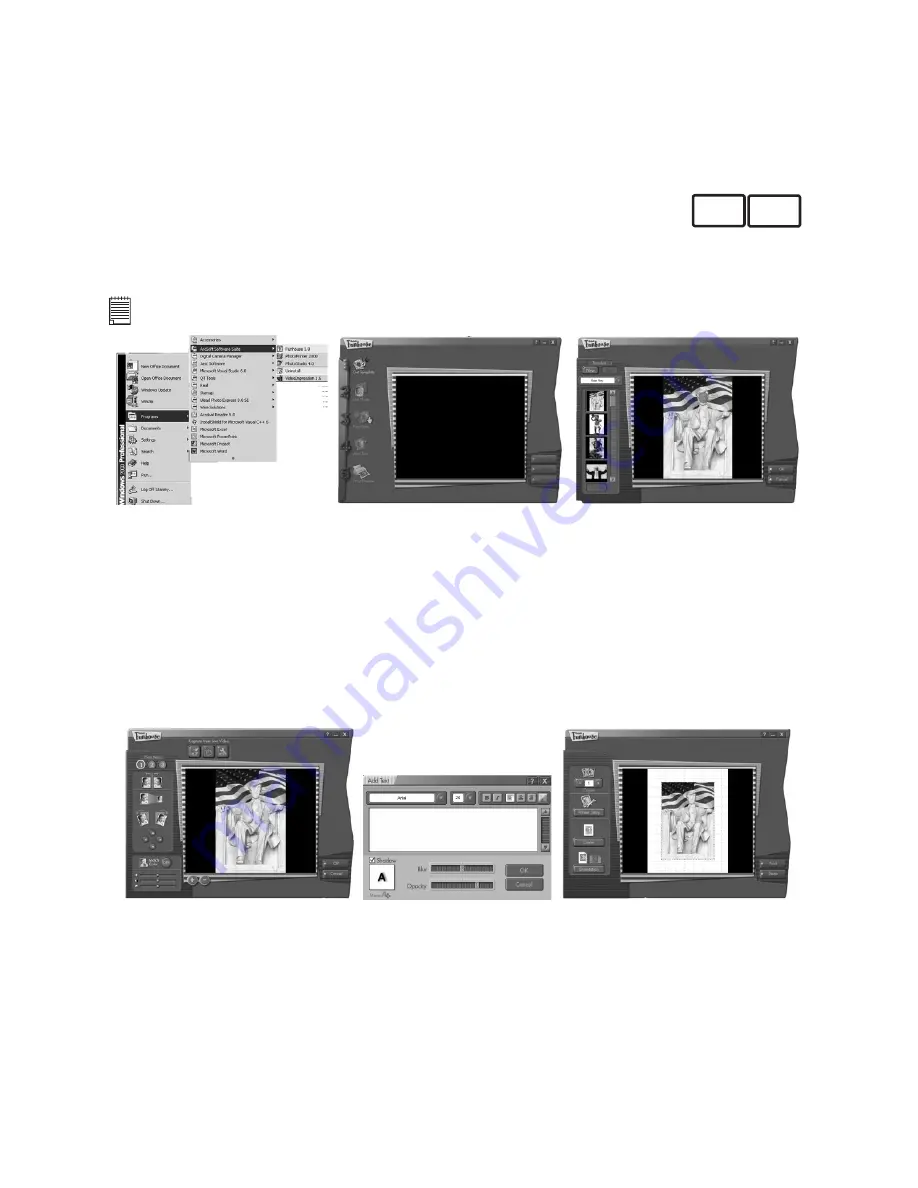
• How to use Funhouse™ 1.0 

PC MAC

1.  Open the “Funhouse 1.0” software.

2.  Click “1. Get Template” to select the template in the different type of category and then 

click “OK” to confirm.

 Important! Make sure the “

TV C@m

” CD-ROM is in the CD-ROM Drive.

Using the images stored in your Digital Camera:- 

3.  Double  click  on  “2.  Get  Photo”  and  click  “Open”  and  select  the  location  where  your 

images are stored.

4.  The selected image will shown within the “mask” on the selected template.  You can 

play  with  the  image  by    clicking  on  “3.  Fine-Tune”  to  resize,  rotate  or  reposition  the 

images by reposition the image using your mouse and dragging the image.  Press “OK” 

to confirm.

5.  Click  “4.  Add  Text”.    Type  in  the  text  your  want  to  write  and  then  press    “OK”  to 

confirm.

6.  Click “5. Print Preview” to print a hard copy.

Содержание CIC-390

Страница 1: ...TM User s Manual TV C m ...

Страница 2: ......

Страница 3: ... Lens 7 Viewfinder 8 Battery door 2 1 3 4 8 7 6 5 1 Docking station connector door 2 Tripod mount socket Bottom View 2 1 1 Digital Camera Connector 2 Floppy Diskette Slot 3 Eject Button 4 Power Supply Port 5 Video Out Port 6 Menu Display Button 7 Scroll Left Button 8 Select Button 9 Power LED 10 Scroll Right Button 1 DC IN 9V TV OUT 9 10 7 6 8 2 3 5 4 ...

Страница 4: ... Picture Taking settings 9 Setting the picture quality 9 Setting the 2X digital zoom 10 Self Timer 10 Re formatting the camera 10 3 Viewing your Pictures on your TV Screen 11 TV C m TV Docking Station 11 Connecting the Docking Station to the TV 11 Docking the Camera 12 Using the TV menu bar 13 Here s how to view the pictures 14 Basic functions 15 Other important information displayed on the TV men...

Страница 5: ... other Softwares 24 How to use PhotoStudio 4 0 PC MAC 24 How to use Arcsoft Funhouse 1 0 PC MAC 25 How to use Arcsoft PhotoPrinter 2000 PC MAC 26 How to use Arcsoft VideoImpression 1 6 PC MAC 27 7 Using your camera as a Web Cam for computer users only 28 Setting up PC 28 Making a call PC 28 8 Troubleshooting Problems 29 Troubleshooting Camera PC MAC 29 Troubleshooting Docking Station 30 9 Getting ...

Страница 6: ...c Microsoft NetMeeting PC Adobe Acrobat Reader PC Mac User s Manual Wrist Strap Camera Bag Quick Guide TV Docking Station Mains Adaptor 3 x Formatted Floppy Diskettes Please take a moment to fill out and return this Registration Card Your valuable input will help us to serve you better Product Registration Card 3 First Name Mr Middle Initial Last Name Address Ms Mrs Miss Please provide any comment...

Страница 7: ...orrectly 3 Close the battery door 1 2 3 Turning the Camera On and Off ON OFF Button To turn the camera on press the power button until the LCD display comes on To turn the camera off press the power button again The LCD display will switch off Note Whenever the camera is not in use please return it to the docking station or remove the batteries from the camera in order to extend the battery life ...

Страница 8: ... battery life after 60 seconds of non use Press the ON OFF button to reactivate the camera Checking Camera Status Switch the Camera on view the camera LCD screen to check which camera settings are active If an icon is not displayed that camera feature is not activated Status Bar Icons HIGH NORMAL LOW PAL NTSC 2X HIGH NORMAL LOW Best Pictures taken Better Good Docking station connected Camera busy ...

Страница 9: ...ove the batteries from the camera in order to extend the battery life Other Picture Taking settings Setting Section Set Picture Quality Setting the Picture Quality Set 2 x Digital Zoom Setting the 2 x Digital Zoom Self Timer Setting the self timer Deleting Pictures Deleting Pictures from the camera Setting the Picture Quality 1 Press the Feature button will appear and then press the Feature Change...

Страница 10: ...conds timer built in Frame our subject and use a stand not supplied to position your camera 1 Switch the camera on 2 Use the Feature button to select the self timer mode Press Feature Change button to confirm The self timer icon will flash until set 3 Frame your subject 4 Press the shutter button the camera counter will automatically count 10 seconds before taking a picture Re formatting the camer...

Страница 11: ...le between the rear of the Docking Station and the Line In Video or Video In socket on the TV 2 Switch the TV ON 3 If you are using a video player connect the TV Out Cable to the Video In socket on the rear of the Video player and switch the TV ON 4 Now connect the 9 volt main adaptor supplied to the rear of the Docking Station and then connect the plug to the socket and switch the mains ON TV OUT...

Страница 12: ...e the Feature Change Button to switch between PAL and NTSC setting See the section on PAL NTSC International TV Settings 3 Slide the camera connection cover open as illustrated below 4 Connect the camera into the docking station Note Make sure your camera is switched on before connecting to your docking station ...

Страница 13: ...Menu Bar is operated by the 4 Function Buttons on top of the Docking Station Power LED TV Menu Bar Display On Off button Used to display or hide the TV Menu Bar Scroll Left TV Menu Bar button Used to move left to the selected icon Scroll right TV Menu Bar button Used to move right to the selected icon Save Enter button Used to either save the pictures to the Floppy Disk or Used to confirm the func...

Страница 14: ... are highlighted in Grey when not active and coloured when active Use the Scroll left and Scroll right and select the Save enter button to confirm the operation The TV Menu Bar Icon will turn to colour when activated Insert one of the Floppy Disks supplied into the slot on the front of the Docking Station Make sure it s the right way round and not upside down See Section INSTALLING A Floppy Disk A...

Страница 15: ... the Camera Select this icon and then use the to select the delete mode from the camera Press the again to confirm deletion If you do not want to delete the current picture displayed on your screen press or Delete all Pictures from the Camera Select this icon and then use the to select the delete mode from the camera To prevent accidental erasure press the again to confirm deletion If you do not w...

Страница 16: ...ty Image Corruption Replace the Floppy Disk Image Faulty No Floppy Disk inserted insert a Floppy Disk Copying a picture to the Floppy Disk Copying all pictures to the Floppy Disk Important SAVING ALL PICTURES ONTO A FLOPPY DISK DISK FULL When the floppy disk is full the TV C m screen picture rotation will cease rotating Remove the full disk Insert a new disk The save mode is resumed by pressing En...

Страница 17: ...e right way up and the right way round with the round visible disk on the underside and the 2 square holes on the outer edge Removing a Floppy Disk from the docking station 1 Firmly press the eject button located directly below the Floppy Disk slot Eject Button Transferring your images from disk to a computer PC MAC 1 Simply remove the floppy disk by pressing the disk eject button on the docking s...

Страница 18: ...ur name and the other details requested for further on line support You must be connected to your internet service provider to register electronically For Macintosh Users MAC 1 Double click on the CD ROM icon TV C m 2 Double click the My Camera 1 icon 3 Click Continue 4 Click Quit to finish the installation A folder named My Camera will appear in your Hard Disk after installation and a short cut i...

Страница 19: ...e selection of printing templates including Kodak Digital Science Inkjet Photo Paper Templates and Avery brand paper products It also includes commonly used image editing tools and a wide selection of templates for frames edges and backgrounds for enhancing images ArcSoft VideoImpression 1 6 Movie Making Software ArcSoft VideoImpression is an easy to use video and image editing software program Th...

Страница 20: ...tick Re insert the CD ROM and follow steps 1 6 ticking only the software you want to add For Macintosh Users MAC 1 Insert the CD ROM disc into the CD ROM drive and close the CD ROM drawer 2 Double click the CD ROM icon TV C m 3 Double click on the selected Arcsoft software in the English Folder which you wish to install 4 Follow the instructions presented on the screen to complete the installation...

Страница 21: ... Re insert the CD ROM disc into the CD ROM drive and close the CD ROM drawer 2 An installation wizard will automatically launch 3 Click the Adobe Acrobat Reader 4 05 icon 4 Follow the instructions presented on the screen to complete the installation Visit http www adobe com for all your FAQ s tips and technical support For Macintosh Users MAC 1 Re insert the CD ROM disc into the CD ROM drive and c...

Страница 22: ...pace Standard Mouse Keyboard For Macintosh Users MAC PowerPC Processor Mac OS version 8 6 9 2 64MB RAM 128MB recommended USB Port 150MB Free disk space Colour display monitor with Higher Colour 16 bit graphics CD ROM Drive Standard Mouse Keyboard Uninstalling the Camera Driver For Windows Users PC 1 Select control panel from the start menu 2 Select Add Remove Program 3 Select My Camera Select Remo...

Страница 23: ... on your computer hard drive If the port is not labelled see your computer Users guide 3 Plug the other end of the USB cable into the port on your camera USB Transferring the Pictures For Windows Users PC 1 Create a folder named My Images on your computer desktop 2 Go to My Computer on your computer desktop and double click on the My Camera icon 3 The Picture files will appear on your desktop 4 Do...

Страница 24: ...hen deleting pictures from your computer Do not disconnect the camera from your computer until the timer icon has finished and we recommend that you wait a further one minute to ensure all deletions has completed How to Use Other Softwares You can upload your images directly from your camera into PhotoStudio ArcSoft Funhouse ArcSoft PhotoPrinter and ArcSoft VideoImpression Images can also be retri...

Страница 25: ...ra 3 Double click on 2 Get Photo and click Open and select the location where your images are stored 4 The selected image will shown within the mask on the selected template You can play with the image by clicking on 3 Fine Tune to resize rotate or reposition the images by reposition the image using your mouse and dragging the image Press OK to confirm 5 Click 4 Add Text Type in the text your want...

Страница 26: ... your FAQ s tips and technical support See Section 9 for more details How to use ArcSoft PhotoPrinter 2000 PC MAC 1 Select the PhotoPrinter 2000 software 2 Choose the Page Layout The selected page layout will on shown 3 Click Get Photo and then press Add or Add Photo Find the image you want which you have already saved in your hard disk and click Open 4 The captured images will be shown on the pho...

Страница 27: ... the Save icon and name your file and then press save Video impression will ask you where you want to place your video Select video template Step 3 Select the album icon and your video clip you have just produced will appear in the video templates Double click on your video your video will now drop into the storyboard Running the video Step 4 Select the play movie icon which will assemble your vid...

Страница 28: ...ick the NetMeeting icon on the desktop or select the NetMeeting icon from the Windows Start Menu 6 Type in the IP address computer name or telephone number for the person you want to call and press the Place Call button To find your own IP address go to Start and click Run Type in winipcfg and click OK IP configuration window will appear and you can see your IP address 7 If you need further help o...

Страница 29: ...iver or download the updated driver from www cool icam com and install the updated driver Check the USB controller in your BIOS if they are activated If these does not work contact your national customer support representative PC Symptom Problem Solution I cannot upload images to the computer Connection failure or The camera has not completed the image processing when you have tried to upload the ...

Страница 30: ... website http www cool icam com Troubleshooting Docking Station The docking station does not have any power and I cannot view the images on my TV The main adaptor is not connected to the docking station or The main adaptor is not plugged into the mains or The main adaptor has a problem connect the main adaptor to the docking station and switch the power on or Connect the main adaptor to the mains ...

Страница 31: ...1 510 979 5520 Tel 8610 6849 1368 Fax 1 510 440 1270 Fax 8610 6849 1367 E mail latinsupport arcsoft com E mail china arcsoft com For Oceania For Europe Middle East Africa Rest ArcSoft Australian Support Center of the World Baulkham Hills New South Wales ArcSoft Europe Support Center Ireland Tel 61 2 9899 5888 Tel 353 0 61 702087 Fax 61 2 9899 5728 Fax 353 0 61 702001 E mail support supportgroup co...

Страница 32: ...cture Image Sensor 640 x 480 pixel Pixel resolution High 640 x 480 pixel Normal 640 x 480 pixel Low 320 x 240 pixel Power 4 x AAA batteries Auto power off after 60 seconds of inactivity Self timer 10 seconds timer F 6 4mm Focal Length Colour System on TV PAL or NTSC TV Docking Station Specifications TV Docking Station Specifications Communication with TV Dimensions Cable included with camera Width...

Страница 33: ...not in use Do not use rechargeable batteries These instructions should be retained for future reference Tips Your Safety Maintenance Your camera should only be operated within the following environmental conditions 41 104º Fahrenheit 5 40º Celsius 20 85 relative humidity non condensing Battery life or image quality may be affected outside these conditions Your Safety Main adaptor The main adaptor ...

Страница 34: ... compliance could void the user s authority to operate the equipment NOTE This equipment has been tested and found to comply with the limits for Class B digital device pursuant to Part 15 of the FCC Rules These limits are designed to provide reasonable protection against harmful interference in a residential installation This equipment generates uses and can radiate radio frequency energy and if n...

Страница 35: ...elgium B G PAL Nicam Teletext Bermuda M Brazil N PAL N MTS Bulgaria D SECAM Canada M NTSC MTS CC Canary Island B PAL China D PAL Colombia M NTSC Cyprus B PAL Czechsolvakia D K SECAM PAL Denmark B PAL Nicam TeleText Egypt B SECAM Faroe Islands DK B PAL Finland B G PAL Nicam Teletext France E L SECAM Teletext Gambia I PAL Germany B G PAL FM FM Teletext Germany Prev East B G SECAM PAL Gibraltar B PAL...

Страница 36: ...PAL Kenya B PAL Korea M NTSC Luxembourg B G PAL NICAM Teletext Madeira B PAL Madagascar B SECAM Malaysia B PAL Malta B G PAL Mauritius B SECAM Mexico M NTSC MTS CC Monaco L G SECAM PAL Morocco B SECAM Netherlands B G PAL FM FM Teletext New Zealand B G PAL Nicam Teletext North Korea D K SECAM Norway B G PAL Nicam Pakistan B PAL Paraguay N PAL Peru M NTSC Philipines M NTSC Poland D K PAL Teletext Po...

Страница 37: ...Teletext United Arab Emirates B G PAL United Kingdom I PAL Nicam Teletext Uruguay N PAL MTS USA M NTSC MTS CC Venezuela M NTSC Yugoslavia B H PAL Zimbabwe B PAL SECAM 625 Advantages Stable Hues and Constant Saturation SECAM shares with PAL the ability to render images with the correct hue and goes a step further in ensuring consistent saturation of colour as well Higher Number of Scan Lines SECAM ...

Страница 38: ...38 UK 0802 2001 WWL Part No OM837371 R1 Printed in China ...

Отзывы: