background image

Issue 2  26/07/2021 

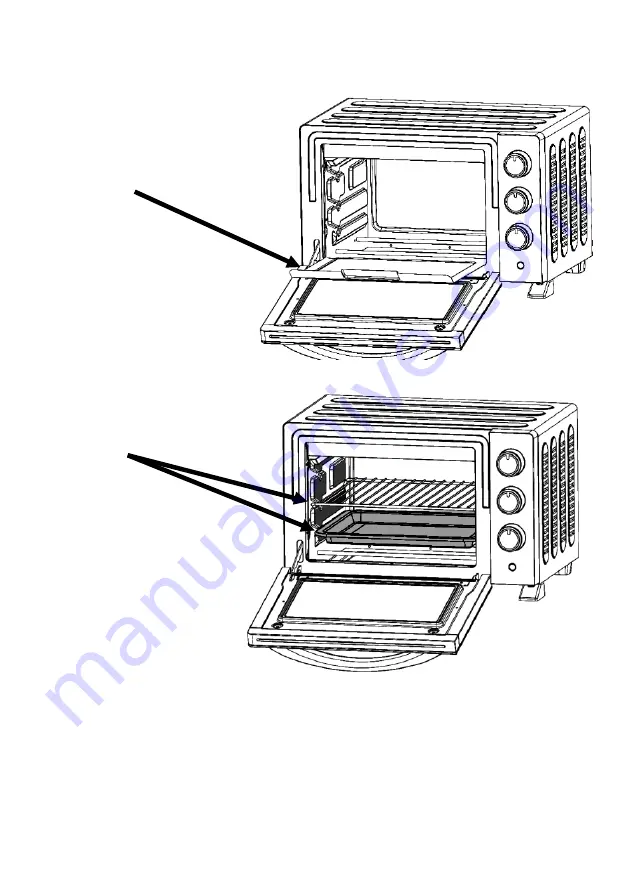
FITTING THE CRUMB TRAY AND RACKS 


Slide  the  crumb  tray 

underneath

  the  lower 

heating  elements  so 
that  it  lays  flush  with 
the  base  of  the  oven  
(fig. 1) 


Slide the grill rack and 
/ or baking tray onto 
the rack supports  
(fig. 2) 


Fig. 1 


Fig. 2 

Содержание KR-E20N-E1Dkh

Страница 1: ...Issue 2 26 07 2021 1 20 Litre Mini Oven Model No KR E20N E1Dkh Care Instruction Manual For household and indoor use only Please read these instructions before use and retain for future reference ...

Страница 2: ...oncerning use of the appliance in a safe way and understand the hazards involved Children shall not play with the appliance Cleaning and user maintenance shall not be made by children unless they are older than 8 and supervised Keep cable plug and appliance dry and away from areas where it is likely to get splashed Never immerse in water Never clean with a steam cleaner Do not pull on the cable to...

Страница 3: ...l sides and 50 cm above the oven to allow adequate ventilation Do not cover and allow the oven to cool fully before storing Do not operate the oven using a timer or separate remote control Do not use without the crumb tray fitted Ensure crumb tray is fitted below the lower heating elements If incorrectly positioned in the oven it could lead to abnormally high temperatures Do not place tinned or bo...

Страница 4: ...ling raw meat and poultry before handling any ready to eat foods Wipe and disinfect surfaces that have been in contact with raw meat and poultry Use separate utensils for handling raw meat poultry and cooked food or wash them thoroughly between use To check whether meat particularly poultry is cooked pierce the flesh with a skewer or fork the juices should run clear Ensure the product is piping ho...

Страница 5: ...1 5 PARTS 1 Door handle 2 Lower heating elements 3 Rack supports 4 Housing 5 Temperature control knob 6 Function knob 7 Air vents 8 Timer knob 9 Indicator 10 Glass door Grill rack Baking tray Rack Tray handle Crumb tray ...

Страница 6: ... the oven see page 5 Where to fit the crumb tray see fig 1 Where to fit the baking tray and rack see fig 2 How to fit the handle to the baking tray and grill rack see figs 3 4 How to open and close the door see figs 5 7 3 Some smoke may be emitted when the oven is first used To eliminate any manufacturing residues open the room window and operate the empty oven at maximum temperature for 10 minute...

Страница 7: ...TTING THE CRUMB TRAY AND RACKS Slide the crumb tray underneath the lower heating elements so that it lays flush with the base of the oven fig 1 Slide the grill rack and or baking tray onto the rack supports fig 2 Fig 1 Fig 2 ...

Страница 8: ...lied when fitting or removing the rack tray from the oven See figs 3 4 below on how to fit the handle Fig 3 Fig 4 If using another cooking vessel Always place the container onto the grill rack Ensure that it will fit into the oven cavity without touching the sides of the oven or the heating elements Ensure that the vessel is suitable for this type of oven e g Ferrite materials such as enamel cast ...

Страница 9: ...sired cooking temperature 100 220 C 6 Turn the FUNCTION selector control knob and select the desired cooking method 7 Turn the TIMER control knob select the cooking time required and the power indicator will illuminate to show that the cooker is now operational 8 Open the oven door Fig 5 6 and place the food into the oven using the grill rack and or baking tray Fig 5 Fig 6 9 If baking or roasting ...

Страница 10: ...lts ensure pieces of food are similar in size and thickness CLEANING Clean the oven grill rack baking and crumb tray after each use 1 Switch off and unplug the oven and allow it and the accessories to cool completely Cleaning the oven whilst hot may cause the glass door to shatter and risk personal injury 2 Wipe external surfaces of the oven with a soft damp cloth and dry surfaces with a soft dry ...

Страница 11: ...external 461 x 376 x 298 mm Product weight net 7 1 kg approx f RECYCLING ELECTRICAL PRODUCTS You should now recycle your waste electrical goods and in doing so help the environment This symbol means an electrical product should not be disposed of with normal household waste Please ensure it is taken to a suitable facility for disposal when finished with Visit www recycle more co uk click on bank l...

Страница 12: ...s identifying the terminals in a rewireable plug Rewireable plugs should only be replaced by a suitably competent person If in doubt consult a qualified electrician The BLUE wire must be connected to the terminal marked with the letter N The BROWN wire must be connected to the terminal marked with the letter L The GREEN YELLOW wire must be connecting to the terminal marked with the letter E or the...

Страница 13: ...Issue 2 26 07 2021 13 ...

Отзывы: