Bitstream formats will be muted.
4.
MENU:
Press to enter the OSD menu, or to back out from menu
items.
Note:
Pressing “MENU” and “+” together will reset the output
resolution to XGA (1024x768@60Hz). Pressing “Menu” and “-”
together will reset the output resolution to 720p@60Hz.
5.
-/+:
Press to move up and down or adjust selections within menus.
When not in the OSD press “-” to adjust the analog audio output
volume (with on screen level indicator). Press “+” to activate the
Auto Adjust function for VGA sources.
6.
ENTER:
Press to confirm a selection or to go deeper into a menu
item within the OSD. When not in the OSD this button switches
between the 2 inputs.
Note: Pressing “ENTER”, “+” and “-” together will perform a factory
reset on the unit
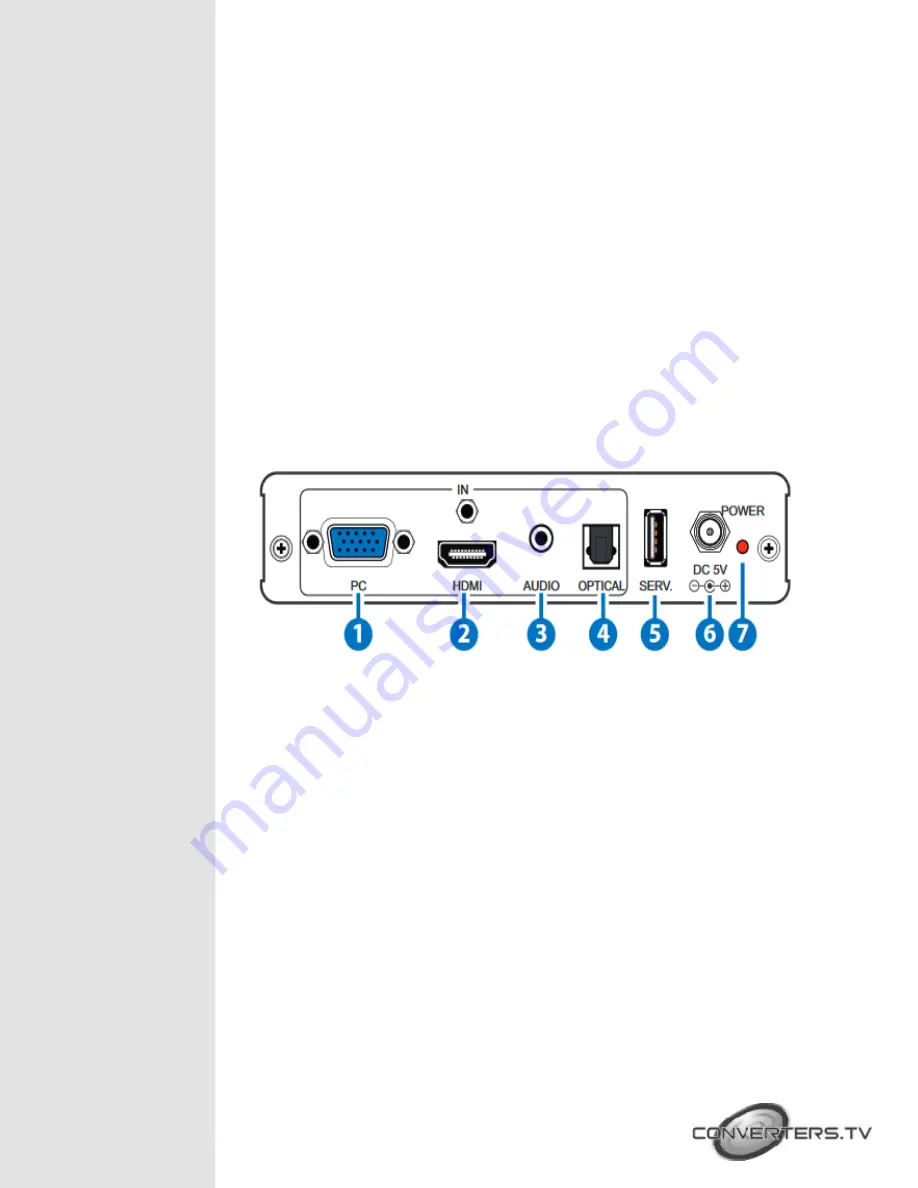
Rear View
1. PC IN:
Connect to VGA source equipment such as a PC or laptop.
YUV sources, such as DVD players, are also supported with the use
of a 15-pin to 3-RCA adapter.
2.
HDMI IN:
Connect to HDMI source equipment such as a media
player, game console or set-top box. DVI sources are also
supported with the use of an HDMI to DVI adapter.
Note:
When outputting 4K@60Hz HDMI signals, a compatible
4K@60Hz display is required. The use of “Premium High Speed
HDMI” cables is highly recommended.
3.
AUDIO IN:
Connect to the stereo analog output of a device such
as a CD player or PC.
4.
OPTICAL IN:
Connect to the optical audio output of a device
such as a media player or game console using an appropriate optical
cable.
5.
SERVICE:
This slot is reserved for firmware update use only.
6.
DC 5V:
Plug the 5V DC power adapter into the unit and connect
it to an AC wall outlet for power.
7.
POWER LED:
This LED will illuminate to indicate the unit is on
and receiving power.
Содержание 15465
Страница 1: ...HDMI VGA to HDMI 6G Scaler ID 15465 Operation Manual ...
Страница 11: ...Connection Diagram ...


