™
©2012 Control4. All rights reserved. Control4, the Control4 logo, the Control4 iQ logo and the Control4 certified logo are registered trademarks or trademarks of Control4 Corporation in
the United States and/or other countries. All other names and brands may be claimed as the property of their respective owners.
control4.com |
™
grounding screw from the back box. You’ll need
this screw to move the grounding wire to your
new adapter plate.
Note:
Attach the ground wire to the back
box in the location indicated by the Ground
symbol.
4
Go to the ‘Installation’ section next for more
instructions.
Installation
1
Insert the grounding screw into the back of
the adapter plate (metal model). Secure the
grounding wire to the grounding screw.
2
Place the metal adapter plate on top of the back
box, and screw it onto the back box using the
two (2) screws that were used to hold the old
Mini Touch Screen in place.
3
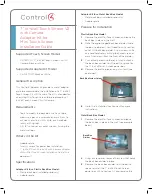
Insert the screws in the opposite corners of the
plate (see photo below).
4
Follow the installation instructions in the
5” or 7” In-Wall Touch Screen with Camera
Installation Guide
to attach the high or low-
voltage connections to the power box before you
7” In-Wall Touch Screen V2
with Camera
Adapter Kit for
Mini Touch Screen
Installation Guide
attach the 7” In-Wall Touch Screen V2 to it. The
use of high or low voltage will depend on your
installation requirements.
5
Remove the two (2) sheet metal screws from the
power box, and use the two (2) screws included
in the kit to attach the power box to the adapter
plate.
6
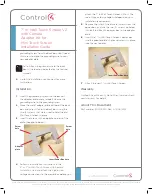
Insert the 7” In-Wall Touch Screen’s power box
into the adapter plate’s hole and screw it in place
(see the next photo).
7
Attach the new 7” In-Wall Touch Screen.
Warranty
Limited 2-year Warranty. Go to http://www.control4.
com/warranty for details.
About This Document
Part number: 200-00324, Rev. A 12/04/2012
Screw
hole
Screw
hole
Insert Power Box here
Adapter
plate
Insert Power Box here


