background image

Set Up The Camera

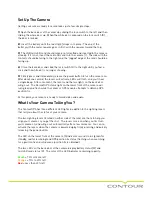
Getting your camera ready to record takes just a few simple steps.

1) Open the back door of the camera by sliding the lock switch to the left and then 

sliding the whole door up.  When the white dot is exposed on the lock switch [K], 

the door is locked.

2)  Insert the battery until the red clip [E] snaps in to place.  The end of the 

battery with the metal squares goes in first, with the squares toward the top.

3)  The 2GB microSD card should come pre-formatted and inserted in the camera 

already.  If it is not, insert the microSD card in to the camera [I].  The side with the 

contacts should be facing to the right and the “jagged” edge of the card should be 

facing up.

4)  Close the back door and slide the lock switch [K] to the right until you feel a 

click and the white dot is no longer showing.

5)  Firmly press and immediately release the power button to turn the camera on.  

After about one second, the lasers will activate, LEDs will flash, and you’ll hear 

a single beep.  After a moment, the lasers and the two lights on the back door 

will go out.  The Record/GPS status light on the lower front of the camera will 

turn green and flash while the camera’s GPS module attempts to obtain a GPS 

position fix.

At this point, your camera is ready to record video and audio.

What Is Your Camera Telling You?

The ContourGPS has three different LED lights in addition to the sighting lasers 

that tell you about the status of your camera.

The two sighting lasers (located on either side of the lens) are there to help you 

align your camera so you get the shot.  The lasers come on when you first turn 

your camera on, and will go out automatically after a few moments.  You can re-

activate the lasers when the camera is powered up by firmly pressing and quickly 

releasing the power button.

The LED on the lower front of the camera [A] indicates record  status (green for 

standby, red for recording) and GPS position fix status (flashing when searching 

for a position fix and solid once a position fix is obtained).

The two LEDs on the back door of the camera display battery status [M] and 

microSD card status [K].  The color of the LED indicates remaining capacity:

Green

 = 70% or more left

Orange

 = 70% to 20% left

Red

 = Less than 20% left

Содержание GPS

Страница 1: ...ing to know your Camera What s In The Box The ContourGPS camera comes with Camera 2GB microSD Card 2 Rotating Surface Mount 1 Goggle Mount 1 Li ion Battery 1 USB Cable 1 Lens Cap CONTOURGPS QUICKSTART GUIDE ...

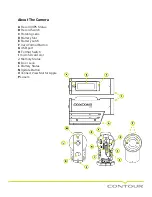
Страница 2: ...tus B Record Switch C Rotating Lens D Battery Slot E Battery Latch F Card Format Button G USB port H Format Switch I microSD card slot J Memory Status K Door Lock L Battery Status N Update Button O Connect View Slot for Apple P Lasers ...

Страница 3: ...nd the two lights on the back door will go out The Record GPS status light on the lower front of the camera will turn green and flash while the camera s GPS module attempts to obtain a GPS position fix At this point your camera is ready to record video and audio What Is Your Camera Telling You The ContourGPS has three different LED lights in addition to the sighting lasers that tell you about the ...

Страница 4: ...matting Your ContourGPS comes with a 2GB microSD card that is pre formatted This card has enough room for about 30 minutes of video of 1080p resolution recording If you have purchased a higher capacity microSD card you need to format it properly to work in your ContourGPS Here is how to format a microSD card 1 Power off the camera 2 Remove the microSD card from the camera 2 Power up the camera wit...

Страница 5: ...In urban canyons GPS signals often bounce off of tall buildings and can increase position error or affect the ability to obtain a position lock 5 Other electronic equipment placed in close proximity to the camera may interfere with the GPS signal and result in either an inability to establish a position lock or inaccurate readings If your camera has issues obtaining a GPS lock please do the follow...

Страница 6: ... and choose Tools Configure Camera from the top menu bar 3 Once the configuration windows appears click on the Camera tab The camera s firmware version information will be presented The most recent firmware download installation instructions and release notes are currently located at http contour com software firmwaregps The 1 2 Switch The 1 2 switch located at the back of the camera allows you to...

Страница 7: ...n change to the Camera tab You will find the firmware version number of your camera listed there StoryTeller should prompt you to update your camera firmware if it is not up to date You must connect your camera at least once to StoryTeller version 3 0 6 or higher so that it can assign a unique Bluetooth ID to the camera s Bluetooth module The computer running StoryTeller MUST be connected to the I...

Страница 8: ...stalled go in to the Settings of your device and turn on Bluetooth Connecting the Camera to Your Device You should now have the firmware and ConnectView card installed on your camera and the app installed on your device with the Bluetooth active You are now ready to connect the camera and your device Turn on your camera then press and hold the the Update button N for five seconds When you release ...

Страница 9: ...s settings without having to connect the camera to a computer Simply adjust any of the settings you wish for each of the two positions of the Format Switch When you are done press the Camera button in the upper left corner to return to the viewfinder mode Your changes will take effect right away This is especially handy for adjusting to different lighting conditions Battery Life Because Bluetooth ...

Страница 10: ...tourGPS camera you need to make sure it s ready to go GET CHARGED Most Contour customers charge their Contour camera battery simply by plugging the camera in to a USB port on an active computer using the provided USB cable But you can also purchase separate USB powered battery chargers car chargers and other accessories at our online store http store contour com Charging time is generally four to ...

Отзывы: