background image

Lampe


9


Les  ampoules  disponibles,  et  les  codes  ILCOS  D 
correspondants  et  les  images  de  ces  lampes  : 
Utilisation  dans  une  lampe  de  type  (ou  utilisation 
dans  une  lampe  de  type  alternatif)  DSR-1.5-S-68 
(code ILCOS D respectant la norme IEC 61231). 


 Lampe à LED non remplaçable  

 Puissance maximale : 1.5W


 Plage de tension :  12V


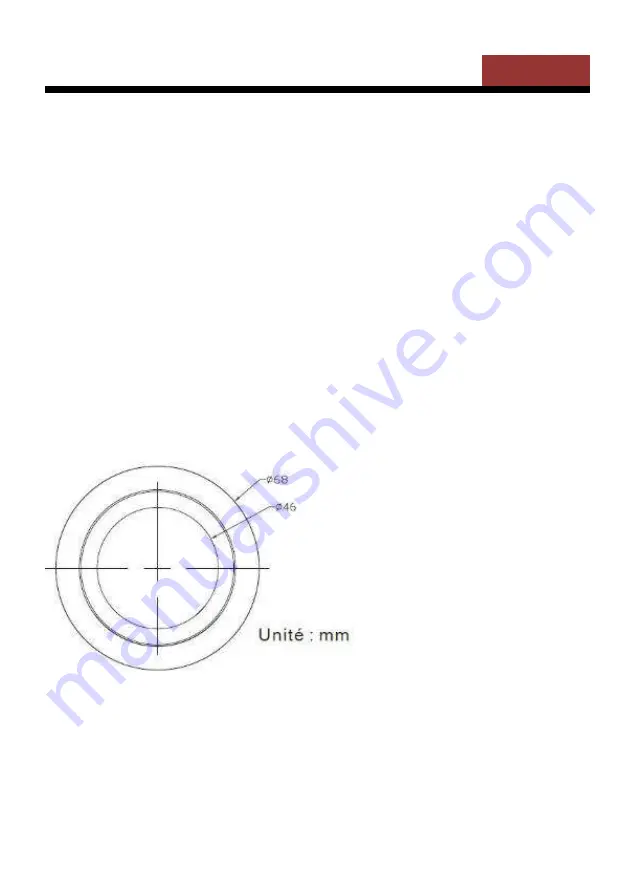
 Dimensions: 


Содержание CEH9062BV

Страница 1: ...CEH9062BV Hotte décorative Decorative Hood Guide d utilisation User manual ...

Страница 2: ... de l appareil Afin de faire fonctionner l appareil correctement et de manière sécurisée lisez ce guide d utilisation attentivement avant d installer et d utiliser le produit Table des matières Trouver des informations 2 Instructions de sécurité importantes 3 Lampe 9 Description du produit 1010 Description des pièces 1111 Installation de la hotte 1212 Préparation avant installation 1212 Installati...

Страница 3: ...er ou d utiliser cet appareil Cet appareil a été conçu pour être utilisé comme une hotte aspirante l évacuation de l air à l extérieur ou une hotte filtrante le recyclage de l air à l intérieur Tous les travaux d installation doivent être effectués par une personne compétente ou un électricien qualifié Cet appareil doit être installé correctement par un personnel qualifié en suivant strictement le...

Страница 4: ...ntales réduites ou dénuées d expérience ou de connaissance s ils si elles sont correctement surveillé e s ou si des instructions relatives à l utilisation de l appareil en toute sécurité leur ont été données et si les risques encourus ont été appréhendés Les enfants ne doivent pas jouer avec l appareil Le nettoyage et l entretien par l usager ne doivent pas être effectués par des enfants sans surv...

Страница 5: ... assurez vous qu il n est pas coincé en dessous de l appareil ou dans l appareil Ne pas utiliser d aérosols à proximité immédiate de l appareil Veillez à jeter le matériel d emballage avec soin Nous vous recommandons également de prendre une attention particulière pendant l utilisation et lors du nettoyage Référez vous aux instructions dans la section NETTOYAGE Ne pas utiliser un nettoyeur à vapeu...

Страница 6: ...ation avec la ventilation de la pièce lors de la présence d appareils fonctionnant au gaz chauffe eau gazinière En cas de doute utilisez la hotte en mode recyclage Une ventilation convenable de la pièce doit être prévue lorsque la hotte est utilisée simultanément avec des appareils utilisant du gaz ou un autre combustible L air ne doit pas être évacué par un conduit qui est utilisé pour évacuer le...

Страница 7: ... incendie nettoyez régulièrement le filtre métallique et surveillez constamment les casseroles contenant de l huile chaude Ne pas flamber d aliments sous la hotte de cuisine Ne pas utiliser l appareil s il montre des signes de dommages ou s il est en état imparfait Contactez le centre de service après vente Lors de l installation toujours respectez les distances suivantes entre le dessus de la cui...

Страница 8: ...l y des risques du choc électrique et de l incendie si le nettoyage n est pas effectué conformément aux instructions MISE EN GARDE Pour raison de sécurité utilisez seulement des vis de même dimensions que celles indiquées MISE EN GRADE Le non respect des consignes d installation peut entraîner des graves blessures RISQUE DU CHOC ELECTRIQUE Le non respect de ces instructions peut entraîner la mort ...

Страница 9: ...spondants et les images de ces lampes Utilisation dans une lampe de type ou utilisation dans une lampe de type alternatif DSR 1 5 S 68 code ILCOS D respectant la norme IEC 61231 Lampe à LED non remplaçable Puissance maximale 1 5W Plage de tension 12V Dimensions ...

Страница 10: ...Description du produit 10 ...

Страница 11: ...ée inférieure 400mm 1 PL 3 Cheminée supérieure 400mm 1 PL 4 Gaine en plastique Φ 150 153mm tuyau flexible de 2m 1 PL 5 Support de la cheminée supérieure 1 PL 6 Support de la cheminée inférieure 1 PL 7 Support de la hotte de cuisine 1 PL 8 Vis ST4 x 8 mm 6 PL 9 Vis ST4 x 30 mm 9 PL 10 Filtre à charbon 2 ...

Страница 12: ...e mettre en service Installation Mode extraction Si le mur comporte une ouverture donnant sur l extérieur votre hotte peut être raccordée comme indiqué sur le schéma ci dessous au moyen de la gaine d extraction fournie ou de n importe quel conduit d extraction approprié par exemple une gaine flexible en aluminium ou constituée d un autre matériau ininflammable dont le diamètre intérieur est inféri...

Страница 13: ...possible Pour permettre une utilisation optimale le conduit ne doit pas dépasser 2 50 m de long au total Le conduit doit donner directement sur l extérieur et ne doit pas donner sur un grenier sous une maison dans un garage ou dans un espace clos Les accessoires pour conduits coudes raccords et adaptateurs réduisent le flux d air Les coudes retournés et les profils en S ne permettent pas une extra...

Страница 14: ...as nécessaire et les procédures d installation sont identiques à celles décrites dans la section Installation Mode extraction Fixation de la hotte au mur Avant de procéder à l installation assurez vous que l appareil n est pas branché sur une prise électrique La hotte doit être placée à 70cm minimum au dessus de la table de cuisson ...

Страница 15: ...us même rebouchés Consultez impérativement un professionnel du bâtiment pour utiliser le système d ancrage vis chevilles approprié au matériau qui constitue votre mur ainsi qu au poids de l appareil Respectez le diamètre des vis de fixation indiqué dans la présente notice Ne modifiez pas les trous destinés à fixer l appareil ou son support de fixation sur le mur Percez le mur à l aide d un foret d...

Страница 16: ...isson Marquez l emplacement du support mural trous placés entre 700 et 800 mm au dessus du plan de travail Retirez la hotte et positionnez le support mural afin de marquer les emplacements des trous sur le mur Percez les 3 trous dans le mur pour y insérer le système de fixation adapté vis ST4x30mm Accrochez la hotte dans les encoches du support mural ...

Страница 17: ...e schéma suivant Retirez la hotte afin de percer le mur et d installer les chevilles adaptées à votre mur Fixez le corps de la hotte à l aide de 4 vis de 4 mm de diamètre en utilisant des chevilles adaptée à votre mur Si le mode extraction est choisi placez la gaine d extraction d air sur l orifice de sortie d air tel qu illustré ci contre ...

Страница 18: ...ée inférieure sur la cheminée inférieure comme illustré Utilisez 2 vis ST4x8mm Ne serrez pas trop les vis assurez vous que la cheminée supérieure peut coulisser facilement dans le cheminée inférieure Insérez la cheminée supérieure dans la cheminée inférieure ...

Страница 19: ...appareil puis marquez les trous sur le mur Retirez la cheminée inférieure puis percez des trous dans le mur trou pour vis diamètre Φ8 mm Utilisez les chevilles adaptées à votre mur Installez la cheminée inférieure puis vissez la au mur à l aide de 2 vis de diamètre Φ 8 mm ...

Страница 20: ...Marquez les emplacements des trous de fixation du support de la cheminée supérieure Rabaissez la cheminée supérieure puis percez des trous dans le mur Insérez les chevilles adaptées à votre mur Fixez le support mural de la cheminée supérieure sur le mur à l aide des chevilles choisis vis de 8 mm conseillées ...

Страница 21: ...llation de la hotte 21 Remontez la cheminée supérieure et fixez la sur le support mural à l aide de 2 vis ST4x8mm Fixez la cheminée inférieure sur les ergots de la hotte de cuisine à l aide de 2 vis ST4x8mm ...

Страница 22: ...le filtre est correctement enclenché Autrement il pourrait tomber ce qui est dangereux Quand le filtre à charbon actif est enclenché la force d aspiration baisse Assurez vous que les filtres sont bien enclenchés pour éviter qu il ne tombe et risque de causer des dommages Les filtres à charbons doivent être remplacés au moins 1 fois par an voir plus souvent en cas d utilisation intense ...

Страница 23: ...s chimiques de matériaux abrasifs ou de brosses dures pour nettoyer l unité Nettoyage mensuel pour filtre à graisse ESSENTIEL Nettoyer le filtre tous les mois peut prévenir tout risque d incendie Le filtre capte la graisse la fumée et la poussière Cela affecte donc directement l efficacité de la hotte S il n est pas nettoyé les résidus de graisse potentiellement inflammables satureront le filtre N...

Страница 24: ...du ventilateur Touche lumière Affichage numérique Affichage de la vitesse du moteur 1 pour vitesse lente 2 pour vitesse moyenne 3 pour vitesse élevée Minuterie rapide Appuyez simultanément sur et pendant 1 s L affichage numérique clignote et le compte à rebours démarre pour 5 minutes Après 5 minutes le moteur et la lumière s éteignent automatiquement et un bip sonore se fait entendre pendant 1 sec...

Страница 25: ...tion débranché Rebranchez le cordon d alimentation Forte vibration de la hotte La turbine de ventilateur est coincée Faîtes intervenir un professionnel pour la réparation Le moteur n est pas correctement fixé Eteignez l appareil et faîtes intervenir un professionnel pour la réparation L unité n est pas correctement fixée sur le support Décrochez l appareil et vérifiez l installation et l emplaceme...

Страница 26: ... maximal PBEP 295 Pa Débit d air maximal Qmax 625 3 m3 h Puissance électrique à l entrée mesurée au point de rendement maximal WBEP 159 2 W Puissance nominale du système d éclairage WL 4 0 W Eclairement moyen du système d éclairage sur la surface de cuisson Emoyen 161 lux Efficacité lumineuse LEhotte 40 3 lux W Classe d efficacité lumineuse A Efficacité de filtration des graisses GFEhotte 69 7 Cla...

Страница 27: ...Informations complémentaires 27 CONTINENTAL EDISON 120 126 quai de Bacalan CS11584 33000 Bordeaux Importé par A M C 123 quai Jules Guesde 94400 Vitry sur Seine ...

Страница 28: ...CTANT L ENVIRONNEMENT Les équipements électriques et électroniques font l objet d une collecte sélective Ne jetez pas les équipements électriques et électroniques usagés avec les déchets ménagers non triés participez au contraire à leur collecte sélective C est pour cette raison que votre appareil tel que le signale le symbole apposé sur sa plaque signalétique ou sur l emballage ne doit en aucun c...

Страница 29: ...mation regarding the installation use and maintenance of the appliance In order to operate the unit properly and securely read this user guide carefully before installing and using the product Contents Find some informations 29 Important safety instructions 30 Lamp 36 Product description 37 Description of the pieces 38 Installing the hood 39 Preparation before installation 39 Installation Mode ext...

Страница 30: ...Touch CommandControl panel 51 Help 52 Technical informations 53 Further information 54 ...

Страница 31: ...or to installation This appliance has been designed for use as an exhausting air evacuation to the outside or filtering indoor air re cycling hood All installation work must be carried out by a competent person or qualified electrician This appliance must be installed correctly by a suitably qualified person strictly following the manufacturer s instructions CAUTIONATTENTION Accessible parts may b...

Страница 32: ...f experience and knowledge if they have been given supervision or instruction concerning use of the appliance in a safe way and understand the hazards involved Children shall not play with the appliance Cleaning and user maintenance shall not be made by children without supervision Regularly check the power plug and power cord for damage If the supply cord is damaged it must be replaced by the man...

Страница 33: ...the power cable Do not use flammable sprays in close vicinity to the appliance Please dispose of the packing material carefully We also recommend that you pay special attention during use and during cleaning Refer to the instructions in the CLEANING section A steam cleaner is not to be used The appliance is not intended to be operated by means of external timer or separated remote control system ...

Страница 34: ...n of the room when there are gas appliances water heater gas cooker If in doubt use the hood in recycling mode Regulations concerning the discharge of air have to be fulfilled Proper ventilation of the room must be provided when the hood is used simultaneously with appliances using gas or other fuel The air must not be vented through a duct that is used to vent flue gases from appliances burning g...

Страница 35: ... avoid the risk of fire clean the metal filter regularly and closely watch and regulate pans containing hot oil Do not use the hood if it shows signs of damage or imperfection Contact customer services Do not flame under the range hood When installing the appliance make sure that the following distances between the top of cooker or hob and the lowest part of the cooker hood must be observed Gas ho...

Страница 36: ... shock and fire if cleaning is not carried out in accordance with the instructions Warning For safety reason please use only the same size of fixing or mounting screw which are recommended in this instruction manual Warning Failure to install the screws or fixing device in accordance with these instructions may result in electrical hazards Electrical Shock Hazard Failure to follow these instructio...

Страница 37: ... correspondence ILCOS D codes and lamp pictures Use type lamp or use in alternative type lamp DSR 1 5 S 68 ILCOS D code in according to standard IEC 61231 Non replaceable LED lamp Max wattage 1 5 W Voltage range 220 24012V 50Hz Dimensions ...

Страница 38: ...Product Description 37 ...

Страница 39: ...1 Hood body 1 PL 2 Lower chimney 400mm 1 PL 3 Upper chimney 400mm 1 PL 4 Plastic pipe Φ 150 153mm 2 meter flexible tube 1 PL 5 Upper chimney bracket 1 PL 6 Lower chimney bracket 1 PL 7 Cooker hood bracket 1 PL 8 Screw ST4 8 mm 6 PL 9 Screw ST4 30 mm 9 PL 10 Carbon filter 2 ...

Страница 40: ...the product before putting it into service Installation Mode extraction If the wall has an opening to the outside your hood may be connected as shown in the diagram below using the extraction duct provided or any suitable extraction conduit for example a flexible aluminum sheath or constituted another non flammable material with an inside diameter of less than 150mm ...

Страница 41: ...ort and straight as possible To allow optimal use the duct must not exceed 2 50m long in total The duct must lead directly to the outside and must not lead to attic a house a garage or in an enclosed space Duct accessories elbows fittings and adapters would reduce the flow of air Bent elbows and S shaped profiles do not provide efficient air extraction they are not recommended for using ...

Страница 42: ... an exit to the outside the exhaust pipe is not required and the installation procedures are the same as those described in the Installation Extraction Mode section Fixing the hood to the wall Before installing make sure the unit is not plugged into an electrical outlet ...

Страница 43: ...l a hole near old holes even plugged It is imperative that you consult a building professional to use the anchoring system screws dowels etc appropriate to the material that constitutes your wall as well as to the weight of the appliance Observe the diameter of the fixing screws indicated in this manual Do not modify the holes for securing the unit or its mounting bracket to the wall Drill the wal...

Страница 44: ... location of the wall bracket Placed the holes between 700 and 800 mm above the worktop Remove the hood and position the wall bracket to mark the locations of the holes on the wall Drill the 3 holes in the wall to insert the appropriate fastening system screw ST4x30mm Hang the hood in the notches of the wall bracket ...

Страница 45: ...l mount screws as shown in the following diagram Remove the hood to puncture the wall and install wall plugs Secure the body of the hood with 4 screws of 4 mm in diameter using dowels adapted to your wall If the extraction mode is selected place the exhaust air duct on the air outlet as shown ...

Страница 46: ...ach the lower chimney support to the lower chimney as shown Use 2 screws ST4x8mm Do not over tighten the screws make sure the upper chimney can slide easily into the lower chimney Insert the upper chimney into the lower chimney ...

Страница 47: ...in the appliance then mark the holes on the wall Remove the lower chimney then drill holes in the wall hole for screw diameter Φ8 mm Use the dowels adapted to your wall Install the lower chimney then screw it to the wall with 2 screws of diameter Φ 8 mm ...

Страница 48: ...ight Mark the locations of the mounting holes of the upper chimney support Lower the upper chimney and then drill holes in the wall Insert the dowels adapted to your wall Secure the wall bracket of the upper chimney to the wall using the selected dowels 8 mm screws recommended ...

Страница 49: ...Installing the hood 48 Reassemble the upper chimney and fix it to the wall bracket with 2 screws ST4x8mm Fasten the lower chimney to the lugs of the kitchen hood using 2 screws ST4x8mm ...

Страница 50: ...e sure the filter is properly engaged Otherwise it could fall which is dangerous When the activated charcoal filter is switched on the suction force drops Make sure the filters are properly engaged to prevent it from falling and may cause damage The carbon filters must be replaced at least once a year or more often if used intensively ...

Страница 51: ... metal pads chemical abrasive material or stiff brush to clean the unit Monthly Cleaning for Grease Filter ESSENTIAL Clean the filter every month can prevent any risk of fire The filter collects grease smoke and dust It is directly affecting the efficiency of the cooker hood If not cleaned the grease residue potential flammable will saturate on the filter Clean it with household cleaning detergent...

Страница 52: ...r decreasing the speed of the fan Light key Digital display Fan speed display 1 for Low speed 2 for Medium speed 3 for High speed Quick timer Press simultaneously for 1 second TheDigital displayflashes the countdown starts for into 5 minutes count down Afterafter 5 minutes the motor light will turn off automatic Buzzer sound for 1 second ...

Страница 53: ...correct rating Power cord looses Plug in to the power supply again Serious Vibration of the unit The fan blade is jammed Switch of the unit and repair by qualified service personnel only The fan motor is not fixed tightly Switch of the unit and repair by qualified service personnel only The unit is not hung properly on the bracket Take down the unit and check whether the bracket is in proper locat...

Страница 54: ...int PBEP 295 Pa Maximum airflow Qmax 625 3 m3 h Measured electric power input at best efficiency point WBEP 159 2 W Nominal power of the lighting system WL 4 0 W Average illumination of the lighting system on the cooking surface Emoyen 161 lux Lighting Efficiency LEhotte 40 3 lux W Lighting efficiency class A Grease Filtering Efficiency GFEhotte 69 7 Grease Filtering Efficiency class D Measured po...

Страница 55: ...Further information 54 CONTINENTAL EDISON 120 126 quai de Bacalan CS11584 33000 Bordeaux Importé par A M C 123 quai Jules Guesde 94400 Vitry sur Seine ...

Страница 56: ...MENTAL PROTECTION Electrical and electronic equipment is subject to selective collection Do not dispose of used electrical and electronic equipment with unsorted household waste instead take part in their selective collection It is for this reason that your appliance as indicated by the symbol on its nameplate or on the packaging must never be thrown in a public or private bin intended for househo...

Страница 57: ...www continentaledison fr ...

Отзывы: