irLEDs series -
LED PAR projectors with infrared remote control
Page 11
English
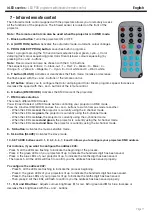
The infrared remote control supplied with the projectors allows you to remotely access
all the functions of the projectors. The infrared sensor is located on the front of the
projector.
Note : The remote control can also be used when the projector is in DMX mode.
1 - Black out button
: Turns the projectors ON or OFF.
2 - A (AUTO RUN) button
: Activates the automatic mode. Automatic colour changes.
3 - PROG (SELECT PROG) button
: Launches built-in programs.
Select a program among the 10 fixed colours selections (red, green, cyan...), Color
Jumping (fast colour sequencing) and Color Dream (slower colour sequencing) by
pressing the + and - buttons.
Note
: Fixed colours can also be chosen with the 0 to 9 buttons.
The sequencing is as follows: 0 = black-out ; 1 = Red ; 2 = Green ; 3 = Blue ; 4 =
Orange ; 5 = Yellow; 6 = Magenta, 7 = Cyan, 8 = Cool white and 9 = Warm white.
4 - F button (FLASH)
: Activates or deactivates the Flash mode. Increase or decrease
the flash speed with the + and - buttons of the remote control.
5 - SP button
: Allows you to configure the Color Jumping and Color Dream programs speed. Increase or
decrease the speed with the + and - buttons of the remote control.
6 - D button (DMX MODE)
: Activates the DMX mode of the projectors.
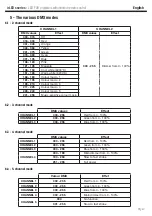
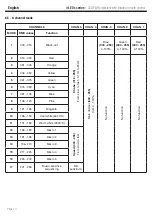
7 - DMX mode selection
There are 5 different DMX modes.
You will need to select a DMX mode before controlling your projector in DMX mode ;
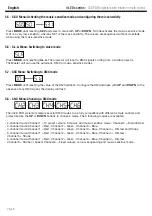
Press the D button (DMX MODE) and use the + and - buttons to switch from one mode to another :
- When the LEDs are
red
, the projector is currently using the 2-channel mode.
- When the LEDs are
green,
the projector is currently using the 3-channel mode.
- When the LEDs are
blue,
the projector is currently using the 4-channel mode.
- When the LEDs are
red and green
, the projector is currently using the 5-channel mode.
- When the LEDs are
red and blue
, the projector is currently using the 6-channel mode.
8 - SA button
: Activates the music-sensitive mode.
9 - SL button (SLAVE)
: Activates the slave mode.
10 - SET ADDR buttons and 0, 1, 2, 3, 4, 5, 6, 7, 8 and 9: Allows you to configure your projectors DMX address.
For instance, if you want to configure the address 245 :
- Press S, all the LEDs are flashing to indicate the beginning of the process.
- Press 2, the green LEDs of your projectors lit up to indicate the hundreds digit has been saved.
- Press 4, the blue LEDs of your projector lit up to indicate the tenths digit has been saved.
- Then press 5. All the LEDs will flash to confirm you the address has been saved properly.
To configure the address 002:
- Press S, all the LEDs are flashing to indicate the process beginning.
- Press 0, the green LEDs of your projectors lit up to indicate the hundreds digit has been saved.
- Press 0, the blue LEDs of your projector lit up to indicate the tenths digit has been saved.
- Then press 2. All the LEDs will flash to confirm you the address has been saved properly.
11 - R, G and B buttons
: Adjusts colours brightness,
R
for red,
G
for green and
B
for blue. Increase or
decrease their brightness with the + and - buttons.
7 - Infrared remote control

