POW150XA User’s Manual
4)
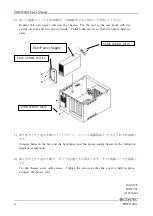
新しい電源ユニットを背面
2
箇所、内側
2
箇所でネジ留めして実装してください。
Replace this new power unit into the chassis. Fix the unit to the rear panel with two
screws on rear and two screws inside. Tighten the screws so that the unit is held in
place.
5)
取り外すときと逆の手順でバックプレーン、ファンの電源供給ケーブルをそれぞれ接続し
ます。
Connect between the fan and the backplane, and the power supply based on the following
diagram, respectively.
6)
取り外すときと逆の手順で、カバーを元通りネジ留めします。そして電源コードを接続し
ます。
Fix the chassis cover with screws. Tighten the screws so that the cover is held in place.
Connect the power cord.
NA03570
LYRT561
[11052014]
SEMS SCREW M3x6
New Power Supply
FLAT SCREW #6x3/16
SEMS SCREW M3x6
4
POW150XA


