background image


ii

 GCOM-2C2-PCI, 

GCOM-4C2-PCI, GCOM-8C2-PCI 

Copyright 

Copyright 2006 CONTEC Co., LTD.  ALL RIGHTS RESERVED 

No part of this document may be copied or reproduced in any form by any means without prior written 
consent of CONTEC Co., LTD.   


CONTEC Co., LTD. makes no commitment to update or keep current the information contained in this 
document.  The information in this document is subject to change without notice. 


All relevant issues have been considered in the preparation of this document.  Should you notice an 
omission or any questionable item in this document, please feel free to notify CONTEC Co., LTD. 


Regardless of the foregoing statement, CONTEC assumes no responsibility for any errors that may 
appear in this document nor for results obtained by the user as a result of using this product. 


Trademarks 

MS, Microsoft , Windows and Windows NT are trademarks of Microsoft Corporation. Other brand and 
product names are trademarks of their respective holder. 


Содержание GCOM-2C2-PCI

Страница 1: ...PC HELPER RS 232C Serial I O Board for PCI 2 ch GCOM 2C2 PCI 4 ch GCOM 4C2 PCI 8 ch GCOM 8C2 PCI User s Guide CONTEC CO LTD...

Страница 2: ...below Check with the following list that your package is complete If you discover damaged or missing items contact your retailer Product Configuration List Board GCOM 2C2 PCI GCOM 4C2 PCI or GCOM 8C2...

Страница 3: ...ject to change without notice All relevant issues have been considered in the preparation of this document Should you notice an omission or any questionable item in this document please feel free to n...

Страница 4: ...nspection 7 Storage 7 Disposal 7 2 SETUP 9 What is Setup 9 Using the Board under Windows Using the Standard COM Driver Software DRV COM WDM 9 Step 1 Setting the Hardware 10 Parts of the Board and Fact...

Страница 5: ...unit 27 Connecting directly to the port connector 28 In the case of GCOM 8C2 PCI 29 Converting the Interface Connector to 9 pin D SUB Male Connectors 29 Converting the Interface Connector to 25 pin D...

Страница 6: ...serial ports per board You can use the standard COM driver software DRV PAC W32 supplied with the board to access the serial ports as standard Windows COM ports Features Maximum communication speed 9...

Страница 7: ...additional boards you can use COM ports in the range COM1 COM256 The boards can be used for all types of serial communications such as for remote access service RAS and uninterruptible power supply UP...

Страница 8: ...onnection Conversion Cable for RS 232C 37M 25M x 4 450mm COM 4M CABLE PC 1 Connection Conversion Cable 78M 9M x 8 1m PCE78 9PS Connection Conversion Cable 78M 25M x 8 1m PCE78 25PS COM 8ch Board Optio...

Страница 9: ...free of charge only when this device is returned freight prepaid with a copy of the original invoice and a Return Merchandise Authorization to the distributor or the CONTEC group office from which it...

Страница 10: ...th and the destruction of equipment and resources Understand the meanings of these labels to operate the equipment safely DANGER DANGER indicates an imminently hazardous situation which if not avoided...

Страница 11: ...terminals with industrial alcohol Do not install or remove the board to or from the slot while the computer s power is turned on Otherwise the board may malfunction overheat or cause a failure Doing s...

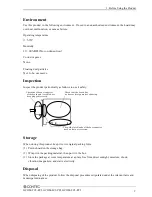
Страница 12: ...the board has no dust or foreign matter adhering The gold plated leads of the bus connector have no stain or corrosion Check that the bus connector of the board and its cable have been plugged correct...

Страница 13: ...1 Before Using the Product 8 GCOM 2C2 PCI GCOM 4C2 PCI GCOM 8C2 PCI...

Страница 14: ...performed before you can start developing application programs for the board using the bundled CD ROM DRV PAC W32 Taking the following steps sets up the software and hardware You can use the diagnosis...

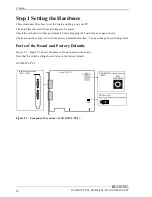
Страница 15: ...et up even with the factory defaults untouched You can change board settings later Parts of the Board and Factory Defaults Figure 2 1 Figure 2 3 shows the names of major parts on the board Note that t...

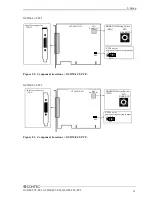
Страница 16: ...3 4 5 6 7 9 A B C D E F 8 PCI bus slot power voltage setting jumper Figure 2 2 Component Locations GCOM 4C2 PCI GCOM 8C2 PCI Interface connector CN1 BOARD ID Setting Switch COM 8 PCI H JP1 SW1 BOARD I...

Страница 17: ...row to the board ID 1 2 3 4 5 6 0 7 9 A B C D E F 8 BOARD ID SW1 Board ID 0 Factory setting Figure 2 4 Board ID Settings SW1 Setting the Supply Voltage Some PCI bus slots on the PC may supply power on...

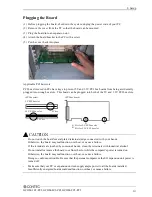
Страница 18: ...PCI bus board 5 V PCI bus slot 3 3 V PCI bus slot A B Slit for 5 V PCI bus slot Slit for 3 3 V PCI bus slot CAUTION Do not touch the board s metal plated terminals edge connector with your hands Othe...

Страница 19: ...AUTION The board cannot be properly installed unless the resources I O addresses and interrupt level for the board can be allocated Before attempting to install the board first determine what PC resou...

Страница 20: ...re Wizard 1 The Add New Hardware Wizard will be started Select Install from a list or specific location then click on the Next button 2 Specify that folder on the CD ROM which contains the setup infor...

Страница 21: ...developing any problem with the operation of the board In this case click on the Continue Anyway button 3 Installation of the Communication Port starts next If prompted for a file by the OS specify th...

Страница 22: ...letion of hardware installation 1 Select System from Control Panel and open Device Manager 2 Check that the names of the boards you are using are registered correctly in the Multifunction adapters fol...

Страница 23: ...ribed below if you wish to view or modify the COM port settings Start Device Manager 1 Select System from Control Panel and start Device Manager 2 Check that the new COM ports are displayed in the Por...

Страница 24: ...form some simple checks on the board operation The following describes the procedure for testing using the serial communications diagnostic program Check Method Obtain an RS 232C cross cable or a loop...

Страница 25: ...OM Setup Specify the number of the COM port you wish to test If connecting two COM ports via a cross cable specify the respective COM ports in Device1 and Device2 If using a loopback connector specify...

Страница 26: ...GCOM 8C2 PCI 21 Start test Click the Start button to start the test using the specified conditions View test result The test result is displayed in the Message window A successful completion message...

Страница 27: ...2 Setup 22 GCOM 2C2 PCI GCOM 4C2 PCI GCOM 8C2 PCI Setup Troubleshooting If you have some problem Contact your retailer...

Страница 28: ...le here when connecting an external device In addition to connecting directly to the connector on the board you can also connect external devices via a connection conversion cable or connection con ve...

Страница 29: ...ale Five connector set Screw nut UNC 4 40 inch screw Figure 3 1 Interface Connector GCOM 2C2 PCI CN1 1 2 3 4 5 6 7 8 9 DCD1 Data Carrier Detect RxD1 Receive Data TxD1 Transmit Data DTR1 Data Terminal...

Страница 30: ...valent cables to connect from the four individual connectors Connector used 37 pin D SUB male connector Thumb screw UNC 4 40 inch screw Cable 9 conductor shielded cable Cable length 250mm Conductor si...

Страница 31: ...4 N C N C N C N C N C DCD 4 SG 4 DSR 4 CTS 4 RTS 4 RxD 4 TxD 4 N C 25 24 23 22 21 20 19 18 17 16 15 14 N C N C N C RI 4 N C DTR 4 N C N C N C N C N C N C 13 12 11 10 9 8 7 6 5 4 3 2 1 CH4 25 24 23 22...

Страница 32: ...the 25 pin D SUB connector Use a separately purchased 25 pin D SUB connector cable to connect from the four individual connectors Figure 3 5 Connection Procedure 1 2 3 4 5 6 7 8 9 10 11 12 13 14 15 16...

Страница 33: ...w nut UNC 4 40 inch screw Figure 3 7 Interface Connector GCOM 4C2 PCI 19 18 17 16 15 14 13 12 11 10 9 8 7 6 5 4 3 2 1 TxD1 CH1 Transmit Data 1 RTS1 CH1 Request to Send 1 DSR1 CH1 Data Set Ready 1 DTR1...

Страница 34: ...bles to connect from the eight individual connectors CH1 CH2 CH3 CH4 CH5 CH6 CH7 CH8 5 4 3 2 1 SG 1 DTR 1 TxD 1 RxD 1 DCD 1 9 8 7 6 RI 1 CTS 1 RTS 1 DSR 1 Cable 9 conductor shielded cable Cable length...

Страница 35: ...RxD 1 TxD 1 N C 25 24 23 22 21 20 19 18 17 16 15 14 N C N C N C RI 1 N C DTR 1 N C N C N C N C N C N C 13 12 11 10 9 8 7 6 5 4 3 2 1 CH1 Cable 9 conductor shielded cable Cable length 1m Conductor size...

Страница 36: ...he 25 pin D SUB connector Use a separately purchased 25 pin D SUB connector cable to connect from the eight individual connectors Figure 3 11 Connection Procedure 1 2 3 4 5 6 7 8 9 10 11 12 13 14 15 1...

Страница 37: ...sion Straight Cable 25M 9F 1 8m RSS 25M 9F RS 232C Connection Conversion Straight Cable 25F 9M 1 8m RSS 25F 9M RS 232C Connection Conversion Cross Cable 25F 9F 1 8m RSC 25F 9F Connecting directly to t...

Страница 38: ...RxD 7 61 N C 42 DSR 8 22 RTS 8 3 TxD 8 60 SG 8 41 DCD 8 21 CTS 8 2 RxD 8 40 RI 8 CN1 1 21 40 60 20 39 59 78 1 DTR 8 Figure 3 14 Pin Assignments of Interface Connector GCOM 8C2 PCI The connector used f...

Страница 39: ...than 1 5mm typically about 1 0mm simply tighten the adjusting screw located on the side of the connector to install it properly The connector should function without a problem TxD RxD RTS CTS DTR DSR...

Страница 40: ...F and FIFO trigger size are set by the Device Manager on Windows XP and 2000 The FIFO trigger size specifies the data buffer size and determines the timing for generating hardware interrupts Setting a...

Страница 41: ...ing value Ex 921600 9600bps 96 As the result is an integer this baud rate can be set 921600 128000bps 7 2 As the result contains a fractional part this baud rate cannot be set Clock 2 mode 460800 Desi...

Страница 42: ...tor register Setup error Baud Rate Generator register Setup error 2 57600 4 28800 57600 5 23040 46080 8 14400 28800 57600 15 7680 15360 30720 61440 50 2304 4608 9216 18432 75 1536 3072 6144 12288 110...

Страница 43: ...4 Functions 38 GCOM 2C2 PCI GCOM 4C2 PCI GCOM 8C2 PCI...

Страница 44: ...File ReadFile and SetCommState etc The serial ports are also compatible with the Visual Basic communication control MSComm About Sample programs Sample programs are provided in the DRVCOM Samples fold...

Страница 45: ...RV COM driver and registry information available from Add Remove Programs Windows XP 2000 1 Open the Control Panel and launch Device Manager from the System applet 2 Expand Multifunction adapters and...

Страница 46: ...5 About Software GCOM 2C2 PCI GCOM 4C2 PCI GCOM 8C2 PCI 41 CD ROM Directory Structure...

Страница 47: ...5 About Software 42 GCOM 2C2 PCI GCOM 4C2 PCI GCOM 8C2 PCI...

Страница 48: ...use 3 I O address Any 32 byte boundary Power consumption 3 3VDC 100mA Max JP1 pins 1 and 2 connected 4 5VDC 100mA Max JP1 pins 2 and 3 connected 4 Operating temperature 0 50 C 10 90 RH No condensation...

Страница 49: ...connected 4 5VDC 150mA Max JP1 pins 2 and 3 connected 4 Operating temperature 0 50 C 10 90 RH No condensation PCI bus specification 32 bit 33MHz Universal key shapes supported 4 Dimension mm 121 69 L...

Страница 50: ...2 connected 4 5VDC 250mA Max JP1 pins 2 and 3 connected 4 Operating temperature 0 50 C 10 90 RH No condensation PCI bus specification 32 bit 33MHz Universal key shapes supported 4 Dimension mm 121 69...

Страница 51: ...GCOM 8C2 PCI Board Dimensions GCOM 2C2 PCI GCOM 4C2 PCI GCOM 8C2 PCI The standard outside dimension L is the distance from the end of the board to the outer surface of the slot cover The Board No is d...

Страница 52: ...6 About Hardware GCOM 2C2 PCI GCOM 4C2 PCI GCOM 8C2 PCI 47...

Страница 53: ...a ku Osaka 555 0025 Japan Japanese http www contec co jp English http www contec com Chinese http www contec com cn No part of this document may be copied or reproduced in any form by any means withou...

Отзывы: