


6
6 Overview of product
� � �
℃/℉
+
+
-
-
3
11
21
20
22
4
5
6
8
10
14
15
16
17
2
1
13
7
9
19
12
23
24
25
27
26
28
29
18
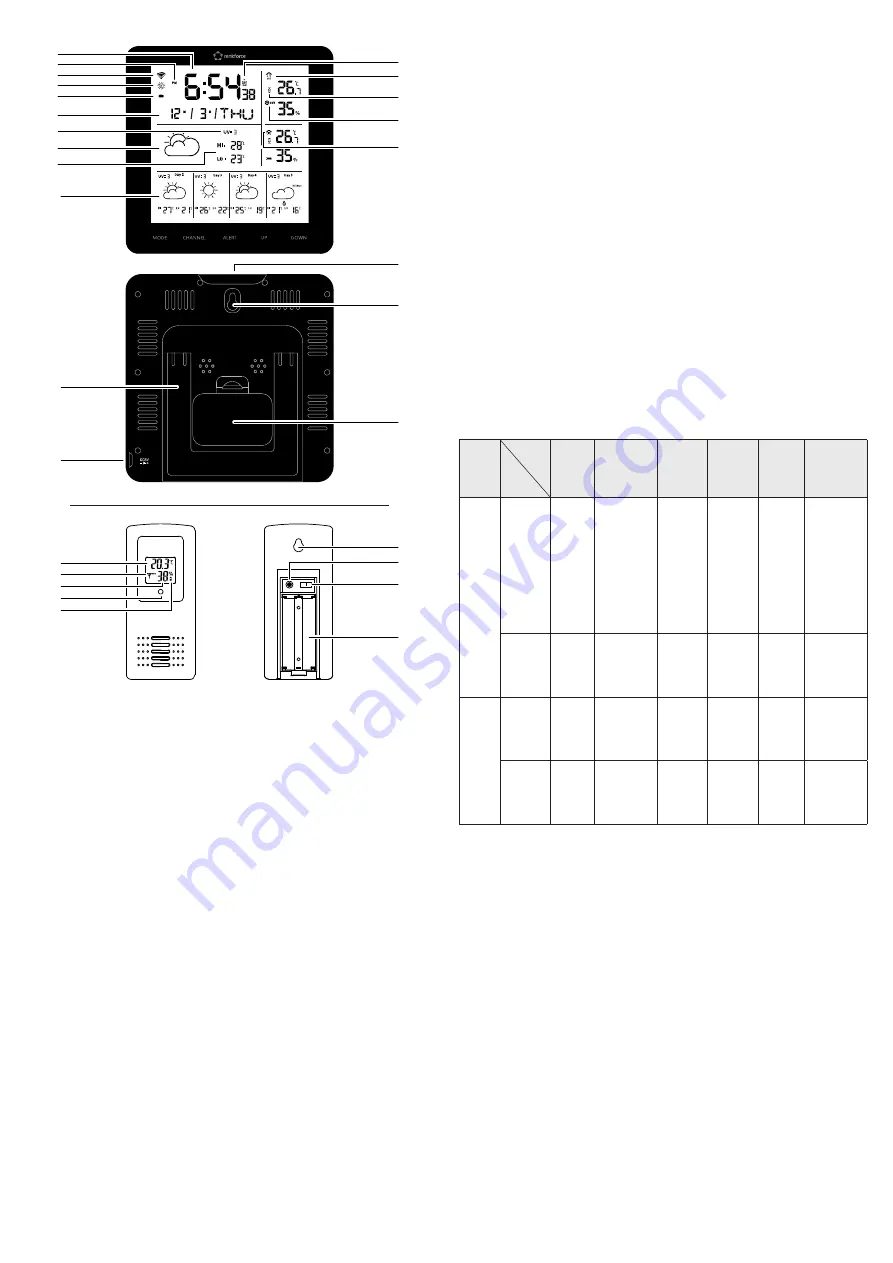
1 Time display
2 AM/PM
3 Wi-Fi signal indicator
4 DST symbol (daylight saving time)
5 Battery indicator
6 Date display (month/day/day of the week)
7 Current UV level
8 Current weather conditions
9 Forecast of the maximum and minimum
temperature
10 Weather forecast for the next 4 days
11 Fold-out stand
12 Connection socket for mains plug
13 Alarm symbol
14 Outdoor display
15 Alert enabled symbol
16 Outdoor humidity
17 Indoor display
18 Snooze/light button
19 Recess for wall mounting
20 Battery compartment
(3 x 1.5 V AAA batteries)
21 Outdoor temperature
22 Current signal output channel
23 Outdoor humidity
24 Indicator light
25 Battery indicator
26 Recess for wall mounting
27 Button for changing the temperature
unit (°C/ °F)
28 Switch for controlling the output channel
(1-3)
29 Battery compartment
(2 x 1.5 V AAA batteries)
7 Operation
7.1 Display options
The device has the following display options:
Wi-Fi time, date, month and week display,
Indoor and outdoor temperature display in °C or °F,
Indoor and outdoor humidity display,
Maximum and minimum values for humidity and temperature,
Current weather conditions,
5-day weather forecast,
Current UV level (from Tuya platform by connecting to Wi-Fi).
7.2 Functions
The device (and/or the associated app) has the following functions:
Wi-Fi connection between a maximum of 3 sensors (1 sensor is included with the product)
and the digital display, as well as with the Tuya app on a mobile device,
Alarm:
– On the product: Adjustable alarm (every day, weekdays, or weekends)
– Via the Tuya app: Individually adjustable for each day,
Temperature alert: Indoor and outdoor temperature alert, which can be configured via the
app or the built-in display and sounds when the preset temperature value is reached,
Recording of the maximum and minimum temperature/humidity readings,
Temperature and humidity trends via Tuya app,
Display can be operated with batteries or power adapter.
7.3 Button functions
Mode
Button
Action
MODE
UP
DOWN
(WAVE/C/F)
CHANNEL ALERT SNOOZE/
LIGHT
Default
mode
Press
once
Check
alarm
times 1,
2 and 3
Check the
max./min.
temperature
and humidity
readings
Switch
between
°C/°F.
Check
the
channel
(1, 2
and 3)
Turn the
alert on/
off
Activate
the snooze
function
when the
alarm
sounds, or
switch the
backlight
on/off
Press
for more
than 3
seconds
Set the
year/
date/
time
Delete
max./min.
readings
–
Receive
outdoor
readings
Set alert Adjust
network
Alarm
mode
Press 1
x / 2 x /
3 x
Check
the
alarm
time
Turn the
alarm on/off
Turn the
alarm on/
off
–
–
Activate
the snooze
function for
5 minutes
Press
for more
than 3
seconds
Set the
alarm
–
–
–
–
–
7.4 Setup
Before using the product, perform the following steps:
1. Insert 2 x 1.5 V AAA batteries into the battery compartment
(29)
of the sensor.
2. Insert 3 x 1.5 V AAA batteries into the battery compartment
(20)
of the display, or connect
the supplied power adapter to the connection socket for the mains plug
(12)
.
3. Place the display as close as possible to the sensor. The maximum transmission range is
50 metres.
4. If necessary, press the DOWN button to change the temperature display (outdoors and
indoors) from °C to °F.
Æ
When the display is supplied with power, it will immediately display the indoor measurement
readings. The outdoor readings will be displayed approx. 3-4 minutes after inserting the
batteries.
7.5 Setting the month / date / 12h or 24h mode / time
1. Press the MODE button for 3 seconds. The "Month" value on the date display
(6)
will start
to flash.
2. Press the UP or DOWN buttons to set the current month.
3. Press the MODE button again. Press the UP or DOWN button to set the desired time format
(12 h / 24 h) for the time display
(1)
.
4. Press the MODE button again, and then use the UP and DOWN buttons to set the hours
and minutes of the time display
(1)
.
5. Press the MODE button again to save the previously entered values.


