background image

18

• Mit der Wipptaste „+/-“ (7) kann der Wert verstellt werden. Zur Schnellverstellung halten Sie

die Wipptaste in der jeweiligen Position länger gedrückt.

• Speichern Sie die Einstellung, indem Sie kurz die Taste „MODE“ (6) drücken.

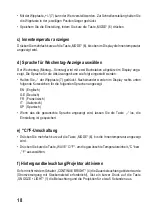
c) Innentemperatur anzeigen

Drücken Sie mehrfach kurz auf die Taste „MODE“ (6), bis oben im Display die Innentemperatur
angezeigt wird.

d) Sprache für Wochentag-Anzeige auswählen

Der Wochentag (Montag....Sonntag) wird mit zwei Buchstaben abgekürzt im Display ange-
zeigt. Die Sprache für die Abkürzungen kann wie folgt eingestellt werden:
• Halten Sie „-“ der Wipptaste (7) gedrückt. Nacheinander werden im Display rechts unten

folgende Kurzzeichen für die folgenden Sprachen angezeigt.
EN (Englisch)
GE (Deutsch)
FR (Französisch)
IT (Italienisch)
SP (Spanisch)

• Wenn das die gewünschte Sprache angezeigt wird, lassen Sie die Taste „-“ los, die

Einstellung ist gespeichert.

e) °C/°F-Umschaltung

• Drücken Sie mehrfach kurz auf die Taste „MODE“ (6), bis die Innentemperatur angezeigt

wird.

• Drücken Sie kurz die Taste „WAVE °C/°F“, um die gewünschte Temperatureinheit „°C“ bzw.

„°F“ auszuwählen.

f) Hintergrundbeleuchtung/Projektor aktivieren

Sofern nicht mit dem Schalter „CONTINUE BRIGHT“ (4) die Dauerbeleuchtung aktiviert wurde
(Stromversorgung mit Steckernetzteil erforderlich!), löst ein kurzer Druck auf die Taste
„SNOOZE • LIGHT“ (1) die Beleuchtung und die Projektion für etwa 5 Sekunden aus.

Содержание 67 16 50

Страница 1: ... Projection Clock Page 23 43 Horloge radiopilotée à projection d heure et couleur chaneante Page 44 64 Radio projectieklok met kleurenwisseling Pagina 65 85 Best Nr Item No N de commande Bestnr 67 16 50 BEDIENUNGSANLEITUNG OPERATING INSTRUCTIONS NOTICE D EMPLOI GEBRUIKSAANWIJZING ...

Страница 2: ...hrzeit Datum manuell einstellen 14 11 Umschalten des 12 24h Modus 14 12 Weckfunktion 14 a Weckzeiten einstellen 15 b Weckfunktion ein ausschalten 15 c Schlummerfunktion SNOOZE 16 d Alarmton beenden 16 13 Sonderfunktionen 17 a Uhrzeit für zweite Zeitzone 17 b Zeitzone einstellen 17 c Innentemperatur anzeigen 18 d Sprache für Wochentag Anzeige auswählen 18 e C F Umschaltung 18 f Hintergrundbeleuchtu...

Страница 3: ...3 Seite 14 Handhabung 20 15 Wartung und Reinigung 21 16 Entsorgung 21 a Allgemein 21 b Batterien und Akkus 21 17 Technische Daten 22 18 Konformitätserklärung DOC 22 ...

Страница 4: ...itung beachten Lesen Sie sich vor Inbetriebnahme des Produkts die komplette Bedienungsanleitung durch beachten Sie alle Bedienungs und Sicherheitshinweise Alle enthaltenen Firmennamen und Produktbezeichnungen sind Warenzeichen der jeweiligen Inhaber Alle Rechte vorbehalten Bei technischen Fragen wenden Sie sich bitte an Deutschland Tel 0180 5 31 21 11 Fax 0180 5 31 21 10 E Mail Bitte verwenden Sie...

Страница 5: ... Snooze Als Besonderheit ist die Farbe für die Hintergrundbeleuchtung und die Projektion stufenlos veränderbar RGB LED eingebaut Der Betrieb des Produkts ist nur in trockenen Innenräumen zulässig Eine andere Verwendung als zuvor beschrieben führt zur Beschädigung dieses Produktes darüber hinaus ist dies mit Gefahren wie z B Kurzschluss Brand elektrischer Schlag etc verbunden Das gesamte Produkt da...

Страница 6: ...g Bei Sach oder Personenschäden die durch unsachgemäße Handha bung oder Nichtbeachten der Sicherheitshinweis verursacht werden übernehmen wir keine Haftung In solchen Fällen erlischt jeder Garantie anspruch Sehr geehrte Kundin sehr geehrter Kunde die folgenden Sicherheitshinweise dienen nicht nur zum Schutz Ihrer Gesundheit sondern auch zum Schutz des Geräts Lesen Sie sich bitte die folgenden Punk...

Страница 7: ...leicher Hersteller gleicher Typ gleiche Kapazität gleicher Ladezustand Lassen Sie Batterien Akkus nicht offen herumliegen es besteht die Gefahr dass diese von Kindern oder Haustieren verschluckt werden Suchen Sie im Falle eines Verschluckens sofort einen Arzt auf Ausgelaufene oder beschädigte Batterien Akkus können bei Berührung mit der Haut Verätzungen verursachen benutzen Sie deshalb in diesem F...

Страница 8: ...Projektionsuhr nicht Betätigen Sie keine Tasten Stellen Sie die Funk Projektionsuhr nicht neben elektrische elektronische Geräte und nicht in die Nähe von Kabeln Steckdosen oder Metallteilen Ein schlechter Empfang ist auch zu erwarten z B bei metallbedampften Isolierglasfenstern Stahlbetonbauweise beschichteten Spezialtapeten oder in Kellerräumen Ein Empfangsversuch wird zu jeder vollen Stunde dur...

Страница 9: ...cht des Projektors reicht nicht aus die Lesbarkeit der Uhrzeit bei Tageslicht zu gewährleisten Die Projektion ist sowohl dauerhaft möglich nur dann wenn das mitgelieferte Steckernetzteil verwendet wird als auch eine Darstellung bei Tastendruck z B in der Nacht Bitte beachten Sie dass das Steckernetzteil ausschließlich zur Stromversor gung für die Hintergrundbeleuchtung und den Projektor dient Die ...

Страница 10: ...10 7 Bedienelemente MODE ALARM ON OFF RADIO CONTROLLED 1 7 6 11 12 13 2 3 5 8 9 10 4 ROTATE WAVE C F COLOR LOCK FLIP FOCUS DC 6V CONTINUE BRIGHT LIGHT SNOOZE 14 ...

Страница 11: ...ng der Displayanzeigen z B Weckzeit Innentemperatur 7 Wipptaster und Verstellen eines Werts bei manueller Einstellung Taste länger gedrückt halten für Sprachauswahl der Wochentagsanzeige Taste kurz drücken für Umschaltung der 12 24h Anzeige Taste länger gedrückt halten für Zeitzonen Einstellung 8 Taste ALARM ON OFF zum Ein Ausschalten der Weckzeiten und zum Beenden des Wecktons 9 Taste WAVE C F Ta...

Страница 12: ...tionsuhr auf eine ausreichend große glatte saubere und stabile Oberfläche Bis die DCF Zeit korrekt empfangen wird und im Display erscheint können 3 bis 5 Minuten vergehen Bei einwandfreiem Signal erscheint das Symbol nicht blinkend Stellen Sie die Funk Projektionsuhr nicht in die Nähe von elektrischen oder elektronischen Geräten Fernseher Computer Stromleitungen o ä oder Metallteilen Metallfenster...

Страница 13: ...ruck auf die Taste LIGHT SNOOZE 1 aktiviert die Projektion für jeweils etwa 5 Sekunden Gleichzeitig ist die Hintergrundbeleuchtung des LC Displays aktiviert b Projektor einstellen Schwenken des Projektors Der Projektor lässt sich um etwa 90 nach vorn bzw 90 nach hinten schwenken Ein mechanischer Endanschlag verhindert ein Überdrehen Wenden Sie keine Gewalt an Drehen der Anzeige Mit dem Einstellrad...

Страница 14: ...kt ca 3 Sekunden bis die große Stundenanzeige in der Mitte des Displays blinkt Mit der Wipptaste 7 kann der Wert verstellt werden Zur Schnellverstellung halten Sie die Wipptaste in der jeweiligen Position länger gedrückt Mit weiteren kurzen Betätigungen der Taste MODE 6 kann weitergeschaltet werden zur Einstellung von Minuten Jahr Monat Tag Die Einstellung erfolgt jeweils wieder mit der Wipptaste ...

Страница 15: ... der oberen Displayzeile blinken Mit der Wipptaste 7 kann der Wert verstellt werden Zur Schnellverstellung halten Sie die Wipptaste in der jeweiligen Position länger gedrückt Drücken Sie kurz die Taste MODE 6 die Minuten blinken Mit der Wipptaste 7 kann der Wert verstellt werden Zur Schnellverstellung halten Sie die Wipptaste in der jeweiligen Position länger gedrückt Drücken Sie kurz die Taste MO...

Страница 16: ...end der Schlummerfunktion blinkt das Glockensymbol der zugehörigen Weckzeit außerdem ein kleines Zz zwischen der Stunden Minutenanzeige in der Mitte des Displays Selbstverständlich können Sie die Schlummerfunktion beim erneuten Weckton nochmals aktivieren drücken Sie wieder die Taste SNOOZE LIGHT 1 d Weckton beenden Um den Weckton und auch die Schlummerfunktion zu beenden drücken Sie kurz die Tast...

Страница 17: ...ie kurz die Taste MODE 6 die Minuten blinken Mit der Wipptaste 7 kann der Wert verstellt werden Zur Schnellverstellung halten Sie die Wipptaste in der jeweiligen Position länger gedrückt Drücken Sie kurz die Taste MODE 6 die Einstellung ist gespeichert b Zeitzone einstellen Die Stunden der Uhrzeitanzeige können abhängig von der Zeitzone um 12 bzw 12 Stunden verstellt werden um die DCF genaue Uhrze...

Страница 18: ... gedrückt Nacheinander werden im Display rechts unten folgende Kurzzeichen für die folgenden Sprachen angezeigt EN Englisch GE Deutsch FR Französisch IT Italienisch SP Spanisch Wenn das die gewünschte Sprache angezeigt wird lassen Sie die Taste los die Einstellung ist gespeichert e C F Umschaltung Drücken Sie mehrfach kurz auf die Taste MODE 6 bis die Innentemperatur angezeigt wird Drücken Sie kur...

Страница 19: ...erden h DCF Empfangsversuch durchführen Die Funk Projektionsuhr führt direkt nach dem Einlegen der Batterien bzw jede Stunde einen DCF Empfangsversuch durch Sie können jedoch auch manuell einen DCF Empfangsversuch starten Halten Sie dazu die Taste WAVE C F für etwa 3 Sekunden gedrückt bis das Funkturm Symbol zu blinken beginnt Die Farbe für die Displaybeleuchtung Projektion wechselt während dem DC...

Страница 20: ...inen warmen Raum gebracht wird Das dabei entstehende Kondenswasser kann unter Umständen das Produkt zerstören Lassen Sie das Produkt zuerst auf Zimmertemperatur kommen bevor es verwendet wird Dies kann u U mehrere Stunden dauern Achten Sie darauf dass die Isolierung des gesamten Produkts weder beschädigt noch zerstört wird Überprüfen Sie vor jedem Gebrauch das Produkt auf Beschädigungen Falls Sie ...

Страница 21: ...s unbrauchbar gewordene Produkt gemäß den geltenden gesetzlichen Bestimmungen b Batterien und Akkus Sie als Endverbraucher sind gesetzlich Batterieverordnung zur Rückgabe aller gebrauch ten Batterien und Akkus verpflichtet eine Entsorgung über den Hausmüll ist untersagt Schadstoffhaltige Batterien Akkus sind mit nebenstehenden Symbolen ge kennzeichnet die auf das Verbot der Entsorgung über den Hau...

Страница 22: ...Innentemperatur Anzeige Anzeigebereich 5 0 bis 50 0 C 23 0 bis 122 0 F Projektor für Uhrzeit schwenkbar Anzeige drehbar Fokus Schärfe einstellbar Farbe für Hintergrundbeleuchtung des LC Display und Projektor stufenlos verstellbar 18 Konformitätserklärung DOC Hiermit erklären wir Conrad Electronic Klaus Conrad Straße 1 D 92240 Hirschau dass sich dieses Produkt in Übereinstimmung mit den grundlegend...

Страница 23: ... Manually Setting the Time Date 35 11 Switching between 12 24h Modes 35 12 Alarm Feature 35 a Setting the Alarm 36 b Switching the Alarm on off 36 c Snooze Function 37 d Switching off the Alarm Sound 37 13 Special Functions 38 a Time in a Second Time Zone 38 b Setting the Time Zone 38 c Displaying Room Temperature 39 d Selecting the Language for Displaying Day of the Week 39 e Switching between C ...

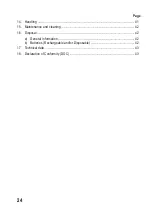
Страница 24: ...24 Page 14 Handling 41 15 Maintenance and cleaning 42 16 Disposal 42 a General Information 42 b Batteries Rechargeable and or Disposable 42 17 Technical data 43 18 Declaration of Conformity DOC 43 ...

Страница 25: ...ollow the operating instructions to preserve this condition and to ensure safe operation Please read the operating instructions completely and observe the safety and operator instructions before using the product All company names and product designations contained herein are trademarks of the respective owners All rights reserved In case of any technical inquiries contact or consult Germany Tel n...

Страница 26: ...ogrammed with a snooze mode A special feature is the ability to continuously alter the colour of the background lighting and projection integrated RGB LED You may only operate the product in dry indoor areas Any use other than that described above could lead to damage to this product and involves the risk of short circuits fire electric shock etc No part of the product may be modified or rebuilt O...

Страница 27: ...to property or personal injury caused by incorrect handling or non compliance with the safety instructions The warranty will be rendered null and void in such cases Dear Customer the following safety instructions are intended not only for the protection of your health but also for the protection of the device Please read carefully through the following points a General Information The unauthorized...

Страница 28: ... same type capacity and charge level Do not leave batteries rechargeable batteries around openly and unattended There is a risk of batteries being swallowed by children or pets If swallowed consult a doctor immediately Leaking or damaged batteries rechargeable batteries may cause acid burns when the come into contact with skin therefore use suitable protective gloves Make sure that batteries recha...

Страница 29: ...iod of time Do not push any buttons Do not place the radio projection clock next to electric electronic devices do not place it near cables plugs or metallic parts Poor reception can also be caused by materials such as metallized insulated glass reinforced concrete buildings coated special wallpaper or installation in cellars An attempt to receive a signal is carried out every hour on the hour A s...

Страница 30: ...g wall The LED light from the projector is not strong enough to display the time legibly by daylight The projection can be continuous only if the provided plug in power unit is used or be activated by pressing a button e g during the night Please note that the plug in power unit acts only as a power source for the background lighting and the projector Thus the batteries should be inserted at all t...

Страница 31: ...31 7 Operating Elements MODE ALARM ON OFF RADIO CONTROLLED 1 7 6 11 12 13 2 3 5 8 9 10 4 ROTATE WAVE C F COLOR LOCK FLIP FOCUS DC 6V CONTINUE BRIGHT LIGHT SNOOZE 14 ...

Страница 32: ...setting room temperature 7 and rocker buttons Changes a value during manual setting Press and hold the button to select the language of the day of the week to be displayed Briefly press of the button to switch between 12 and 24 hour displays Press and hold the button button to set the time zone 8 Use the ALARM ON OFF to switch the alarm on or off and to stop the alarm sound 9 WAVE C F button Press...

Страница 33: ... stable surface for positioning the radio projection clock It can take between 3 and 5 minutes until the DCF time is received correctly and displayed If the signal is correct the symbol will be displayed not flashing Do not place the radio projection clock close to electric or electronic devices for example television sets computers power cables etc or metal parts metal windows doors heating eleme...

Страница 34: ... Pressing the LIGHT SNOOZE button 1 activates the projection for 5 seconds The background lighting of the LC display is activated simultaneously b Adjusting the Projector Swivelling the projector The projector can be swivelled approx 90 forward and backward A mechanical stop prevents it from being turned too far Do not use any force Rotating the Display The ROTATE 11 rotary control allows you to r...

Страница 35: ... the display Hold the MODE button 6 down long enough approx 3 seconds until the hours of the time display start to flash in the middle of the display The rocker button 7 can be used to set the hour For quick adjustment hold down the rocker button a little longer By briefly pressing the MODE 6 button you can switch to setting minutes year month day Each setting is then adjusted using the rocker but...

Страница 36: ... long enough approx 3 seconds until the hours of the alarm time start to flash in the upper part of the display The rocker button 7 can be used to set the alarm time For quick adjustment hold down the rocker button a little longer Briefly press the MODE 6 button the minutes flash The rocker button 7 can be used to set the alarm time For quick adjustment hold down the rocker button a little longer ...

Страница 37: ... the bell symbol for the corresponding alarm time will blink in addition a small Zz symbol appears between the hour and minutes shown in the middle of the display Of course when the alarm goes off again you can activate the snooze function again by pressing the SNOOZE LIGHT 1 button again d Switching Off the Alarm To end the alarm tone and also the snooze function press the ALARM ON OFF 8 button ...

Страница 38: ...e longer Briefly press the MODE 6 button the minutes flash The rocker button 7 can be used to set the time For quick adjustment hold down the rocker button a little longer Briefly press the MODE 6 button the setting is saved b Setting the Time Zone The hours of the time display can be adjusted by up to 12 or 12 hours depending on the time zone in order to comply with the exact DCF time of the resp...

Страница 39: ...er button 7 The following abbreviations for the following languages will be shown in sequence on the right bottom of the display EN English GE German FR French IT Italian SP Spanish When the desired language is shown release the button the setting is saved e Switching between C F Briefly and repeatedly press the MODE 6 button until the display shows the room temperature Briefly press the WAVE C F ...

Страница 40: ... out DCF Signal Check The Radio Projection Clock carries out a DCF signal check after batteries have been inserted and or every hour You can however manually attempt to receive DCF signal Simply hold down the WAVE C F button for approx 3 seconds until the radio tower begins to flash The colour of the display lighting projection changes to blue during DCF signal checks The display lighting projecti...

Страница 41: ...y after it has been brought from a cold into a warm room Condensation that forms might destroy your device Allow the device to reach room temperature before connecting it to the power supply This process may take several hours Make sure the insulation of the whole product is neither damaged nor destroyed Check the product for damage before each use If you detect any damage do not operate the produ...

Страница 42: ...tutory regulations b Batteries and Rechargeable Batteries As the end user you are required by law regulation on disposal of batteries to return all used batteries rechargeable and non rechargeable batteries Disposing of batteries in the house hold waste is prohibited Contaminated batteries rechargeable batteries are labelled with these symbols to indicate that disposal in domestic waste is forbidd...

Страница 43: ...nction Room temperature display display range 5 0 to 50 0 C 23 0 to 122 0 F Time Display Projector can be rotated swivelled focus sharpness can be adjusted Colour for background lighting of the LC display and projector can be continuously adjusted 18 Declaration of Conformity DOC We Conrad Electronic Klaus Conrad Straße 1 D 92240 Hirschau hereby declare that this product adheres to the fundamental...

Страница 44: ...11 Passage du mode 12 et 24 h 56 12 Fonction réveil 56 a Réglage des heures de réveil 57 b Activation et désactivation de la fonction réveil 57 c Fonction sommeil SNOOZE 58 d Arrêt de l alarme 58 13 Fonctions particulières 59 a Heure du second fuseau horaire 59 b Réglage du fuseau horaire 59 c Affichage de la température intérieure 60 d Sélection de la langue de l affichage du jour de la semaine 6...

Страница 45: ...45 Page 14 Manipulation 62 15 Maintenance et nettoyage 63 16 Élimination 63 a Généralités 63 b Piles et accumulateurs 63 17 Caractéristiques techniques 64 18 Déclaration de conformité DOC 64 ...

Страница 46: ...vre les instructions contenues dans le présent mode d emploi Avant l utilisation de ce produit lisez attentivement l intégralité du présent mode d emploi et respectez toutes les instructions d utilisation et consignes de sécurité Tous les noms de société et toutes les désignations de produit sont des marques déposées de leurs propriétaires respectifs Tous droits réservés Pour toutes vos questions ...

Страница 47: ...oéclairage et la projection modifiable en continu DEL RGB incorporée constituent la particularité de l horloge Le produit ne doit être utilisé que dans les locaux intérieurs secs Toute utilisation autre que désignée ci dessus entraîne l endommagement du produit ainsi que des risques de court circuit d incendie d électrocution etc Le produit dans son ensemble ne doit être ni transformé ni modifié L...

Страница 48: ...ssume aucune responsabilité en cas de dommages matériels ou corporels résultant d une utilisation de l appareil non conforme aux spécifications ou d un non respect des présentes instructions Dans ces cas la garantie est annulée Chère Cliente cher Client Les consignes de sécurité suivantes ne sont pas destinées à préserver uniquement votre santé mais aussi à préserver le bon fonctionnement de l app...

Страница 49: ...mbinez jamais piles et accumulateurs Utilisez toujours un jeu de piles ou d accus identiques même fabricant même type même capacité même état de charge Ne laissez pas les piles accumulateurs à la portée de tous les enfants ou les animaux domestiques pourraient les avaler Dans un tel cas immédiatement consulter un médecin Les accumulateurs ou les piles endommagés ou qui fuient peuvent entraîner des...

Страница 50: ...horloge à ce moment N actionnez aucune touches Ne placez pas l horloge radiopilotée à projection d heure près des appareils électriques électroniques ni à proximité de câbles de prises de courant ou de pièces métalliques Les fenêtres d isolation métallisées une construction en béton armé les revêtements spéciaux de papier peint ou les caves peuvent aussi altérer la réception Un essai de réception ...

Страница 51: ...r La lumière DEL du projecteur ne suffit pas pour assurer la lisibilité de l heure à la lumière du jour La projection est possible non seulement de façon permanente uniquement lorsque l on utilise le bloc d alimentation fourni mais aussi une par pression de touche la nuit par ex Veuillez noter que le bloc d alimentation est prévu exclusivement pour l alimentation électrique du rétroéclairage et du...

Страница 52: ...52 7 Eléments de commande MODE ALARM ON OFF RADIO CONTROLLED 1 7 6 11 12 13 2 3 5 8 9 10 4 ROTATE WAVE C F COLOR LOCK FLIP FOCUS DC 6V CONTINUE BRIGHT LIGHT SNOOZE 14 ...

Страница 53: ...ature intérieure 7 Interrupteur à bascule et Changement d une valeur lors du réglage manuel Maintenir la touche enfoncée plus longtemps pour sélectionner la langue de l affichage du jour de la semaine Appuyer courtement sur la touche pour commuter à l affichage 12 24h Maintenir la touche enfoncée plus longtemps pour régler les fuseaux horaires 8 Touche ALARM ON OFF pour activer désactiver les heur...

Страница 54: ...sur une suface suffisamment grande lisse propre et stable 3 à 5 minutes peuvent s écouler avant que l horloge ne puisse capter correctement l heure DCF et qu elle apparaisse sur l écran Le symbole sans clignotement apparaît si le signal est parfaitement reçu Neplacezpasl horlogeradiopilotéeàprojectiond heureàproximitéd appareils électriques ou électroniques tels que téléviseur ordinateur câbles él...

Страница 55: ... la touche LIGHT SNOOZE 1 activer la projection pendant respectivement 5 secondes Parallèlement le rétroéclairage de l écran LCD est activé b Réglage du projecteur Orienter le projecteur Le projecteur peut être orienté d env 90 vers l avant et de 90 vers l arrière Une butée d arrêt mécanique empêche de fausser le mécanisme Ne pas forcer Pivoter l affichage La mollette de réglage ROTATE 11 permet d...

Страница 56: ...e de l écran Maintenez la touche MODE 6 enfoncée env 3 secondes jusqu à ce ce le grand affichage des heures clignote au centre de l écran L interrupteur à bascule 7 permet de changer la valeur Pour le réglage rapide maintenez enfoncé plus longuement l interrupteur à bascule dans la position respective Mit Vous passez au réglage des minutes année mois jour en continuant d actionner la touche MODE 6...

Страница 57: ...rrupteur à bascule 7 permet de changer la valeur Pour le réglage rapide maintenez enfoncé plus longuement l interrupteur à bascule dans la position respective Appuyez brièvement sur la touche MODE les minutes clignotent L interrupteur à bascule 7 permet de changer la valeur Pour le réglage rapide maintenez enfoncé plus longuement l interrupteur à bascule dans la position respective Appuyez brièvem...

Страница 58: ...t le mode sommeil le symbole de la cloche de l heure de réveil correspondante clignote par ailleurs un petit Zz apparaît entre l affichage des heures et des minutes au centre de l écran Vous pouvez bien sûr réactiver la fonction sommeil lors de la prochaine sonnerie en réappuyant sur la touche SNOOZE LIGHT 1 d Arrêt de la sonnerie Pour arrêter la sonnerie mais aussi la fonction sommeil appuyez cou...

Страница 59: ...MODE les minutes clignotent L interrupteur à bascule 7 permet de changer la valeur Pour le réglage rapide maintenez enfoncé plus longuement l interrupteur à bascule dans la position respective Appuyez brièvement sur la touche MODE le réglage est enregistré b Réglage du fuseau horaire Les heures de l affichage peuvent être modifiées de 12 ou de 12 heures selon le fuseau horaire pour ajuster l heure...

Страница 60: ...intenez l interrupteur à bascule 7 enfoncé Les caractères abrégés suivants des langues ci après sont affichés les uns après les autres à droite en bas de l écran EN anglais GE allemand FR français IT italien SP espagnol Relâchezlatouche lorsquelalanguedésiréeestaffichéepuisenregistrezlaconfiguration e Commutation de C F Appuyez plusieurs fois courtement sur la touche MODE 6 jusqu à affichage de la...

Страница 61: ...i de réception du signal DCF L horloge radiopilotée à projection d heure exécute un essai de réception du signal DCF dès la mise en place des piles voire toutes les heures Cependant vous pouvez démarrer aussi l essai de réception manuellement Maintenez à cet effet la touche WAVE C F pendant env 3 secondes jusqu à ce que le symbole de la tour de radio se mette à clignoter La couleur de l éclairage ...

Страница 62: ... le produit lorsqu il vient d être transporté d un local froid à un local chaud L eau de condensation qui en résulte pourrait dans des conditions défavorables détruire le produit Attendre que le produit ait atteint à la température ambiante pour l utiliser Selon le cas cela peut durer plusieurs heures Veillez à ce que l isolation de l ensemble du produit ne soit ni endommagée ni détruite Contrôlez...

Страница 63: ...x dispositions légales en vigueur b Piles et accumulateurs Le consommateur final est légalement tenu ordonnance relative à l élimination des piles usagées de rapporter toutes les piles et accumulateurs usés il est interdit de les jeter dans les ordures ménagères Les piles et accumulateurs qui contiennent des substances toxiques sont caractérisés par les symboles ci contre qui indiquent l interdict...

Страница 64: ...mmeil Snooze Affichage de la température intérieure plage d affichage de 5 0 à 50 0 C 23 0 à 122 0 F Projecteur pour l heure pivotant affichage orientable foyer mise au point réglable Couleur du rétroéclairage de l écran LCD et projecteur réglable en continu 18 Déclaration de conformité DOC Conrad Electronic Klaus Conrad Strasse 1 D 92240 Hirschau Allemagne déclare que le produitestenconformitéave...

Страница 65: ...0 De tijd datum handmatig instellen 77 11 Overschakelen tussen de 12 24u modus 77 12 Wekfunctie 77 a Wektijden instellen 78 b Wekfunctie in en uitschakelen 78 c Sluimerfunctie SNOOZE 79 d Alarmtoon stoppen 79 13 Speciale functies 80 a Uur voor de tweede tijdzone 80 b Tijdzone instellen 80 c Binnentemperatuur weergeven 81 d Taal instellen voor de weergave van de dag van de week 81 e C F omschakelin...

Страница 66: ...66 Pagina 14 Algemeen gebruik 83 15 Onderhoud en reiniging 84 16 Afvalverwijdering 84 a Algemeen 84 b Batterijen en accu s 84 17 Technische gegevens 85 18 Verklaring van overeenstemming DOC 85 ...

Страница 67: ...gebruiksaanwijzing op om deze status van het apparaat te handhaven en een ongevaarlijke werking te garanderen Lees vóór de ingebruikneming van dit product de volledige gebruiksaanwijzing door en neem alle bedienings en veiligheidsvoorschriften in acht Alle voorkomende bedrijfsnamen en productaanduidingen zijn handelsmerken van de betreffende eigenaren Alle rechten voorbehouden Bij technische vrage...

Страница 68: ...voor de achtergrondverlichting en de projectie traploos regelbaar RGB LED ingebouwd Het product mag alleen worden gebruikt in droge ruimten binnenshuis Een andere toepassing dan hierboven beschreven kan leiden tot beschadiging van het product Daarnaast bestaat het gevaar van bv kortsluiting brand of elektrische schokken Het gehele product mag niet worden gewijzigd of omgebouwd Het apparaat mag all...

Страница 69: ...jn wij niet aansprakelijk Bij materiële schade of persoonlijke ongelukken die door onoordeelkundiggebruikofniet nalevingvandeveiligheidsvoorschriften veroorzaakt werden aanvaarden wij geen enkele aansprakelijkheid In dergelijke gevallen vervalt elk recht op garantie Geachte klant de volgende veiligheidsvoorschriften hebben niet enkel de bescherming van uw gezondheid maar ook de bescherming van het...

Страница 70: ... dezelfde fabrikant hetzelfde type dezelfde capaciteit dezelfde laadtoestand U mag batterijen accu s niet zomaar laten rondslingeren wegens het gevaar dat kinderen of huisdieren ze inslikken Raadpleeg bij inslikken onmiddellijk een arts Lekkende of beschadigde batterijen accu s kunnen bij contact met de huid verwondingen veroorzaken Draag in zo n geval steeds beschermende handschoenen Let erop dat...

Страница 71: ...k in deze tijd niet Bedien geen toetsen Plaats de radio projectieklok niet naast elektrische elektronische apparaten en niet in de buurt van kabels contactdozen of metalen onderdelen Er is ook een slechte ontvangst mogelijk bij isolatieramen met een opgedampte metaallaag gewapend beton speciaal gecoat behangpapier of in kelders Op elk vol uur wordt een ontvangstpoging doorgevoerd Eén ontvangst per...

Страница 72: ... licht van de projector volstaat niet om de leesbaarheid van de tijd ook bij daglicht te garanderen De projectie is permanent mogelijk alleen als de meegeleverde netadapter wordt gebruikt en de weergave kan tijdelijk door een druk op de knop worden geactiveerd bijvoorbeeld s nachts Hou er rekening mee dat het netdeel uitsluitend voor de voeding van de achtergrondverlichting van de projector dient ...

Страница 73: ...73 7 Bedieningselementen MODE ALARM ON OFF RADIO CONTROLLED 1 7 6 11 12 13 2 3 5 8 9 10 4 ROTATE WAVE C F COLOR LOCK FLIP FOCUS DC 6V CONTINUE BRIGHT LIGHT SNOOZE 14 ...

Страница 74: ...tuur 7 Wipschakelaar en Veranderen van een waarde bij manueel instellen Toets langer ingedrukt houden voor het selecteren van de taal van de dag van de week Toets kort indrukken om over te schakelen tussen 12 24h weergave Toets langer ingedrukt houden voor het instellen van de tijdzone 8 Toets ALARM ON OFF voor het in uitschakelen van de wektijden en het beëindigen van de wektoon 9 Toets WAVE C F ...

Страница 75: ...eplaatst Plaats de radio projectieklok op een voldoende groot vlak zuiver en stabiel oppervlak Het kan 3 tot 5 minuten duren voor de DCF tijd correct zichtbaar wordt op het display Bij een correct signaal verschijnt het symbool niet knipperend Plaats de radio projectieklok niet in de buurt van elektrische of elektronische apparaten tv computer stroomleidingene a ofmetalenvoorwerpen metalen raam de...

Страница 76: ...OOZE 1 activeert de projectie voor telkens ongeveer 5 seconden Tegelijk wordt de achtergrondverlichting van het LC display ingeschakeld b Projector instellen Draaien van de projector De projector kan over ongeveer 90 naar voren resp 90 naar achter worden vedraaid Een mechanische eindaanslag voorkomt te ver draaien Gebruik geen geweld Draaien van de indicatie Met de knop ROTATE 11 kan de indicatie ...

Страница 77: ...den tot de grote uuraanduiding in het midden van het display gaat knipperen Met de wiptoets 7 kan de waarde ingesteld worden Voor het snel instellen houdt u de wiptoets langer in de betrokken stand ingedrukt Met nogmaals kort indrukken van de toets MODE 6 kan worden verder geschakeld voor het instellen van de minuten het jaar de maand en de dag De instelling gebeurt telkens weer met de wiptoets 7 ...

Страница 78: ...e wektijd op de bovenste displayregel gaat knipperen Met de wiptoets 7 kan de waarde ingesteld worden Voor het snel instellen houdt u de wiptoets langer in de betrokken stand ingedrukt Druk kort op de toets MODE 6 de minuten knipperen Met de wiptoets 7 kan de waarde ingesteld worden Voor het snel instellen houdt u de wiptoets langer in de betrokken stand ingedrukt Druk kort op de toets MODE 6 de i...

Страница 79: ...dens de sluimerfunctie knippert het kloksymbool van de betrokken wektijd en verschijnt een klein Zz tussen de uren minutenindicatie in het midden van het display Vanzelfsprekend kunt u de sluimerfunctie bij een nieuwe wektoon opnieuw activeren druk nogmaals op de toets SNOOZE LIGHT 1 d Wektoon beëindigen Om de wektoon en de sluimerfunctie te beëindigen drukt u kort op de toets ALARM ON OFF 8 ...

Страница 80: ...stand ingedrukt Druk kort op de toets MODE 6 de minuten knipperen Met de wiptoets 7 kan de waarde ingesteld worden Voor het snel instellen houdt u de wiptoets langer in de betrokken stand ingedrukt Druk kort op de toets MODE 6 de instelling wordt opgeslagen b Tijdzonde instellen De uren van de uurweergave kunnen naargelang de tijdzone met 12 resp 12 uren worden versteld om de DCF precieze tijd aan...

Страница 81: ... de de wiptoets 7 ingedrukt Na elkaar worden op het display rechts beneden de volgende korte aanduidingen voor de volgende talen weergegeven EN Engels GE Duits FR Frans IT Italiaans SP Spaans Zodra de gewenste taal zichtbaar is laat u de toets los de instelling wordt opgeslagen e C F omschakeling Druk meermaals kort na elkaar op de toets MODE 6 tot de binnentemperatuur zichtbaar wordt Druk kort op...

Страница 82: ...h DCF ontvangsttest doorvoeren De radio projectieklok voert meteen na het plaatsen van de baterijen resp om het uur een ontvangstpoging door Maar u kunt ook met de hand een DCF ontvangstpoging starten Hou daartoe de toets WAVE C F ongeveer 3 seconden ingedrukt tot het radiozender symbool gaat knipperen De kleur voor de displayverlichting projectie verandert tijdens de DCF ontvangstpoging in blauw ...

Страница 83: ...oduct nooit direct wanneer het van een koude in een warme ruimte is gebracht Het condenswater dat hierbij ontstaat kan het product onder bepaalde omstandigheden onherstelbaar beschadigen Laat het product eerst op kamertemperatuur komen voordat u het gebruikt Dit kan soms meerdere uren duren Zorg dat de isolatie van het totale product niet wordt beschadigd of wordt verwijderd Controleer het product...

Страница 84: ...ldende wettelijke bepalingen voor afvalverwerking ingeleverd worden b Batterijen en accu s UbentalseindgebruikervolgensdeKCA voorschriftenwettelijkverplichtallelege oplaadbare batterijen en accu s in te leveren verwijdering via het huisvuil is niet toegestaan Batterijen accu s die schadelijke stoffen bevatten worden gekenmerkt door de hiernaast vermelde symbolen die erop wijzen dat deze niet via h...

Страница 85: ... Binnentemperatuur indicatie weergevegebied 5 0 tot 50 0 C 23 0 tot 122 0 F Projector voor de tijd draaibaar indicatie draaibaar focus scherpte instelbaar Kleur achtergrondverlichting van het LC display en projector traploos instelbaar 18 Verklaring van overeenstemming DOC Hierbij verklaren wij Conrad Electronic Klaus Conrad Straße 1 D 92240 Hirschau dat dit product in overeenstemming is met de al...

Страница 86: ...86 ...

Страница 87: ...87 ...

Страница 88: ...tice est une publication de la société Conrad Electronic SE Klaus Conrad Str 1 D 92240 Hirschau Allemagne Tous droits réservés y compris traduction Toute reproduction quel que soit le type par exemple photocopies microfilms ou saisie dans des traitements de texte electronique est soumise à une autorisation préalable écrite de l éditeur Impression même partielle interdite Cette notice est conforme ...

Отзывы: