background image

NOTES:

1. All functions must be enabled by an Authorized Dealer during installation to 

be functional on remote

2.

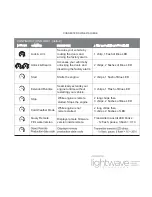
= Press & release button

3.


= Press & hold button for the amount of seconds indicated in the center of icon.

4. Coma (,) between icons = Press buttons one after the other
5. Timeout between each button press = 3 seconds

This Single button transmitter can be configured in 3 different way to change it’s behaviour with your vehicle.  
To configure your transmitter, please follow the steps below.

1- Choose which configuration mode is desired from the next pages of this guide.
2- Once the Configuration mode is chosen, Press and hold the button on the transmitter for at least 

10 seconds.  The White LED will blink once + 1 chirp.

3- Then the White LED will blink 1 or 2 or 3 times to display the current transmitter configuration mode. 

(you now have 10 seconds to proceed to Step 4)

4- Press and Release the button until the White LED blinks the desired configuration mode.
5- When the White LED is blinking the desired selection, Press and Hold the transmitter button for 10 seconds.

After 10 seconds, the White LED will blink the 1 or 2 or 3 blinks depending on the saved configuration mode.

6- Release the transmitter button.

Note: To exit programming at any time, do not press transmitter button for at least 10 seconds.  Also removing
           the batteries will not alter the programmed configuration mode.

COMMAND


S & CONFIRMATIONS

In order to get the most out of your Connected RFK2101 remote, please take a moment to get 

acquainted with the following commands and confirmations below:

5s

Содержание RFK2101

Страница 1: ......

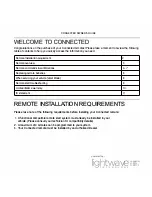
Страница 2: ...servicing your vehicle Valet Mode 8 Remote start troubleshooting 9 Limited lifetime warranty 10 IC statement 11 REMOTE INSTALLATION REQUIREMENTS Please take note of the following requirements before installing your Connected remote 1 A functional compatible remote start system must already be installed in your vehicle Please consult your technician for compatibility details 2 A maximum of 4 remote...

Страница 3: ...ion TX LED Receive Confirmation RX LED Chime Batteries Required 2 x CR2016 Avg Battery Life 1 Year Warranty 1 year REMOTE OVERVIEW Please take a moment to familiarize yourself with your Connected RTX2100 remote s general features CONNECTED OWNER S GUIDE REMOTE MODEL RFK2101 ...

Страница 4: ...The White LED will blink once 1 chirp 3 Then the White LED will blink 1 or 2 or 3 times to display the current transmitter configuration mode you now have 10 seconds to proceed to Step 4 4 Press and Release the button until the White LED blinks the desired configuration mode 5 When the White LED is blinking the desired selection Press and Hold the transmitter button for 10 seconds After 10 seconds t...

Страница 5: ...t 1 chirp 1 flash of Blue LED 2 chirps 2 flashes of Blue LED 2 chirps 1 flash of Blue LED While engine is remote started Stops the engine 2 long chirps then 3 chirps 2 flashes of LED Cold Weather Mode Accesses your vehicle by unlocking the doors and disarming the factory alarm CONFIGURATION MODE 1 default Displays remote firmware version inside remote Query Remote Firmware Version Transmitter transmit ...

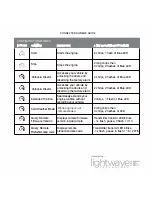
Страница 6: ...y extends your engine runtime without restartina vour vehicle Displays remote firmware version inside remote Displays remote production date code I I 2 chirps 1 flash of Blue LED 2 long chirps then 3 chirps 2 flashes of Blue LED 2 chirps 2 flashes of Blue LED 2 chirps 2 flashes of Blue LED 3chirps 1 Flash of Blue LED 2 long chirps then 3 chirps 2 flashes of LED Transmitter transmit LED blinks 1x f...

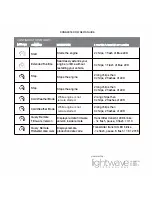
Страница 7: ...te Displays remote production date code 2 chirps 1 flash of Blue LED 3 chirps 1 Flash of Blue LED 2 long chirps then 3 chirps 2 flashes of LED 2 long chirps then 3 chirps 2 flashes of LED 2 long chirps then 3 chirps 2 flashes of LED 2 long chirps then 3 chirps 2 flashes of LED Transmitter transmit LED blinks 1x flash pause 3 flash V 1 3 Transmitter transmit LED blinks 1x flash pause 6 flash 16 201...

Страница 8: ...ont and back part from the transmitter 2 Remove the old batteries and replace by two new CR2016 batteries 3 Close back the front and back of the transmitter and reinstall the 2x screws WHEN SERVICING YOUR VEHICLE To ensure safety during vehicle servicing the remote starter must be placed in Valet Mode The Valet Mode will disable remote start functionality See your Remote starter manual for Valet m...

Страница 9: ...fails to start the vehicle the parking lights will flash a number of times according to the possible remote start error Please consult your specific Remote Starter owners guide for error details Please consult your retailer for more details powered by lightwave iw TECH N OL O GY ...

Страница 10: ... IS AUTOMATICALLY VOID IF An original proof of purchase is not provided when servicing the product during the warranty period The Connected product is transferred to another vehicle The vehicle in which the product was originally installed is transferred to a new owner Lightwave Technology Inc is not responsible for any damages whatsoever including but not limited to any consequential damages inci...

Страница 11: ......

Отзывы: