background image


14


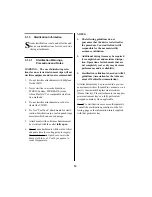
3.1.3

Sterilization Information


team sterilization is safe and effective and 
has no contraindications for its use in ster-
ilizing attachments.


3.1.3.1

Sterilization Warnings, 
Precautions and Notes


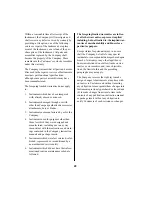
WARNING: The use of disinfecting solu-
tions for an exterior instrument wipe will not 
sterilize equipment and is not recommended.


1.

Do not sterilize attachments with Ethylene 
Oxide (EtO).

2.

Never sterilize in a washer/sanitizer, 
STERIS System, STERRAD System, 
Abtox Plazlyte™ or comparable steriliza-
tion methods.

3.

Do not sterilize attachments in cold ster-
ilants like CIDEX.

4.

Do Not “Peel Pack” attachments for steril-
ization. Sterilization in a sealed pouch traps 
moisture which can cause damage.

5.

Attachments with collet mechanisms must 
be sterilized with the collet 


fully open


.

6.

Do not use attachments while warm. Allow 
adequate time for cooling prior to surgery. 
Do not immerse in liquid or cover with a 
damp cloth to cool. Cool by exposure to 
room temperature.


NOTES:

1.

The following guidelines do not 
guarantee that the device is sterile after 
the procedure. Your institution is still 
responsible for the normal sterility 
assurance validation.

2.

Additional drying time may be required 
for complete heat and moisture dissipa-
tion. Operation of attachments that are 
not completely cool or dry may decrease 
performance and/or reliability.

3.

Sterilization validation is based on AAMI 
guidelines (Association for the Advance-
ment of Medical Instrumentation).


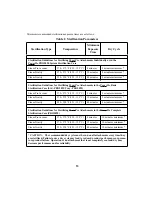
All attachments may be processed in a pre-vac-
uum steam sterilizer (Steam Pre-vacuum) or in a 
gravity (downward) displacement sterilizer 
(Steam Gravity). Place attachments in an appro-
priate instrument tray or a fully perforated, 
wrapped container, when applicable.


PowerPro


 sterilization cases are sold separately. 

Consult the sterilization guidelines on the fol-
lowing page or the information insert supplied 
with that particular tray.

S

Содержание Linvatec Hall PowerPro Series

Страница 1: ...The Hall PowerPro Attachment Instruction Manual...

Страница 2: ...otherwise or disclosed to third parties in whole or in part without the prior express written consent of Linvatec Linvatec reserves the right to revise this publication and to make changes from time t...

Страница 3: ...mer PRO2047 4 2 1 2 Drilling Attachments 5 2 1 2 1 Zimmer Hudson Drill PRO2046 5 2 1 2 2 AO Drill PRO2070 5 2 1 2 3 AO Attachment Small PRO2038 5 2 1 2 4 Trinkle AO Attachment PRO2029 6 2 1 3 Jacobs C...

Страница 4: ...gittal Saw Attachment PRO2043 11 2 1 6 2 Reciprocating Saw Attachment PRO2045 11 3 0 MAINTENANCE 3 1 Cleaning and Sterilizing 12 3 1 1 Cleaning Precautions 12 3 1 2 Attachment Cleaning Instructions 13...

Страница 5: ...med ical professionals completely familiar with the required techniques and instructions for use of the equipment Read and follow all warning and caution notices and instruc tions marked on the produc...

Страница 6: ...t Reciprocating Saw PRO2045 Sagittal Saw PRO2043 in the oscillate mode They are only to be operated in the drill mode 12 After each use thoroughly clean attach ments See 3 1 Cleaning and Sterilizing o...

Страница 7: ...k PRO2041 1 4 High Torque Jacobs Chuck PRO2042 Trinkle AO PRO2029 AO Attachment Small PRO2038 Radiolucent Drive Adapter Attachment PRO2514 3 8 Keyless Chuck Attachment PRO2375 Wire Driver for Battery...

Страница 8: ...ations in the Drill mode Variable Speed 0 420 rpm Torque forward and reverse 100 in lbs 1 To attach accessories to Reamer attach ments a Place the handpiece in the safe posi tion b Pull the collet sle...

Страница 9: ...ull the collet sleeve back and insert the accessory shank into the collet Release the collet sleeve 2 1 2 1 Zimmer Hudson Drill PRO2046 Specifications Collet Accepts Zimmer Hall Series 3 Hall Series 4...

Страница 10: ...the handpiece in the safe posi tion b Pull the collet sleeve back c Align the dimple on the Trinkle shank with the black arrow on the outer collet sleeve Totally insert the Trinkle shank The spring l...

Страница 11: ...g the shank completely into the collet 4 Release the collet sleeve The shank is now locked into the collet Pull the drill bit firmly to verify it is properly seated 5 To remove the drill bit pull back...

Страница 12: ...1 4 Keyless Chucks 1 To attach accessories to Keyless Chuck attachments a Place the handpiece in the safe posi tion b Insert accessory shank into chuck c While holding the knurled ring below the chuck...

Страница 13: ...Ring Copper 2 1 4 4 Radiolucent Drive Adaptor PRO2514 1 To attach a radiolucent drive attachment a Place the handpiece in the safe posi tion b Slide the radiolucent drive attachment onto the adaptor u...

Страница 14: ...in lbs Insertion of pins and wires and the functionality of the handpiece with either pins or wires is the same with either attachment 2 1 5 1 Wire Driver PRO5028 for Battery Handpieces Specification...

Страница 15: ...vary based on the power source in use 2 1 6 1 Sagittal Saw Attachment PRO2043 Specifications Operating Speed 0 26 000 cpm Stroke 4 arc NOTE The sagittal saw attachment accepts only Hall 5023 Series Sa...

Страница 16: ...Hall Surgical at the recommended service intervals is mandatory to keep your product warranties in effect Any services and or repairs done by any unautho rized repair facility may result in reduced pe...

Страница 17: ...tion of the attach ment by performing the following a Feed the wire end of a cleaning brush through the attachment b Pull the brush completely through the attachment Repeat until all debris is removed...

Страница 18: ...ing prior to surgery Do not immerse in liquid or cover with a damp cloth to cool Cool by exposure to room temperature NOTES 1 The following guidelines do not guarantee that the device is sterile after...

Страница 19: ...O2092 Steam Pre vacuum 270 272 F 132 133 C 4 minutes 8 minutes minimum Steam Gravity 270 272 F 132 133 C 15 minutes 8 minutes minimum Steam Gravity 250 254 F 121 123 C 40 minutes 8 minutes minimum Ste...

Страница 20: ...l Number Reason for Return Original Invoice Number Date of Purchase Repairs Products returned for repair must have an authorized Return Goods R G number prominently dis played on the box and included...

Страница 21: ...an authorized Return Goods R G number which must be prom inently displayed on the box and included on all paperwork Returns must be shipped prepaid freight otherwise they will not be accepted Product...

Страница 22: ...040 AO Reamer Attachment PRO2041 1 4 Jacobs Chuck Attachment PRO2042 1 4 High Torque Jacobs Chuck Attachment PRO2043 Sagittal Saw Attachment PRO2045 Reciprocating Saw Attachment PRO2046 Zimmer Hudson...

Страница 23: ...e Camera Heads 500 use service program prorated credit after 250 uses 14 Envision 1 4 Autoclavable Camera Heads 500 uses or Twelve 12 months whichever comes first 15 Envision Autoclavable 3CCD Camera...

Страница 24: ...y inconsistent with the instructions and warn ings contained in the Company instruction manuals and package inserts 5 Instruments which were last serviced refur bished reprocessed or reconditioned by...

Страница 25: ...21...

Страница 26: ...22...

Страница 27: ......

Страница 28: ...v C 02 2002 Hall Surgical 11311 Concept Boulevard Largo Florida 33773 4908 Phone 727 392 6464 Customer Service 800 925 4255 USA Fax 727 399 5256 International Fax 727 397 4540 www linvatec com 2002 Li...

Отзывы: