background image


-43- 

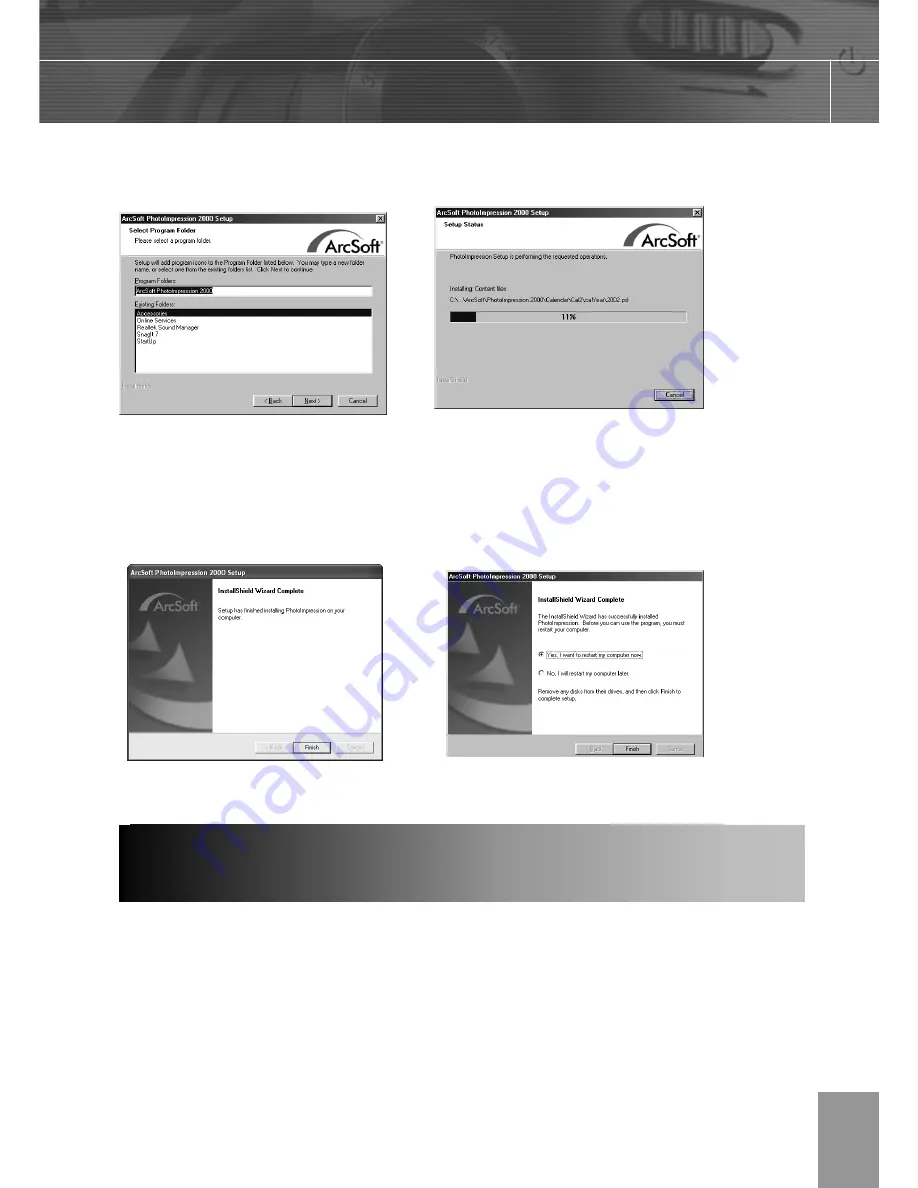
Step 11

 Click


[

Next >]. 

(fig

3.7) 

Step 12

 The screen will show the status of the installation. (fig

3.8) 


Step 13

 Click 

[Finish]. 

 Win98 will request for restart.


        Win 2000 /ME/XP   


Step 1

  Make sure your camera is powered off and not connected to the computer. 

Step 2

  Make sure the computer is powered on and Windows is running. 

Step 3

  Close any other applications or software you may be running. 

Step 4

  Insert the supplied CD-ROM into your computer’s CD-ROM Drive. 


NOTE:

 If the installer does not start automatically within 30 seconds after the 

CD-ROM has been inserted, click on “

My Computer

” either on the Desktop or in 

INSTALLING ADOBE ACROBAT READER 5- ALL 

WINDOWS USERS (OPTIONAL) 


Fig

.

 3.7 

Fig

.

 3.8 

Win 98 FE/SE 

Содержание 4340z

Страница 1: ......

Страница 2: ...lay Mode 15 Shooting Mode 15 Playback Mode 15 Information Displayed on the LCD Monitor 16 Shooting Mode 16 Playback Mode 16 Using the Zoom Feature 17 4TakingPictures Basic Still Image Shooting 18 Reviewing the Image after Shooting 19 Setting the Image Quality and Resolution 19 Using the Flash 20 Tips on Red Eye Reduction feature 20 Setting the Metering Mode 21 Macro Mode 21 Setting the Self Timer ...

Страница 3: ...reen 36 Identifying Your Operating System 37 Installing the DriverAnd Directx 9 Windows98 98se 38 Installing Directx 9 Windows 2000 40 Installing Arcsoft Photoimpression Allwindowsusers 41 Installing Adobe Acrobat Reader 5 All Windows Users Optional 43 8MakingConnections Downloading Images to a Computer 46 Downloading the Files by Using an SD Card Reader 46 Connecting the Camera to a Computer with...

Страница 4: ... contact your dealer immediately if any of the items below are missing or damaged Camera USB Cable Soft Case Strap 2 AA Batteries Software Installation CD ROM including multilingual user s guide Package Contents Quick Start Guide ...

Страница 5: ...ort CD ROM drive 1024 x 768 monitor 24 bit color true color Macintosh Power Mac G3 or later Mac OS 9 0 9 1 9 2 and OS X Minimum 64 MB RAM USB port CD ROM drive 640 x 480 monitor with thousands of color millions of color recommended Specifications are subject to change without prior notice System Requirements ...

Страница 6: ...mage may result In particular remain at least one meter away from infants when using flash Keep the camera away from water and other liquids Do not use the camera with wet hands Never use the camera in the rain or snow Moisture creates the danger of fire and electric shock Keep the camera and its accessories out of the reach of children and animals to prevent accidents or damage to the camera If y...

Страница 7: ...articular installation If this equipment does cause harmful interference to radio or television reception which can be determined by turning the equipment off and on the user is encouraged to try to correct the interference by one or more of the following measures Reorient or relocate the receiving antenna Increase the separation between the equipment and receiver Connect the equipment to an outle...

Страница 8: ...Quick View Down button Left button button button Camera mode button LCD screen SET button Shutter button Power button Viewfinder Self portrait mirror Flash Lens Self Timer Red Eye Reduction LED Flash Ready LED Auto Focus AF LED Tripod Socket Battery Memory Card Door W zoom out button T zoom in button ...

Страница 9: ...hen carrying it by the wrist strap Side AttachingtheWristStrap Attach the wrist strap as illustrated UsingtheSoftCase Store the camera in the soft case when it is not in use Using the Included Accessories DC IN terminal USB port ...

Страница 10: ...uick View mode To move the cursor to right when MENU screen is shown To enter submenu DownButton To set Continuous Shot in Shooting Mode To set Self Timer in Shooting Mode and Video Mode To move the cursor down when MENU screen is shown LeftArrow To set Macro shooting in Shooting Mode and Video Mode To move the cursor left when MENU screen is shown SETButton To enter submenu To confirm the setting...

Страница 11: ...nside the battery cover 4 Close the Battery Memory Card door BatteryStatusIndications The battery power level indicator represents the level of power of the batteries The meaning of each icon is as follows Charge Level High Low Indicator When the battery is running out the message Replace Battery will be displayed on the LCD Installing the Batteries If POWER button is pressed for over 1 second but...

Страница 12: ...Battery Memory Card door If you wish to delete all the images and video clips stored in the internal memory or memory card or when you use a brand new memory card please follow the steps below to format the internal memory or memory card 1 Insert the memory card if you want to format the memory card instead of the internal memory 2 Turn on the camera 3 Press the button 4 Press the arrow to select ...

Страница 13: ...o Shooting Mode Toturnoffthecamera Press the power button to turn off the camera 1 Formatting will erase all the data in the memory including the protected files Please check the contents in the memory before formatting it 2 SD cards formatted in another camera computer or peripheral device may not operate correctly When that happens reformat the SD card with this camera Turning the Power On Off P...

Страница 14: ...e button 3 Press the arrow to select the Setup Menu 4 Press the or arrow to select Date Time then press the SET button or the arrow to enter its submenu 5 Press the and arrow to select a field to change 6 Press the and arrow to set the values 7 After the Date Time and Date Time format is set press the SET button repeatedly to confirm the settings and then to exit Date Time submenu 8 Press the butt...

Страница 15: ...submenu 3 Press the or to set Date Stamp on off 4 Press the SET button to confirm the selection 5 Press the button twice to close the menu window 1 Press the button 2 Press the arrow to select the Setup Menu 3 Press the or arrow to select Language then press the SET button or the arrow to enter its submenu 4 Press the or to select a Language 5 Press the SET button to confirm the setting and to clo...

Страница 16: ... 5 Press the or to select the settings you wish to set then press the SET button 6 Press the button to close the menu window This chart shows the options for each menu settings MenuItemsSelectablewiththeMENUButton Menu Item Available Setting Default Setting Resolution 2304 x 1728 Quality Fine Exposure 2 1 7 1 3 1 0 0 7 0 3 0 0 0 3 0 7 1 0 1 3 1 7 2 0 0 Auto White Balance Auto Metering Auto Multi S...

Страница 17: ...tup Menu USB Computer Printer Computer Menu Item Available Setting Default Setting Protect Single Protect All Unprotect All Delete All Single All Slide Show Off 5 sec 10 sec Print Order Single All Reset Playback Mode Menu Copy To Card No Yes Exposure 2 1 7 1 3 1 0 0 7 0 3 0 0 0 3 0 7 1 0 1 3 1 7 2 0 Auto White Balance Auto Movie Mode REC File NO Reset On Off Off Note Every time the camera is power...

Страница 18: ...ss the DISP button to turn the LCD on or off The LCD display changes as indicated below ShootingMode On with Information On No Information LCD Off PlaybackMode On with Information On no Information Setting the LCD Display Mode ...

Страница 19: ...on such as the camera settings remaining image capacity and shooting date etc ShootingMode PlaybackMode Information Displayed on the LCD Monitor Auto 0 3 Memory Storage Type Memory Storage Type Current file number total file number ...

Страница 20: ... well as 4x digital zoom capability 1 Press T Tele to zoom in to your subject While the optical zoom is activated mechanical sound come from the lens movements can be heard You can also see the lens retracts While the digital zoom is activated the zoom scale indicator will be shown on the LCD 2 Press W Wide to zoom out Using the Zoom Feature ...

Страница 21: ...he Shutter button fully down to capture the image 1 If the Shaking Warning indicator is shown on the LCD that means the shutter speed is low and you should place the camera on a tripod or a steady place before shooting in order to ensure the image quality 2 In the following conditions the AF LED will continue to blink and the AF Frame will remain in red There are several subjects at different dist...

Страница 22: ...e or arrow to select the REC Menu 3 Press the or arrow to select Resolution or Quality then press the SET button or arrow to enter its submenu 4 Press the or to select the settings you wish to set then press the SET button 5 Press the button twice to close the menu window Resolution Purpose Large 1 2592 1944 Print large prints Large 2 2304 1728 Print large prints Medium 1 1600 1200 Print on small ...

Страница 23: ...ally detect when the flash is needed and the flash will fire after a short delay to prevent Red Eye phenomenon 1 Press the button to switch between flash modes The selected flash mode icon appears on the LCD monitor 2 Shoot the image Tips on Red Eye Reduction feature Shooting with flash in dark places the subject s eyes may appear red in the picture This phenomenon is known as Red Eye and occurs w...

Страница 24: ...se this mode when the subject is backlit or surrounded by bright light 1 Press the button 2 Press the or arrow to select the REC Menu 3 Press the or arrow to select Metering then press the SET button or arrow to enter its submenu 4 Press the or to select the settings you wish to set then press the SET button 5 Press the button twice to close the menu window Use the macro mode to shoot close up of ...

Страница 25: ...a will automatically and continuously capture 3 consecutive images at approximately 1 images per second in 1600 x 1200 resolution To exit the Continuous Shooting function press the button until disappears from the LCD Setting Description Ten seconds 3 images at 1600 x 1200 resolution 1 Focus range mentioned is the distance between the camera lens surface and the subject 2 Any flash setting can be ...

Страница 26: ...posure to give well exposed pictures under most lighting conditions If the captured picture of the main subject turns out to be too light or too dark use the Exposure Compensation feature to improve the exposure aspect 1 Press the button 2 In the camera menu press the or arrow to select Exposure then press the SET button 3 Press the and to set the exposure compensation value Available settings are...

Страница 27: ...ing under overcast shady or twilight skies Tungsten For recording under tungsten lighting Fluorescent For recording under fluorescent lighting Black white For recording black white photo 1 Press the button 2 In the camera menu press the or arrow to select white balance then press the SET button 3 Press the and to set the white balance value then press the SET button Use the self portrait mirror to...

Страница 28: ...t record 3 Press the shutter button again to stop recording the movie The camera stops recording automatically when the memory capacity is reached 1 The Video resolution is set to 320 240 pixels and cannot be changed 2 The Self Timer and Macro mode shooting can be activated in Video Mode p 22 23 3 The Exposure compensation and White Balance can be adjusted before recording video clip Video Mode Mo...

Страница 29: ...laying the video clip 2 Use to move to the previous file and to move to the next file 3 Press the Camera Mode button twice to return to shooting mode Still images can be magnified up from 1 times to 8 times 1 When the desired image is shown on the LCD press T to magnify the image 2 Press the or arrows to move the magnified area around the image 3 Press W to zoom out You may turn the picture inform...

Страница 30: ... the T button or the SET button to display the selected image in full screen size Erase files that you donít want to keep to make more memory space available You can erase individual files or all files in Playback Mode ErasingImagesIndividually 1 Press Camera Mode button to enter the Playback Mode 2 Use or to search for the file you want to delete 3 Press 4 Press or to select YES or NO 5 Press SET...

Страница 31: ...e button to enter the Playback Mode 2 Press the button 3 Press the arrow to select Protect then press the SET button or the arrow to enter its submenu 4 Press and to select Single or Protect All then press or the SET button to enter its submenu 5 Press and to select Yes or No and then press the SET button to confirm the choice Note After pressing the SET button to protect one image the protect ico...

Страница 32: ... that are stored in the camera s internal memory to an SD memory card 1 Insert an SD card and press the Camera Mode button to enter the Playback Mode 2 Press the button 3 Press the arrow to select Copy to card then press the SET button or the arrow to enter its submenu 4 Press and to select YES or NO then press SET to confirm You can set USB mode to connect the camera with a printer or computer 1 ...

Страница 33: ...ched 0999 the camera will create a new folder For example if the current folder is 100DICAM the new folder will be named 101DICAM If the total folder number reached 999 and the total file number exceeds 9999 the camera will display the warning message FILE NUMBER OVER In this case please set the File Number Reset to ON mode and then format the memory or insert a new memory card p 32 About File and...

Страница 34: ...will start from the previous number For example 0065 0066 File numbers will reset to 0001 For example 0065 0001 To numbering the files from 0001 when a new SD card is inserted 1 Insert a new SD card 2 Turn the camera on and press the button 3 Press the or arrow to select the REC Menu 4 Press the or arrow to select File NO Reset then press the SET button or arrow to enter its submenu 5 Press the or...

Страница 35: ...row to select Single All Reset then press the SET button or to enter its submenu Then follow one of the below methods To set different printing order for single images 1 Press the or to set the number of copies up to 999 then press to confirm the setting 2 Press the or to set date on off then press to confirm the setting 3 Press the SET button to confirm 4 Press the or arrow to select the other im...

Страница 36: ...era s LCD automatically when the camera is properly connected to a printer that supports PictBridge 1 Press the or arrow to highlight Image then press SET to enter its submenu 2 Press the or arrow to select Single or All then press the button 3 Press the or to set the number of copies up to 30 then press SET to confirm the setting 4 Press the or arrow to select Print then press the button 5 Press ...

Страница 37: ...he images will be printed SettingPrintSize 1 In PictBridge menu press the or arrow to select Custom 2 Press to enter the setting menu 3 Press the or arrow to select Size then press the button 4 Press the or to set the size of print then press SET to confirm the setting ...

Страница 38: ...ridgeCustomMenu Item Menu Screen Settings Content Size Auto Postcard 4 6 8 10 A6 A4 B5 Type Auto Plain Photo Fast Layout Auto 1 2 4 6 8 Index Full Quality Auto Draft Normal Fine Date Auto On Off File Auto On Off ...

Страница 39: ...al Media Center 360MB free hard disk space 128MB of RAM Minimum 800 x 600 display with 16 bit color 1024 x 768 with 24 bit color or better is recommended USB Port 4x CD ROM Drive Macintosh Mac OS 9 0 9 1 9 2 and X 10 1 or later Power PC based 32MB of RAM 640 x 480 display with Thousands of colors Millions of colors recommended Built In USB Port The installer will automatically detect which softwar...

Страница 40: ...will appear fig 1 1 The information about your computer is listed under the system area 3 Confirm that your computer is running one of the following operating systems and proceed to the page in the chart for installation instructions System Proceed to page Windows 98 Windows 98 Second Edition Page 38 Windows 2000 Page 40 Windows Millennium Edition Windows XP Home Edition Windows XP Professional Ed...

Страница 41: ...puter Step 2 Make sure the computer is powered on and Windows 98 or 98SE is running Step 3 Close any other applications or software you may be running Step 4 Insert the supplied CD ROM into your computer s CD ROM Drive NOTE If the installer does not start automatically within 30 seconds after the CD ROM has been inserted click on My Computer either on the Desktop or in the Start Menu and locate th...

Страница 42: ...y OR You may change the default folder by clicking Browse and selecting a different folder in your computer Click Next fig 1 4 Step 9 Click Install fig 1 5 Step 10 Install progress bar Step 11 The next screen will begin the DirectX setup Select I accept the agreement then click Next fig 1 6 Step 12 Click Next fig 1 7 Step 13 Click Finish Your computer will automatically restart fig 1 8 Fig 1 3 Fig...

Страница 43: ...OM Drive NOTE If the installer does not start automatically within 30 seconds after the CD ROM has been inserted click on My Computer either on the Desktop or in the Start Menu and locate the CD ROM Drive Double click on the CD ROM Drive icon for installation and proceed to Step 5 Step 5 Select the language Click OK fig 2 1 Step 6 The installation screen will appear click on Install Microsoft Dire...

Страница 44: ...r software you may be running Step 4 Insert the supplied CD ROM into your computer s CD ROM Drive NOTE If the installer does not start automatically within 30 seconds after the CD ROM has been inserted click on My Computer either on the Desktop or in the Start Menu and locate the CD ROM Drive Double click on the CD ROM Drive icon for installation and proceed to Step 5 Step 5 Select the language Cl...

Страница 45: ... Step 7 Click Next fig 3 3 Step 8 Click Yes fig 3 4 Step 9 Click Next fig 3 5 Step 10 Make sure the two applications are checked and then click Next fig 3 6 Fig 3 1 Fig 3 2 Fig 3 3 Fig 3 4 Fig 3 5 Fig 3 6 ...

Страница 46: ... Step 2 Make sure the computer is powered on and Windows is running Step 3 Close any other applications or software you may be running Step 4 Insert the supplied CD ROM into your computer s CD ROM Drive NOTE If the installer does not start automatically within 30 seconds after the CD ROM has been inserted click on My Computer either on the Desktop or in INSTALLING ADOBE ACROBAT READER 5 ALL WINDOW...

Страница 47: ...lation screen will appear Click on Install Adobe Acrobat Reader 5 Fig 4 2 Step 7 Status bar Step 8 Click Next Fig 4 3 Step 9 The files will be saved into C Program Files Adobe Acrobat 5 automatically OR You may change the default folder by clicking Browse and selecting a different folder in your computer Click Next Fig 4 4 Step 10 Installation progress Fig 4 1 Fig 4 2 Fig 4 3 Fig 4 4 ...

Страница 48: ... 45 Step 11 Select Yes to restart the computer or No to restart the computer later Click Finish Win 98 FE Win 98SE 2000 ME XP ...

Страница 49: ... the camera driver supplied in the supplied CD ROM before connecting the camera to the computer DownloadingtheFilesbyUsinganSDCardReader 1 Take the SD card out from the camera p 9 and insert it into an SD card reader 2 Connect the SD card reader to the computer 3 Double click the driver icon representing the SD card 4 Copy the images from the card into a folder on the hard disk of your computer Do...

Страница 50: ...cessfully completed 1 The camera will turn off automatically if the USB cable is disconnected 2 Use an optional AC power adapter when connected to a computer to save battery power 3 Windows 98 user If this is the first time the camera has been connected to the computer Windows detects the camera as an Unknown device and automatically completes the required software installation 1 You do not need t...

Страница 51: ... is not installed in the camera all photos recorded by the camera will be stored in the internal memory If an SD card is installed photos and video clips are stored on the SD card OptionalSDMemoryCard Photos video clips and other information recorded by the camera are stored on the SD card using the Design Rule for Camera File System DCF protocol The DCF protocol is designed to accommodate file an...

Страница 52: ...rce and choose Concord 4340z 5 Click on the Camera Scanner Icon A second window will appear showing the contents pictures in the memory and options on how to handle them fig 1 3 6 Select the desired picture to view edit or save by clicking on it The selected image will be highlighted by a border To choose all pictures click on Select All 7 Click on Get Photos The pictures will then be added to you...

Страница 53: ...ple Resize the photo by using the Crop Resize tools Modify the photo by using the Retouch tools For example to remove red eyes Add some text onto the photo by using the Text tools 11 Click on Save to save the photo Two options are available Save and Save As 12 Click on Print to print the photo The options available include Standard Printing Greeting Card Multiple Printing or Thumbnail Printing ...

Страница 54: ...camera was moving when the image was captured Hold the camera steady when shooting picture Image is blurry or out of focus The subject was beyond the range within which the camera can focus Turn the Macro mode on if the subject is within 10 cm zoomed out or 50 cm zoom in don t use Macro mode when shooting distant subjects Image is not displayed on the LCD monitor An SD Card with non DCIF images re...

Страница 55: ...Mechanical shutter 1 2000 8 sec with CCD variable electronic shutter Optical Zoom Effective 3x continuous Digital Zoom Shooting mode 4 continuous Playback mode 8 scrollable Image File Format Still EXIF 2 2 compatible format JPEG compression DCF compatible Support DPOF PIM II Pictbridge White Balance Auto Day light Cloudy tungsten fluorescent Black white Start up Time Less than 3 sec Picture Storag...

Страница 56: ...f this User s Guide or the FAQ section on our website you can also E mail us by clicking the E mail address link to the customer support center in the Camera Support Section Customer Support Before You E mail or Call us If you have questions concerning the operation of the camera or software installation that are not listed either in the troubleshooting section of this User s Guide or the FAQ sect...

Страница 57: ...ft Inc 46601 Fremont Blvd Fremont CA 94538 Tel 510 440 9901 Fax 510 440 1270 E mail support arcsoft com China ArcSoft Beijing Co Ltd No 6 South Capital Gym Road Beijing New Century Hotel Office Building 1060 Beijing 100044 China Tel 8610 6849 1368 Fax 8610 6849 1367 E Mail tech arcsoft com cn Japan ArcSoft Japan 9F 1 21 9 Higashi Gotanda Shinagawa ku Tokyo 141 0022 Japan Tel 81 3 5795 1392 Fax 81 ...

Отзывы: