background image

ENGLISH 

40 

 
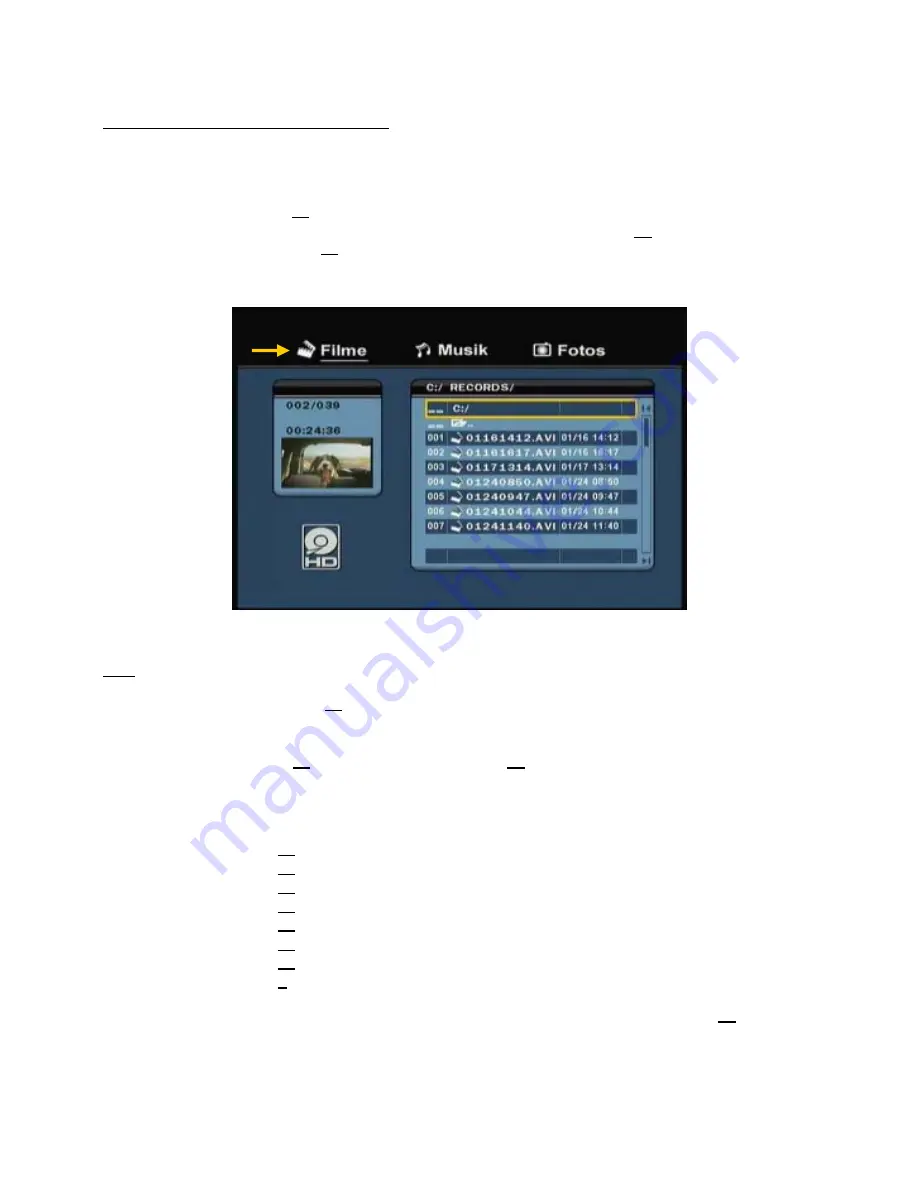
Playback of your recordings & other movies 

 
You can play the recorded programs and other movies, stored on the HDD of the unit, on your TV through 

the ‘

Movies

’ option of the unit. 


Press the ‘

Menu

’ button (

40

) on the remote control to return to the Main Menu. 


Select the ‘

Movies

’ 

[1]

 icon in the Main Menu with the ‘

Navigation

’ buttons (

15

) on the remote control, 

and press the ‘

Enter

’ button (

26

) on the remote control to open the ‘

Movies

’ Mode. 


The file browser of the unit will be shown on your screen, with the ‘

Records

’ folder on the HDD selected 

by default.  


The unit will only show the movie files which are available on your unit. Other files will not be shown. 


Tip :

   When you are in 

‘Movies’ [1]

‘Music’ [2] 

or 

‘Photos’ [3]

 mode, you can easily switch between 

these options through the upper bar in the media browser. 


Use the navigation keys (

15

) to go to the upper bar and change the mode. 


Select the file you would like to play with the navigation buttons on the remote control. 


Press the ‘

Enter

’ button (

26

) or the ‘

Play/Pause

’ button (

17

) on the remote control to start the 

playback of the selected file. 

 
During playback, you can use the following playback options on the remote control: 


-


Play/Pause


(

17

Play the selected file or pause the playback. 

-


Stop


(

24

Stop the playback. 

-


Rewind


(

18

Rewind the playback. 

-


Fast Forward


(

23

Fast Forward the playback. 

-


Previous


(

19

Play the previous file in the current folder. 

-


Next 


(

22

Play the next file in the current folder. 

-


Repeat  

(

11

Change the Repeat option of the current file/folder. 

-


Info 


(

2

Display the playback details. 


You can return from the file browser menu to the Main Menu by pressing the ‘

Menu

’ button (

40

) on the 

remote control. 


Содержание CM3PVRL

Страница 1: ...weicht die Softwareinstallation auf Ihrem Computer von der im Folgenden beschriebenen etwas ab Dies h ngt vom Windows Betriebssystem ab das Sie verwenden Tipp Die Firmware des Conceptronic CM3PVRL ka...

Страница 2: ...nd setzen Sie es keinen Fl ssigkeiten aus Trennen Sie das Netzteil von der Stromversorgung wenn Sie das Ger t f r l ngere Zeit nicht benutzen Verwenden Sie das Ger t m glichst nicht in der N he von Br...

Страница 3: ...teckplatz 13 S Video Ausgang 5 USB Host Port 14 Component Pr Ausgang 6 Power 3sec Stopp Taste 15 Digitaler Koaxialausgang 7 Navigationstasten 16 A V Ausgang Composite Video Audio 8 A V Eingang Composi...

Страница 4: ...Aufzeichnung Erh hen der Aufzeichnungszeit 30 Minuten 17 PLAY PAUSE Starten Anhalten der Wiedergabe Aufzeichnung anhalten Aktivieren von Time Shifting 18 REWIND R cklauf der Wiedergabe 19 PREVIOUS Vor...

Страница 5: ...s Koaxial SPDIF Kabel f r das Audiosignal Composite Stecken Sie das Composite Kabel gelb rot und wei in die entsprechenden AV Ausgangsbuchsen des Ger ts Stecken Sie die andere Seite des Composite Kabe...

Страница 6: ...mponent Kabels in die Component Buchsen an Ihrem Fernseher ein Anschluss des der Audiokabel s Sie haben 2 M glichkeiten f r den Anschluss des Ger ts an Ihren Fernseher Ihr Heimkinosystem Analog ber di...

Страница 7: ...ere Seite des Composite Kabels gelb rot und wei in die AV Eingangsbuchsen des Ger ts ein Anschluss des Stromversorgungskabels Sobald das Ger t an Ihr Audio Videoger t angeschlossen ist k nnen Sie das...

Страница 8: ...Fernbedienung ein Setzen Sie die Batterieabdeckung auf der R ckseite der Fernbedienung wieder ein Hinweise Die Fernbedienung funktioniert am besten bei einem Abstand bis ca 5 Meter Richten Sie die Fer...

Страница 9: ...W hrend der Initialisierung erscheint die Meldung Please Wait Bitte warten auf dem Bildschirm Hinweis Das voreingestellte Ausgabesignal ist Composite Wenn Sie eine andere Ausgabe f r das Ger t verwen...

Страница 10: ...on System im Einstellungsmen Stellen Sie das TV System auf das von Ihrem Fernseher verwendete System ein Sie haben die Wahl zwischen PAL und NTSC W hlen Sie die gew nschte Systemsprache Sie k nnen w h...

Страница 11: ...ald die Time Shifting Funktion initialisiert ist wird das Live A V angehalten und das Ger t zeichnet den Kanal im Hintergrund auf Wenn die Time Shifting Funktion aktiviert ist erscheint auf dem Bildsc...

Страница 12: ...auf der Fernbedienung starten Das Ger t zeichnet auf bis die Taste Stop 24 auf der Fernbedienung gedr ckt wird oder bis die H chstaufzeichnungszeit von 6 Stunden erreicht wird Wenn Sie w hrend einer A...

Страница 13: ...oder Weekly W chentlich Wenn Sie die Option Once Einmal gew hlt haben dr cken Sie die rechte Navigationstaste 15 um den Monat und den Tag f r die Aufzeichnung zu w hlen Wenn Sie die Option Weekly W c...

Страница 14: ...eine Stunde Damit ist die Aufzeichnung programmiert und das Ger t f ngt zur programmierten Zeit an den programmierten Kanal aufzuzeichnen Wenn auf dem Ger t Aufzeichnungen programmiert sind k nnen Sie...

Страница 15: ...zeigt Tipp Wenn Sie sich im Filme 1 Musik 2 oder Fotos 3 Modus befinden k nnen Sie ber die obere Leiste im Media Browser auf einfache Weise zwischen diesen Optionen umschalten Gehen Sie mithilfe der N...

Страница 16: ...re Leiste im Media Browser auf einfache Weise zwischen diesen Optionen umschalten Gehen Sie mithilfe der Navigationstasten 15 zur oberen Leiste um den Modus zu ndern W hlen Sie mithilfe der Navigation...

Страница 17: ...te 37 auf der Fernbedienung gedr ckt werden Tipp Die Untertiteldateien sind auch im Browsermen aufgef hrt wenn Filme im Hauptmen gew hlt wird Sie k nnen also auch Untertiteldateien an andere Speichero...

Страница 18: ...s Verwenden Sie nicht die Enter Taste 26 zum Starten der Wiedergabe Durch Dr cken dieser Taste werden lediglich die Ordner Unterordner angezeigt und die Wiedergabe wird nicht gestartet W hrend der Wie...

Страница 19: ...dia Browser auf einfache Weise zwischen diesen Optionen umschalten Gehen Sie mithilfe der Navigationstasten 15 zur oberen Leiste um den Modus zu ndern W hlen Sie mithilfe der Navigationstasten auf der...

Страница 20: ...im Media Browser auf einfache Weise zwischen diesen Optionen umschalten Gehen Sie mithilfe der Navigationstasten 15 zur oberen Leiste um den Modus zu ndern W hlen Sie mithilfe der Navigationstasten au...

Страница 21: ...Das Ger t wird automatisch erkannt und installiert und als zus tzliches Laufwerk Ihres Computers angezeigt Standardm ig wird die interne Festplatte des Ger ts als USB Speicherger t initialisiert Umsc...

Страница 22: ...as Sie von folgender Website herunterladen k nnen http www free codecs com download FFDShow htm F hren Sie nach der Installation des FFDShow MPEG4 Codec Pakets einen Neustart Ihres Computers aus Danac...

Страница 23: ...ur Auswahl der Systemsprache f r das Ger t Standardeinstellung Englisch Zeitformat Zum Einstellen des gew nschten Zeitformats Standardeinstellung T_M_J_24 Datum einst Zum Einstellen des aktuellen Datu...

Страница 24: ...ie Dateien bei Navigieren durch Ihre Mediendateien sortiert werden Diashow Zeit ndern der Zeit w hrend der ein Foto auf Ihrem Bildschirm angezeigt wird wenn Sie die Diashow Funktion verwenden Adv A V...

Страница 25: ...tronic Web Site www conceptronic net Tip The Conceptronic CM3PVRL is firmware upgradable To upgrade your unit with the latest firmware version you can visit the Conceptronic Web Site Tip Please check...

Страница 26: ...o not immerse or expose the unit to liquids Disconnect the power adapter if you do not intend to use the unit for an extended period of time Avoid using the unit in a location near combustibles Change...

Страница 27: ...2 5A 4 MMC MS SD Card Slot 13 S Video Output 5 USB Host Port 14 Component Pr Output 6 Power 3sec Stop Button 15 Digital Coaxial Output 7 Navigation Buttons 16 A V Output Composite Video Audio 8 A V I...

Страница 28: ...gh the Menu s 16 REC Start Recording Increase Record Time 30 Minutes 17 PLAY PAUSE Start Playback Pause Playback Pause Recording Initiate Timeshift 18 REWIND Rewind Playback 19 PREVIOUS Previous File...

Страница 29: ...cable Red White or the Coaxial SPDIF cable Composite Connect the Composite cable Yellow Red and White to the corresponding AV Output jacks on the unit Connect the other side of the Composite cable Yel...

Страница 30: ...the Component cable to the Component Jacks on your TV Connecting the Audio Cable s You can connect the unit to your TV and or your home cinema system in 2 different ways Analog through the RCA Audio...

Страница 31: ...Audio Video device Connect the other side of the Composite cable Yellow Red and White to the AV Input jacks of the unit Connecting the Power Cable When the unit is connected to your Audio Video equip...

Страница 32: ...remote control Replace the battery cap on the back of the remote control Notes The best operational range of the remote control is about 5 meters Point the remote control to the IR receiver which is e...

Страница 33: ...le while During initializing the message Please Wait is shown on your screen Note The default output signal is Composite If you are using another output for the unit it is possible that your screen do...

Страница 34: ...em in the Setup Menu Set the TV System to the TV System used by your TV You can choose between PAL and NTSC Set the Sys Language to the language of your choice You can choose between ENGLISH DUTCH SPA...

Страница 35: ...te control to initialize the Timeshift feature When the Timeshift feature is initialized the Live A V will be paused and the unit will record the channel on the background During Timeshift the screen...

Страница 36: ...current channel by pressing the Rec button 16 on the remote control The unit starts recording until you press the Stop button 24 on the remote control or until the maximum record time of 6 hours is re...

Страница 37: ...ogramming the selected schedule Select the Source of your scheduled recording Press the Enter button 26 on the remote control to continue Select the record mode Once Daily or Weekly If you have select...

Страница 38: ...r LP 656 hours and 45 minutes app 760MB for 1 hour The recording is now programmed as a scheduled recording and the unit will start recording on the programmed time and channel When the unit is progra...

Страница 39: ...When you are in Movies 1 Music 2 or Photos 3 mode you can easily switch between these options through the upper bar in the media browser Use the navigation keys 15 to go to the upper bar and change th...

Страница 40: ...sily switch between these options through the upper bar in the media browser Use the navigation keys 15 to go to the upper bar and change the mode Select the file you would like to play with the navig...

Страница 41: ...tton 37 on the remote control Tip The subtitle files are also listed in the browser menu when Movies is selected from the main menu so you can also copy subtitles to other locations DVD Playback funct...

Страница 42: ...tart the playback of the selected DVD Note Do not use the Enter button 26 to start is will only show the files subfolders and does not start DVD Playback During DVD playback you can use the following...

Страница 43: ...ily switch between these options through the upper bar in the media browser Use the navigation keys 15 to go to the upper bar and change the mode Select the file you would like to play with the naviga...

Страница 44: ...easily switch between these options through the upper bar in the media browser Use the navigation keys 15 to go to the upper bar and change the mode Select the file you would like to play with the nav...

Страница 45: ...ide of the unit and to a free USB port on your computer Turn the unit on with the main power switch on the backside of the unit The unit will be recognized and installed automatically and will be show...

Страница 46: ...y the recorded programs you need to install a XviD codec on your computer The XviD codec is added to the FFDShow MPEG4 Codec Pack which you can download on the following website http www free codecs c...

Страница 47: ...factory default settings Only the configuration will be restored The data on your Harddisk will not be erased A V Set Video Output Select the Video Output signal which corresponds with the used output...

Страница 48: ...osite Video CVBS Audio Input Analog Stereo signal Video Output Composite Video CVBS S video Component Video YPbPr Audio Output Analog Stereo signal Digital Coaxial SPDIF USB Port USB Device USB Host S...

Страница 49: ...G1 2 Layer3 MP3 Subtitle files SRT SUB SSA SMI Audio Playback Format MP3 MP3 Bit rate 24 320Kbps CBR VBR Stereo MPEG1 2 Layer I II Bit rate 24 320Kbps CBR VBR Stereo WMA WMA Bit rate 16 384Kbps CBR st...

Отзывы: