background image

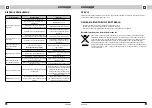
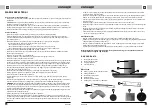
IMPORTANT SAFETY INFORMATION

Upon delivery of fume hood

•  Immediately after delivery, check the package for any damage during shipping.

•  Caution! Caution! Some edges of this appliance that are hidden after installation are sharp! Be careful not 

to get cut when handling an uninstalled unit.

•  Do not install the appliance if it has been damaged. Contact the store where you purchased it immediately.

•  Remove all the packaging and marketing materials before first use.

•  Keep the packaging materials away from children or dispose of them properly.

During installation

•  Do not use the appliance in any way other than as described in this manual.

•  Only use it as a household appliance and for removal of fumes arising from cooking of food or for recircula-

tion and absorption of smells arising from cooking of food.

•  This appliance can be used in households and similar places like: 

 - Kitchen cabinets in shops, offices and other workplaces.

 - Appliances used in agriculture.

 - Appliances used by guests in hotels and other areas in a hotel environment.

 - Appliances used in a Bed and Breakfast environment.

•  Do not touch the appliance with wet hands.

•  Do not allow children or unauthorized people to handle the appliance, use it out of their reach. 

•  Children should not play with the appliance.

•  Pay extra attention if the appliance is used near children.

•  Do not allow the appliance to be used as a toy.

•  This appliance can be used by children aged 8 years and over. Persons with reduced physical, sensory or 

mental capabilities, or lack of experience and knowledge, should be supervised or familiarized with the 

instructions for use of the appliance in a safe way and have been made aware of the risks involved.

•  If a malfunction occurs, turn off the appliance and unplug it from the wall outlet.

•  When disconnecting the unit from the wall outlet, never pull the power cord, grasp the plug end and 

disconnect it by removing it from the receptacle.

•  Do not immerse the power cord or the plug in water or any other liquid.

•  Check the appliance and the power cord for damage regularly.

•  Do not switch on the appliance if it has been damaged.

•  Unless the appliance is in operation, ensure that all its controls are switched off.

•  Do not manipulate with an open flame (e.g. singeing) under the appliance. If you remove a cooking vessel 

from a gas burner, reduce its flame to minimum or turn it off!

•  Caution!

 Risk of fire! Care must be taken to ensure that the diameter of the gas burners on the gas cooker 

or the cooking plate corresponds to that of cooking utensils used. If cooking vessels with a diameter lower 

than recommended are used, the flame could start to burn around the cooking vessel resulting in a risk of 

melting plastic handles.

•  While deep frying or frying of food, observe this food all the time. In the case of oil overheating, there is a 

risk of fire!

•  Ensure that the flames do not get too close to the appliance.

•  Observe intervals for replacement and cleaning of filters (at least every 2-3 months). Failure to observe 

these requirements results in a risk of fire due to fat accumulating in the filters!

•  All the respective current standards and official regulations must be observed relating to the removal of 

the extracted air.

•  A ventilation duct diameter for the removal of the extracted air should be approximately the same or 

larger than that of the hood’s flexible outlet duct.

•  Extracted air should not be led to a chimney intended for discharge of flue gases and combustion products 

or a shaft serving for ventilation of rooms where fireplaces are situated.

•  When the appliance and fireplaces are in operation simultaneously, vacuum in the room should not be 

higher than 4 Pa (0.04 mbar).

•  Do not use any accessories other than those recommended by the manufacturer.

•  Do not use accessories with damaged surface treatment or if it has been worn out or has other defects.

•  Do not use any corrosive cleaning agents for cleaning. Maintenance and cleaning on a regular basis extend 

the lifetime of the appliance.

•  Children should not clean and maintain the appliance unless they are at least 8 years old and under 

supervision.

Possible defects

•  Only qualified service technicians should repair or perform maintenance to this appliance.

•  During the repairs the appliance must be disconnected from the power. Switch off the circuit breaker or 

remove the plug from the wall outlet.

•  When disconnecting the unit from the wall outlet, never pull the power cord, grasp the plug end and 

disconnect it by removing it from the receptacle.

•  If the power cord is damaged, contact the authorised service centre.

If you fail to follow these instructions, any possible repair cannot be recognized as a warranty repair.

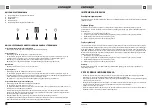
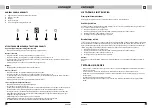
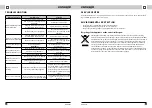
PRODUCT DESCRIPTION

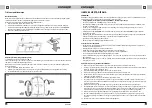
Upper chimney cover

Lower chimney cover

Appliance body

Control panel

Accessories

Bracket for upper and lower 

chimney cover

Bracket for appliance

Flexible outlet duct 

Back-flow flap

Metal fat filter

Carbon filter (to be purchased)

A

C

D

2

3

4

1

B

E

F

EN

EN

53

52

OPK 4690

OPK 4690

Содержание OPK 4690

Страница 1: ...ODSAVAČ PAR KOMÍNOVÝ ODSÁVAČ PÁR KOMÍNOVÝ OKAP KUCHENNY KOMINOWY TVAIKA NOSŪCĒJS BRĪVSTĀVOŠAIS CHIMNEY FUME HOOD OPK 4690 CZ SK PL LV EN ...

Страница 2: ...ržba Instalace spotřebiče Řešení potíží Ochrana životního prostředí TECHNICKÉ PARAMETRY Technické parametry Napětí 220 240 V 50 60 Hz Celkový příkon 253 W Příkon motoru 250 W Provedení Komínový Montáž Na stěnu Výška 450 mm Šířka 900 mm Hloubka 505 mm Průměr výstupního pružného potrubí 150 mm Počet stupňů výkonu odsávaného vzduchu 4 Kapacita odsávaného vzduchu 800 m3 h Počet tukových filtrů 3 Potře...

Страница 3: ...ebič používán jako hračka Tento spotřebič může být používán dětmi ve věku od 8 let výše a osobami se sníženými fyzickými smyslo vými nebo duševními schopnostmi nebo bez patřičných zkušeností a znalostí pokud jsou pod dohledem nebo byly seznámeny s pokyny k použití spotřebiče bezpečným způsobem a rozumí jeho rizikům V případě poruchy vypněte spotřebič a vytáhněte zástrčku ze zásuvky elektrického na...

Страница 4: ...í a výměna filtrů Kovové tukové filtry Při běžném používání spotřebiče by kovové tukové filtry měly být zkontrolovány příp čištěny každý měsíc V případě častějšího smažení nebo fritování tento interval zkraťte Nepoužívejte spotřebič bez řádně nasazených kovových tukových filtrů POPIS OVLÁDACÍHO PANELU 1 Tlačítko zapnutí vypnutí osvětlení 2 Tlačítko minus 3 Displej 4 Tlačítko plus 5 Tlačítko zapnut...

Страница 5: ...é a 750 mm pro plynové varné desky Obr 3 3 Svislou čarou vyznačte střed varné desky sporáku 4 Vyvrtejte otvory a připevněte držák pro odsavač dle Obr 4 5 Ujistěte se že je držák ve vodorovné poloze aby se po zavěšení odsavače zabránilo shromažďování maziva tuku na jedné straně Obr 5 6 Zavěste odsavač na připevněný držák dle Obr 6 7 Po zavěšení odsavače nasaďte na výstupní otvor výstupní pružné pot...

Страница 6: ...ě opačným způsobem jakým se provádí instalace spotřebiče demontujete jednotlivé části odsavače Obr 11 Připevnění horního dílu komínu k držáku Obr 10 Připevnění šrouby držáku pro horní díl komínu Obr 9 Obr 8 Připevnění šrouby držáku pro spodní díl komínu Obr 7 Obr 6 Obr 5 SPRÁVNĚ SPRÁVNĚ ŠPATNĚ Obr 4 Připevnění šrouby držáku pro odsavač 110 500 Obr 3 CZ CZ 11 10 OPK 4690 OPK 4690 ...

Страница 7: ...ežité části jsou poškozeny Obraťte se na servis Špatně nebo málo zasunutá zástrčka do zásuvky elektrického napětí Zkontrolujte připojení zástrčky Zásuvka není napájena Zkontrolujte napájení zásuvky např připojením jiného spotřebiče Světla nesvítí a motor nepracuje Špatně nebo málo zasunutá zástrčka do zásuvky elektrického napětí Zkontrolujte připojení zástrčky Zásuvka není napájena Zkontrolujte na...

Страница 8: ...Inštalácia prístroja Riešenie problémov Ochrana životného prostredia TECHNICKÉ PARAMETRE Technické parametre Napätie 220 240 V 50 60 Hz Celkový príkon 253 W Príkon motora 250 W Prevedenie Komínový Montáž Na stenu Výška 450 mm Šírka 900 mm Hĺbka 505 mm Priemer výstupného pružného potrubia 150 mm Počet stupňov výkonu odsávaného vzduchu 4 Kapacita odsávaného vzduchu 800 m3 h Počet tukových filtrov 3 ...

Страница 9: ...deťom a nesvojprávnym osobám používať prístroj používajte ho mimo ich dosahu Deti sa nesmú s prístrojom hrať Dbajte na zvýšenú opatrnosť ak sa prístroj používa v blízkosti detí Nedovoľte aby sa prístroj používal ako hračka Tento prístroj môžu používať deti od 8 roku veku a osoby so zníženými fyzickými zmyslovými alebo duševnými schopnosťami alebo bez príslušných skúseností a znalostí ak sú pod doh...

Страница 10: ...é filtre Pri bežnom používaní prístroja treba kovové tukové filtre skontrolovať príp vyčistiť každý mesiac V prípade častejšieho smaženia alebo fritovania tento interval skráťte Nepoužívajte prístroj bez dobre nasadených kovových tukových filtrov 1 Vyberte kovové filtre podľa obr 1 POPIS OVLÁDACIEHO PANELU 1 Tlačidlo zapnutia vypnutia osvetlenia 2 Tlačidlo mínus 3 Displej 4 Tlačidlo plus 5 Tlačidl...

Страница 11: ...ké a 750 mm pre plynové varné dosky obr 3 3 Zvislou čiarou vyznačte stred varnej dosky sporáka 4 Vyvŕtajte otvory a na odsávač pripevnite držiak podľa obr 4 5 Ubezpečte sa že držiak je vo vodorovnej polohe aby sa po zavesení odsávača zabránilo zhromažďovaniu tuku na jednej strane obr 5 6 Odsávač zaveste na pripevnený držiak podľa obr 6 7 Po zavesení odsávača nasaďte na výstupný otvor výstupné pruž...

Страница 12: ...pôsobom akým sa robí inštalácia prístroja demontujte jednotlivé časti odsávača Obr 11 Pripevnenie horného dielu komína k držiaku Obr 9 Obr 8 Pripevnenie skrutky držiaka pre spodný diel komína Obr 7 Obr 6 Obr 5 SPRÁVNE SPRÁVNE NESPRÁVNE Obr 4 Pripevnenie skrutky držiaka pre odsávač 110 500 Obr 3 Obr 10 Pripevnenie skrutky držiaka pre horný diel komína SK SK 23 22 OPK 4690 OPK 4690 ...
Страница 13: ...v zásuvke elektrického napätia Skontrolujte pripojenie zástrčky V zásuvke nie je elektrické napätie Skontrolujte elektrické napätie v zásuvke napr pripojením iného spotrebiča Svetlá nesvietia a motor nepracuje Nesprávne alebo málo zasunutá zástrčka v zásuvke elektrického napätia Skontrolujte pripojenie zástrčky V zásuvke nie je elektrické napätie Skontrolujte elektrické napätie v zásuvke napr prip...

Страница 14: ...acja Instalacja urządzenia Rozwiązywanie problemów Ochrona środowiska PARAMETRY TECHNICZNE Parametry techniczne Napięcie 220 240 V 50 60 Hz Całkowity pobór mocy 253 W Pobór mocy silnika 250 W Wykonanie Kominowe Montaż Na ścianie Wysokość 450 mm Szerokość 900 mm Głębokość 505 mm Średnica elastycznej rury wylotowej 150 mm Ilość stopni mocy odsysania powietrza 4 Ilość odsysanego powietrza 800 m3 h Il...

Страница 15: ...nia par powstających podczas go towania artykułów żywnościowych lub do recyrkulacji i pochłaniania zapachów powstających podczas gotowania żywności Niniejsze urządzenie jest przeznaczone do użytku domowego i w miejscach takich jak Aneksy kuchenne w sklepach biurach i innych miejscach pracy Jako urządzenia używane w rolnictwie Jako urządzenia używane przez gości w hotelach motelach i innych miejsca...

Страница 16: ...rysowania powierzchni Urządzenia nie wolno czyścić parą Nie wolno nigdy zostawiać substancji agresywnych ani kwaśnych sok z cytryny ocet na powierzchniach urządzenia które są lakierowane lub ze stali nierdzewnej OPIS PANELU STEROWANIA 1 Przycisk włączania wyłączania oświetlenia 2 Przycisk minus 3 Wyświetlacz 4 Przycisk plus 5 Przycisk włączania wyłączania urządzenia OPIS POSZCZEGÓLNYCH PRZYCISKÓW ...

Страница 17: ...Rys 4 5 Upewnij się że uchwyt jest w pozycji poziomej aby po zawieszeniu okapu uniknąć gromadzenia się smaru tłuszczu po jednej stronie Rys 5 6 Zawieś okap kuchenny na przymocowanym uchwycie jak pokazano na Rys 6 7 Po zawieszeniu okapu kuchennego podłącz do otworu wylotowego elastyczną rurę wylotową Rys 7 W razie potrzeby użyj zwężki o średnicy 150 120 mm Drugą część elastycznej rury włóż do przyg...

Страница 18: ...sposób odwrotny niż w jaki wykonano montaż urządzenia zdemontuj poszczególne części okapu kuchennego Rys 11 Mocowanie górnej części komina do uchwytu Rys 9 Rys 8 Mocowanie uchwytu dolnej części komina śrubami Rys 7 Rys 6 Rys 5 PRAWIDŁOWO PRAWIDŁOWO NIEPRAWIDŁOWO Rys 4 Mocowanie uchwytu okapu kuchennego śrubami 110 500 Rys 3 Rys 10 Mocowanie uchwytu górnej części komina śrubami PL PL 35 34 OPK 4690...

Страница 19: ... ważne elementy są uszkodzone Skontaktuj się z serwisem Nieprawidłowo lub za mało wsunięta wtyczka do gniazdka napięcia elektrycznego Sprawdź podłączenie wtyczki Gniazdko nie jest zasilane Sprawdź zasilanie gniazdka np podłączając inne urządzenie Światła nie świecą i silnik nie pracuje Nieprawidłowo lub za mało wsunięta wtyczka do gniazdka napięcia elektrycznego Sprawdź podłączenie wtyczki Gniazdk...

Страница 20: ...kcija Trīšana un apkope Ierīces uzstādīšana Traucējumu novēršana Vides aizsardzība TEHNISKIE DATI Tehniskie dati Spriegums 220 240 V 50 60 Hz Kopējā elektriskā slodze 253 W Motora jauda 250 W Variants Brīvstāvošais Montāža Pie sienas Augstums 450 mm Platums 900 mm Dziļums 505 mm Gaisa novadīšanas kanāla diametrs 150 mm Ventilatora jaudas pakāpju skaits 4 Maksimālā gaisa plūsma 800 m3 h Tauku filtr...

Страница 21: ...u no gāzes plīts degļa maksimāli samaziniet tā liesmu vai izslēdziet to UZMANĪBU Ugunsgrēka risks Pārliecinieties ka gāzes plīts degļa vai virsas diametrs atbilst ēdiena gata vošanas traukam Ja izmantojat ēdiena gatavošanas trauku ar mazāku diametru nekā ieteicamais liesmas var parādīties arī trauka malās un izraisīt plastmasas rokturu izkušanas risku Fritēšanas vai cepšanas laikā nepārtraukti uzr...

Страница 22: ...nas izslēgšanas taustiņu Lai pilnībā izslēgtu ierīci divreiz nospiediet ieslēgšanas izslēgšanas taustiņu LIETOŠANAS INSTRUKCIJA Pirms pirmās izmantošanas Pirms jaunas ierīces izmantošanas higiēnas nolūkos notīriet to ar mitru drāniņu Ventilācijas režīms Izvadīto gaisu līdz ventilācijas šahtai ventilē elastīgas caurules Ja ierīcē ir uzstādīts aktīvās ogles filtrs noņe miet to skat nodaļu Tīrīšana u...

Страница 23: ...tādīta kurtuve Ventilācijas cauruļu līkumam jābūt 120 C Ēdiena gatavošanas laikā pienācīgi jāvēdina telpas Savienojums ar elektrotīklu Pārliecinieties ka elektrotīkla spriegums un strāvas aizsardzība atbilst tam spriegumam kas ir minēts uz tehnisko pamatdatu plāksnītes Izmantojiet tikai iezemētas sienas kontaktrozetes Neizmantojiet rozešu sadalītājus kā arī savienotājus vai pagarinātājus Ierīces v...

Страница 24: ...erīci noņemiet atsevišķas tvaika nosūcēja detaļas 11 Att Dūmvada nosega apakšējās daļas piestiprināšana kronšteinam 9 Att 8 Att Kronšteina skrūvju piestiprināšana dūmvada nosega apakšējai daļai 7 Att 6 Att 5 Att PAREIZI PAREIZI NEPAREIZI 4 Att Kronšteina skrūvju piestiprināšana tvaika nosūcējam 110 500 3 Att 10 Att Kronšteina skrūvju piestiprināšana dūmvada nosega augšējai daļai LV LV 47 46 OPK 46...

Страница 25: ...t logus vai durvis pārbaudiet attālumu starp tvaika nosūcēju un plīti Nepieciešamības gadījumā palieliniet attālumu starp tvaika nosūcēju un plīti Tvaika nosūcējs nav novietots vienā līmenī Tvaika nosūcējs nav novietots vienā līmenī vai nav pienācīgi pievilktas kronšteina skrūves Pārbaudiet vai kronšteins ir novietots vienā līmenī nepieciešamības gadījumā pievelciet stiprinājuma skrūves un izlīdzi...

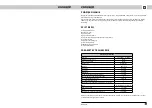
Страница 26: ...lation of the appliance Troubleshooting Environmental protection TECHNICAL SPECIFICATIONS Technical specifications Voltage 220 240 V 50 60 Hz Total power input 253 W Motor power input 250 W Type Chimney type Assembly Wall mounting Height 450 mm Width 900 mm Depth 505 mm Diameter of flexible outlet duct 150 mm Extracted air output stages 4 Capacity of extracted air 800 m3 h Fat filters 3 Required n...

Страница 27: ...o ensure that the diameter of the gas burners on the gas cooker or the cooking plate corresponds to that of cooking utensils used If cooking vessels with a diameter lower than recommended are used the flame could start to burn around the cooking vessel resulting in a risk of melting plastic handles While deep frying or frying of food observe this food all the time In the case of oil overheating th...

Страница 28: ...ene reasons Ventilation mode The extracted air is discharged through the flexible outlet duct to the ventilation shaft out of the room If the appliance is equipped with a carbon filter remove it see chapter Cleaning and maintenance 1 Push button 1 to switch on the appliance 2 Using buttons 2 and 4 select the required value of the extracted air exhaust output 3 The display shows the output value 1 ...

Страница 29: ...ing Connection to the mains Make sure the mains voltage and current protection correspond to the values on the rating plate of the appliance Only use grounded sockets Do not use multiple sockets plugs and extension cords The plug of the power cord on the appliance must be freely accessible even after the installation Changes in a connection may only be performed by a qualified professional Electri...

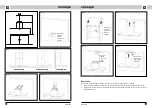
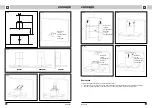
Страница 30: ...rcuit breaker 2 Subsequently disassemble individual parts of the hood in reverse order of the appliance installation Fig 11 Screwing the upper chimney part to the bracket Fig 9 Fig 8 Screwing the lower chimney part bracket Fig 7 Fig 6 Fig 5 CORRECT CORRECT INCORRECT Fig 4 Screwing the hood bracket 110 500 Fig 3 Fig 10 Screwing the upper chimney part bracket EN EN 59 58 OPK 4690 OPK 4690 ...
Страница 31: ...k distance between the hood and the cooking plate If required increase distance between the hood and the cooking plate The hood is not levelled The hood bracket is not levelled or the bracket screws are not tightened firmly Check the bracket for being levelled or tighten holding screws and level the hood SERVICE CENTRE Extensive maintenance or repair which requires access to internal parts of the ...

Страница 32: ...ol sk M SERVIS Mareš Jaroslav Komenského 38 010 01 Žilina 041 5640627 041 5640627 mservis zoznam sk T V A servis s r o Južná trieda 48 D 040 01 Košice 055 6338501 055 6233537 tvaservis nextra sk VILLA MARKET s r o Odborárov 49 052 01 Spišská Nová Ves 053 4421857 053 4426030 villamarket eta stonline sk X TECH s r o Gorkého 2 036 01 Martin 043 4288211 043 4308993 servis x tech sk ZMJ elektroservis H...

Страница 33: ...kia s r o Hurbanova 1563 23 911 01 Trenčín Tel 421 326 583 465 Fax 421 326 583 466 www my concept sk PL Elko Valenta Polska Sp Z o o Ostrowskiego 30 53 238 Wroclaw Tel 48 71 339 04 44 Fax 71 339 04 14 www my concept pl LV Verners VT Ltd Piedrujas iela 5a Riga Latvia Tel 371 67021021 fakss 371 67021000 e pasts info verners lv www verners lv ...

Отзывы: