background image

Printer Maintenance and Troubleshooting

A78408098-005

69

3.


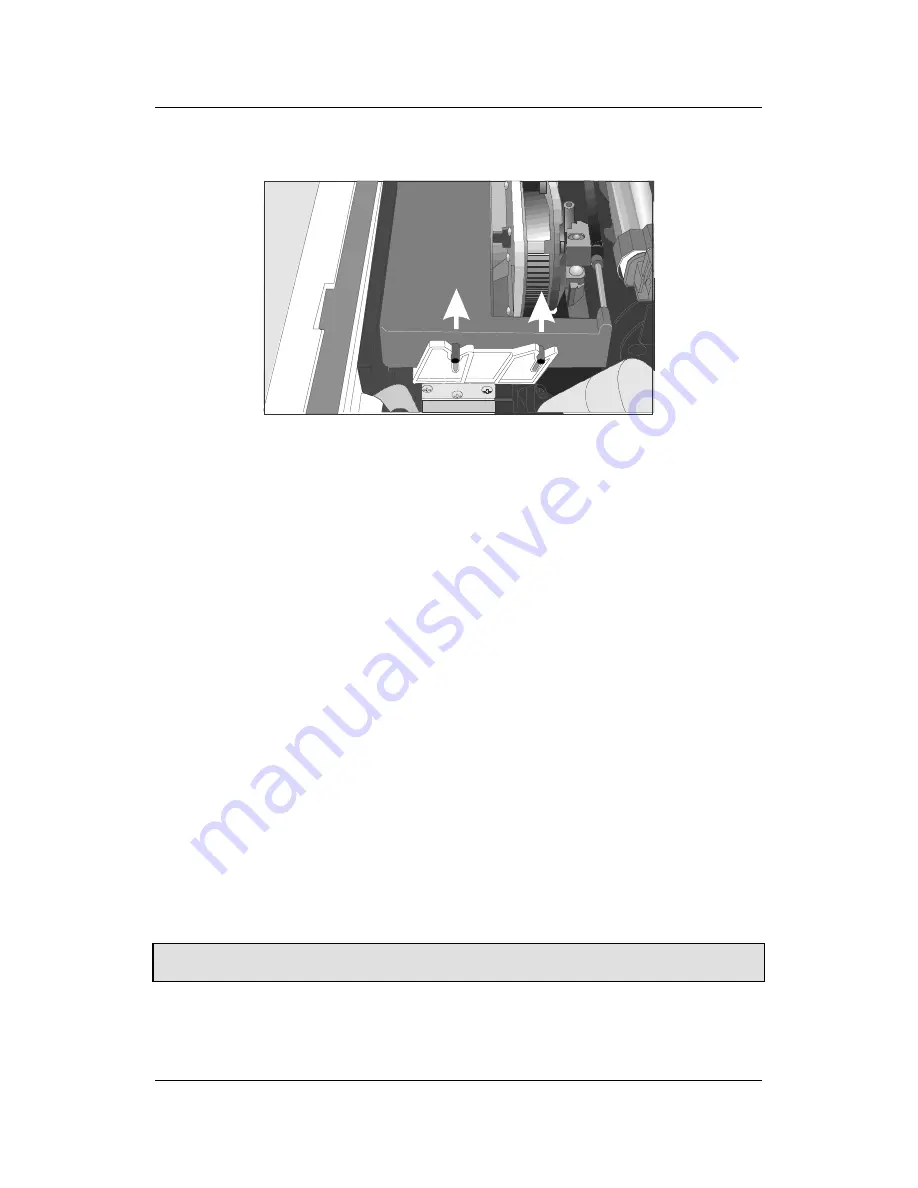
Remove the used ribbon cartridge by lifting it up.

Now, you are ready to insert the new ribbon cartridge. See "Ribbon Cartridge
Installation" before in this manual.

Printing the Self Test

At this point you should check if the printer is working well. The self-test
printout allows you to check the print quality and printer operations

Proceed as follows:

1.


Keep the 

ON LINE

 key pressed while powering on the printer until the

display boxes are filled in and the printer stops all motions.

2.


When you release the key, the printer starts the self-test printout.

3.


To stop the self-test printing, press the 

ON LINE

 key again. The printer is

offline.

Error Handling

When an error condition occurs:


the printer is disabled;


the first message on the display indicates the error, while the second
message gives indicates more details concerning the error conditions.


Press always the ON LINE  key to reset the error condition.

Содержание 9058

Страница 1: ...9 90 05 58 8 9 90 05 58 8D D U Us se er r M Ma an nu ua al l Rev 001...

Страница 2: ......

Страница 3: ...onsumables with original packaging identified by its holographic label In this way a proper use of the printer at quality level unreliability stated in the product characteristics can be assured All t...

Страница 4: ...ipment and the receiver to outlets on different circuits Consult the dealer or an experienced radio TV technician for help Changes or modifications not expressly approved by the party responsible for...

Страница 5: ...ta ai in n t th he e p pr ri in nt te er r c co ov ve er rs s i in n a a s sa af fe e p pl la ac ce e b be ec ca au us se e t th he ey y s sh ho ou ul ld d b be e r re ei in ns st ta al ll le ed d i...

Страница 6: ...Up p Y Yo ou ur r P Pr ri in nt te er r 4 4 Choosing a Suitable Location 4 Printer Assembly 5 Removal of the Shipment Locks 5 Ribbon Cartridge Installation 5 Upper Push Tractor Installation 9058D mode...

Страница 7: ...g the Lower Tractor 58 Loading Paper Using the Upper Tractor 63 Loading Paper Using the Lower Push Tractor and the Rear Pull Tractor option 66 P Pr ri in nt te er r M Ma ai in nt te en na an nc ce e a...

Страница 8: ...Table of Contents A78408098 005 vi...

Страница 9: ...iple copies 1 original and 7 copies Automatic paper path selection Easy operability via operator panel menu and S W commands Optional Automatic Sheet Feeder 120 sheets capability which handles cut she...

Страница 10: ...er manual the following items are included in the box Notify any damage to your supplier Upper Push Tractor 9058D model only Ribbon Cartridge Power Cable CD ROM Printer Parts Front View 9058 model Pus...

Страница 11: ...5 3 9058D model Push Tractors Cover Operator Panel Paper Knob Power Switch Rear View ASF Area Cover Power Cable Connector Rear Tractor Installation Area Covers Paper Knob Top Cover Rear Tractor Area C...

Страница 12: ...must not be exposed to direct sunlight extreme heat cold dust or humidity see Printer Specifications later You need an AC power outlet compatible with the plug of the printer s power cord The voltage...

Страница 13: ...you remove all the shipment locks from the printer Ribbon Cartridge Installation Two types of ribbon cartridges are available for this printer depending on whether the color kit is installed or not 1...

Страница 14: ...e printer on The print carriage prepares for ribbon cartridge installation 4 Before installing the ribbon cartridge turn the ribbon winding knob in the arrow direction located on the cartridge to take...

Страница 15: ...s The cartridge black Long Life or color to be used when the color kit is installed has only one groove 6 Slide and insert the ribbon guide between the print head and the ribbon guide mask holding it...

Страница 16: ...ite plastic holder onto the color kit as shown in the following figure Ribbon Guide Holder for Color Kit Color Kit 7 Turn the ribbon winding knob in the direction of the arrow to take up slack in the...

Страница 17: ...D model only An additional push tractor is provided with the 9058D printer This second push tractor unit can be installed in front position on the lower push tractor 1 Find the upper push tractor amon...

Страница 18: ...t Computer Connection This printer can be connected to your host computer via two available interfaces A bidirectional IEEE1284 parallel interface A RS 232C 422C serial interface Before connecting the...

Страница 19: ...Power Connection M Ma ak ke e s su ur re e t th ha at t t th he e p po ow we er r o ou ut tl le et t m ma at tc ch he es s t th he e p po ow we er r r ra at ti in ng g o of f t th he e p pr ri in nt...

Страница 20: ...Always use a grounded outlet 2 Make sure that the power switch is in 0 position OFF 3 Insert the power cable plug into the printer connector and the other power cable end into a convenient outlet the...

Страница 21: ...following messages will be displayed 9058 or 9058D then PRINT OUT NO 3 Press the key to enter the menu The first menu item is displayed PARALL INTERFACE 4 Press the key until the language first level...

Страница 22: ...essages Message Description LOAD ASF1 LOAD ASF2 LOAD ASF3 These messages are displayed when the corresponding paper path is out of paper LOAD LOWER PUSH LOAD LOW PUSH MF LOAD MANUAL FORM LOAD PSH PLL...

Страница 23: ...h and manual single sheet path are selected 9058 model only PUSH PULL The push pull paper path is selected QUIET PRINT OFF Printing at normal noise level QUIET PRINT ON Printing at reduced noise level...

Страница 24: ...unction keys are enabled when the printer is offline READY indicator unlit The function keys have three functions each Normal Function The normal function of the keys does not require previous action...

Страница 25: ...g this key the input buffer is cleared an a break 250 msec on a serial interface is sent The message RESET BREAK is displayed PROGRAM Key PROGRAM Normal Function Enables the printer setups as follows...

Страница 26: ...isables the alternative key functions LOAD FF Key LOAD FF Normal Function Executes a Form Feed FF when paper is loaded into the printer it advances to the following page if no paper is loaded it is po...

Страница 27: ...printer is turned off PARK Shift Function Parks the paper in the currently selected paper path Program Function Scrolls the menu and macro functions forward Key Combination PROGRAM SHIFT Normal Functi...

Страница 28: ...online without printing or offline READY indicator unlit to select the Program Setup Moving within the Printer Setups The arrow keys are used to move within the different functions inside the Printer...

Страница 29: ...r On Configuration and how to move inside the Setup Main Structure Parall Interface Serial Interface Functions Back to MFG NO Print out NO Print out YES Back to MFG YES Parallel Interface Settings Ser...

Страница 30: ...t starts as soon as you select this value Parallel Interface This menu defines the use of the parallel interface and is structured according to the interface specific parameters Parallel Interface Par...

Страница 31: ...nal I F 1284 BIDIR SELECT IN HOST or SELECTIN ON or DATA BITS 8 SELECT IN ON The SELECT IN signal of the parallel interface is ignored and treated always as ON SELECT IN HOST The printer checks the SE...

Страница 32: ...1 emulation EMUL EPSON LQ The printer uses the EPSON LQ 1050 2550 emulation EPSON Character Sets EMUL EPSON CHAR SET CS1 or CHAR SET CS2 or CHAR SET ITALIC or NATION CP437 These items select the chara...

Страница 33: ...BM National Character Sets CHAR SET CS2 NATION CP437 or NATION or NATION 8859 15 or AUTO CR YES The following national character sets can be selected CP 437 CP437 G CP850 CP851 CP 852 CP 853 CP 855 CP...

Страница 34: ...ON emulation The printer checks the AUTOFEEDXT signal coming from the host and executes an automatic LF after CR if the signal is low This item is displayed only for the parallel interface IBM Compres...

Страница 35: ...ace specific parameters Serial Interface Parameters Serial I F No Baud 9600 Data Bits 8 Parity None Handshake DTR Serial I F Baud Data Bits 7 Parity Handshake Xon Xof Serial Interface Connection Local...

Страница 36: ...IAL I F 232 Defines the usage of the serial interface RS 232 C SERIAL I F 422 Defines the usage of the serial interface RS 422 A Baud Rate SERIAL I F NO BAUD 300 or BAUD 600 or BAUD 1200 or BAUD 2400...

Страница 37: ...ARK Parity check is disabled and the transmitted parity bit is always a Mark PARITY SPACE Parity check is disabled and the transmitted parity bit is always a Space Handshake Protocol PARITY NONE HANDS...

Страница 38: ...ce EPSON National Character sets See description of the parallel interface IBM National Character Sets See description of the parallel interface CR Code Behavior See description of the parallel interf...

Страница 39: ...n Color Text Direct Uni Graph Direct Uni Bar Code Uni P On Path Last Menu Bar Codes 90 9058D Functions Group Parameters Sequence None Buzzer Yes Quick Yes Ribbon Black Bar Codes 60 Text Direct Bi Grap...

Страница 40: ...aper Overlay No item appears Paper Loading Sequence This selection appears only if on the 9058 model the automatic sheet feeder is installed or if on the 9058D model the automatic sheet feeder or the...

Страница 41: ...e Manual Slot 9058 model only BUZZER YES QUICK NO or QUICK YES or BLACK RIBBON QUICK NO The single sheet in the manual path is loaded by the operator The printer is then disabled QUICK YES The single...

Страница 42: ...AR CODES UNI or P ON PATH MACRO Selects the print direction for bar codes Paper Path at Power On BAR CODES UNI P ON PATH MACRO or P ON PATH LAST or MENU ENGLISH P ON PATH MACRO The paper path at power...

Страница 43: ...ed you mind about the settings you have just done The default values for the menu items are described at the beginning of the Power On Configuration Setup paragraph FUNCTIONS BACK TO MFG NO or BACK TO...

Страница 44: ...wing figure shows the structure and how to move inside the Program Setup Main Structure Print out Yes Macro 1 Line sp 6 lpi Next Macro No Config Menu Yes Hex Dump Yes Tear adjust Line sp Next Macro Ye...

Страница 45: ...prepare four printing environments MACRO 1 MACRO 2 MACRO 3 and MACRO 4 Each macro is composed of a group of parameters which define a configuration that can then be recalled to easily set the printer...

Страница 46: ...t Impact Perfor Safe Yes Autogap Tuning Horiz Tuning Vert Macro MFG Yes Next Macro Yes Macro 1 Macro 2 Line Sp 6 lpi Line Sp Lock No Length 1 Line Top of Form 0 Skipover 0 Font Draft Pitch 10 cpi Pitc...

Страница 47: ...value set for vertical spacing can be changed by software or operator panel LINE SP LOCK YES Setting this item the value set for vertical spacing cannot be changed by software but only by operator pa...

Страница 48: ...VER or SKIPOVER xxx or FONT Draft These items set the skipover perforation The values range between 0 and the page length 1 Font Selection SKIPOVER 0 FONT Draft or FONT Courier or FONT OCR B or FONT G...

Страница 49: ...ms are self explaining Pitch Lock PITCH 10 CPI PITCH LOCK NO or PITCH LOCK YES or LEFT MARGIN 0 PITCH LOCK NO Setting this item the pitch can be changed by software or operator panel PITCH LOCK YES Se...

Страница 50: ...fines the default paper path for the current macro SLASH ZERO NO LOWER PUSH or UPPER PUSH 9058D model only or MANUAL FORM 9058 model only or PUSH PULL or ASF 1 or ASF 2 or ASF 3 or TEAR NORMAL LOWER P...

Страница 51: ...it receives printing data LABELS This item must be set when printing on labels in order to avoid paper jams The paper does not execute any backward movement NO TEAR The paper does not execute any back...

Страница 52: ...hen the perforation of the paper passes PERFOR SAFE YES The function is enabled The print head is moved aside when the perforation passes Adjusting the Distance of the Print Head PERFOR SAFE NO AUTOGA...

Страница 53: ...UNING VERT 360 or MACRO MFG NO These values adjust the distance between the top paper margin and the first printable line The values correspond to 1 180 inch units i e the tuning ranges between 1 6 an...

Страница 54: ...press PARK key You can now set the parameters for Macro 2 as described above In this way you prepare the second printing environment Passing over from one macro to the other then sets two different p...

Страница 55: ...on later in this Chapter Storing the values TEAR ADJUST xxxx STORE QUIT or STORE SAVE or STORE CURRENT or PROG EXIT STORE QUIT This setting does not save any of the new values set The values set previ...

Страница 56: ...bin of the automatic sheet feeder LOAD ASF2 Loading a cut sheet from the second bin of the automatic sheet feeder LOAD ASF3 Loading a cut sheet from the third bin of the automatic sheet feeder To load...

Страница 57: ...without printing 2 Check if the paper perforation matches the tear off bar on the printer If it does not 1 Press the PROGRAM key to enter the Program Setup 2 Press the key until the following message...

Страница 58: ...TEAR NORMAL Pressing the or key it is now possible to decide how to execute the tear off function TEAR NORMAL Pressing the ON LINE key the paper is moved to the tear off position Pressing again the O...

Страница 59: ...As soon as these keys are released the following messages will be displayed 9058 or 9058D then MENU LOCKED Now the access to the printer setups is locked If the PROGRAM key is pressed the LOCKED MENU...

Страница 60: ...ath is changed then the paper is loaded in the new paper path When parking via SW command the printer requests to park the paper PARK SURE message is displayed by pressing the PARK key When loading pa...

Страница 61: ...Path 9058D only Push Pull Path 9058 and 9058D Manual Path 9058 only Base Configuration With Installed Options Lower Push Path 9058 and 9058D Automatic Sheet Feeder plus Lower Push Tractor 9058 and 90...

Страница 62: ...0 55 to 150 Other sheets 45 to 75 45 to 75 45 to 75 Carbon Paper 35 35 35 Envelopes 9058 model only Loading Mode Manual Feeding Length 102 to 559 mm 4 to 22 inches Thickness Max variations 3 mm 0 013...

Страница 63: ...ts can be loaded manually one at a time using the front manual paper path manual or automatic loading or automatically using the ASF option for large quantities of paper Inserting a cut sheet the fanf...

Страница 64: ...for the QUICK function in the Power On Configuration Manual loading mode QUICK NO Make sure that the printer is disabled Insert a cut sheet onto the front paper support and press the LOAD FF key to fe...

Страница 65: ...Paper Loading Paper Using the Lower Tractor 9058 model 9058D model If your printer is the 9058 model make sure that the cut sheets support is closed before loading the fanfold paper 1 To select the lo...

Страница 66: ...The display shows PARK SURE Tear off the fanfold loaded from the upper tractor paper path to avoid paper jams Press the PARK key Then the display shows LOAD LOWER PUSH 2 Open the tractor area cover tu...

Страница 67: ...ring the sprocket levers Slide the left sprocket to the first printing column 4 Space the paper guides along the tractor bar Open the sprocket covers of the left and right sprocket If your printer is...

Страница 68: ...on the left and right sprocket pins Close the sprocket covers 6 Match the left sprocket for the first printing position with the ninth mark and lock it in place Adjust the right sprocket gently to re...

Страница 69: ...Paper Handling A78408098 005 62 7 Close the tractor area cover Press the LOAD FF key to load the paper into the printer 8 The paper must be loaded as shown in figure...

Страница 70: ...the PATH key to select the upper tractor paper path The display shows PATH CHANGING 2 If fanfold paper is present in the lower tractor paper path the printer automatically parks this fanfold before lo...

Страница 71: ...ting column 6 Space the paper guides along the tractor bar Open the sprocket covers of the left and right sprocket 7 Insert the paper perforation on the left and right sprocket pins and close the spro...

Страница 72: ...Paper Handling A78408098 005 65 9 Close the tractor area cover Press the LOAD FF key to load the paper into the printer 10 The paper must be loaded as shown in figure...

Страница 73: ...paper can be loaded only in push pull mode 1 Press the PATH key to select the push pull paper path The display shows LOAD PUSH PULL If your printer is the 9058D model press the PATH key to select the...

Страница 74: ...and rotate the sprocket bar to align the sprocket pins of the rear tractor with the paper perforation 4 Lock the sprocket covers and lower the sprocket levers 5 Press the ON LINE key to confirm that t...

Страница 75: ...agents because they may cause discoloration and scratching Be especially careful not to damage the electronic and mechanical components Replacing the Ribbon Cartridge 1 Make sure that the printer is...

Страница 76: ...rations Proceed as follows 1 Keep the ON LINE key pressed while powering on the printer until the display boxes are filled in and the printer stops all motions 2 When you release the key the printer s...

Страница 77: ...fanfold BUFFER OVERFLOW CHARACTER LOST An overflow condition occurs in the buffer if the serial interface is selected Turn the printer off and on again or press the PROGRAM and ON LINE key successivel...

Страница 78: ...ECK RIBBON The ribbon of the cartridge is blocked Check that the ribbon is correctly inserted Turn the tension knob to make sure that the ribbon is not jammed Press the ONLINE key to reset the error c...

Страница 79: ...paper can be loaded in push pull mode See Loading Paper Using the Lower Push Tractor and the Rear Pull Tractor before in this manual Removing the Rear Pull Tractor 1 Push the lever on the rear pull tr...

Страница 80: ...es loading The ASF includes A paper stacker which automatically collects the output paper A single bin for single sheets A5 A4 Letter Legal Executive and envelopes A 2nd and 3rd optional bins are also...

Страница 81: ...elow The color kit is installable by an authorized technician The color or the black ribbon Long Life cartridge can be used when the color kit is installed Pedestals Two printer floor pedestals are av...

Страница 82: ...al x vertical Draft Quality 10 cpi 12 x 24 36 x 24 12 cpi 12 x 24 30 x 24 15 cpi 8 x 24 24 x 24 Print Density characters per inch Normal 10 12 15 17 1 20 24 Enlarged 5 6 7 5 8 5 Proportional Line leng...

Страница 83: ...trial 2 5 Matrix Postnet Codabar Paper Handling 9058 model Base Configuration Fanfold Paper 1 LOWER PUSH TRACTOR Fanfold width 76 to 432 mm 3 to 17 inches Copies 1 original 7 copies Max thickness 0 63...

Страница 84: ...modes 36 pin Amphenol connector Receive Buffer max 32 Kbytes Serial RS 232 C and RS 422 A dB 25 connector Baud Rate 300 to 38400 bps Automatic interface switching Reliability MTBF Mean Time between f...

Страница 85: ...cters Long life black ribbon cartridge 20 million characters Color ribbon cartridge 2 million characters for each band Automatic Sheet Feeder ASF with envelopes and sheet stacker Two additional trays...

Отзывы: