background image

Instruction Manual

28

in its documentation. The opposite end of the modem’s data cable should be a DB9
female serial connection. Connect that end of the cable to the Serial connection on the
rear panel of the SVxx41HDIE.

Modem configuration

Although most connections will work appropriately with the default settings on
SVxx41HDIE, manual changes can be made. To do so:

Login to the Web interface as

Admin

. Click

Modem

, listed on the left side of the main

page. You will then be presented with the

Modem Option

menu (see above). Make the

following changes to enable and configure the modem connection.

Enable modem connections (PPP) via serial port/modem:

select

Enabled

.

Baud rate to use (affects connection between us and the modem only):

select

115200.

Init string:

leave as

ATE0S0=1&K3

(see below).

The baud rate dictates the connection speed between the SVxx41HDIE’s serial port and
the modem, and does not affect the connection speed between the local and remote
modems, as they will negotiate their own connection speed when a connection is made.
It is highly recommended that this setting be left at the default for best performance.

The initialization (“init”) string is the command (using the standardized Hayes AT
command set) that the SVxx41HDIE will send to the modem to activate it. The string
included should work with the majority of modems and configures the following
connection properties: answer incoming calls on the first ring, enable hardware flow
control, and lock the connection speed. Your modem’s documentation will describe other
potential init strings that you can use to alter the connection properties. For instance,
you could commit the settings to the modem’s non-volatile memory (NVRAM) or allow
the modem to adjust the connection speed for greater stability (and so on). You may
wish to test the connection with the default init string first, before making changes
specific to your modem model or situation, to simplify the troubleshooting process.

Click the

Commit

button to save your changes and activate the modem feature with the

specified settings.

Configuring the Remote Connection

This section describes how to configure a typical Windows dial-up session to access the
modem connection on the SVxx41HDIE. The instructions here relate to a Windows XP
configuration; other versions of Windows are similar.

1.

Open

My Network Places

from the desktop or the

Start

menu.

2.

Click

View network connections

.

3.

Click

Create a new connection

under

Network Tasks

.

4.

The

New Connection Wizard

window will open.  Click

Next

.

Содержание SV1641HDIE

Страница 1: ...www compatible eu 31 35 628 14 14 info compatible eu Server Remote Control SV441HDIE SV841HDIE SV1641HDIE Instruction Manual Actual product may vary from photo ...

Страница 2: ...or relocate the receiving antenna Increase the separation between the equipment and receiver Connect the equipment into an outlet on a circuit different from that to which the receiver is connected Consult the dealer or an experienced radio TV technician for help Use of Trademarks Registered Trademarks and other Protected Names and Symbols This manual may make reference to trademarks registered tr...

Страница 3: ...SD 5 Web configuration using DHCP 6 Web configuration using a static IP address 7 Terminal configuration using a serial cable 8 Using the Web Interface 8 The login screen 9 Web Interface introduction 9 Main Menu selections 10 Network Config 11 User Accounts 12 Security 13 Compatibility 13 SNMP 13 RADIUS 14 Modem 14 Serial Ports 14 Time Date 14 Firmware 15 Manual upload 15 Port Numbers 16 Help menu...

Страница 4: ...Connecting a modem 27 Modem configuration 28 Configuring the remote connection 28 Accessing the Web Interface 29 Modem Troubleshooting Guide 30 Serial Remote Control operation 31 Background 31 Connecting Serial Remote Control modules 31 Configuring viewing Remote Control modules via Web Interface 31 Advanced configuration using the integrated SSH shell 33 Remote login via SSH 33 About Security Cer...

Страница 5: ...using any Java enabled Web browser and connected to virtually any host server or computer that supports PS 2 input devices On Screen Display offers convenient control and configuration options Contents This package should contain 1 x KVM Remote Control unit 1 x Power adapter 1 x Power cord 1 x Serial Cable 1 x Instruction Manual Required Cables and Hardware Depending on your needs you may need one...

Страница 6: ... Ethernet patch cable connect the LAN connector on the rear panel of the SVxx41HDIE to a network data jack usually on a hub switch router or pre wired wall jack 7 Important If you want to continue to use the host computer locally skip step 9 and go directly to Connecting a Local Keyboard Mouse and Monitor after completing step 9 Otherwise complete steps 9 and 10 now and continue to Configuration M...

Страница 7: ...Remote Control s host computer inputs to the console connectors on a KVM switch allowing you to control more than one computer remotely using a single Server Remote Control If you want to use SVxx41HDIE through a KVM switch consult the documentation that came with the switch for more details on how to make the necessary connections See the section entitled Configuring the SVxx41HDIE for more infor...

Страница 8: ...r the operating system installed on the host computer Windows 98 1 From the Control Panel click on Mouse 2 From Mouse Properties click on the Motion tab 3 Make sure the Pointer speed bar is centered and Acceleration is set to None Windows 2000 1 From the Control Panel Click on Mouse 2 From Mouse properties click on the Motion tab 3 Make sure that the Pointer speed bar is centered and Acceleration ...

Страница 9: ...address will be displayed in its place 10 0 0 15 by default Please make note of the assigned IP address as you will need to enter it into your web browser to access the Web Interface If static IP addresses are assigned you will likely need to change the Net Mask IP Address and other details prior to connecting via your Web browser If this is the case connect a local PS 2 keyboard and press the Ent...

Страница 10: ...our Web browser If you are unsure of how to access your network s DHCP log contact your System Administrator for details If the unit is powered on and connected to the network via LAN port on the rear panel it will automatically attempt to lease an IP address using DHCP Before you can begin the configuration process you will need to access the DHCP log from your file server or other device that ac...

Страница 11: ...escribed above is not applicable in those situations To access the Web configuration for this product you will need to configure the workstation you are using to the same subnet 255 255 255 0 and also assign it a valid IP address i e 192 168 1 100 For details on how to change the IP address of your computer if necessary consult your documentation or System Administrator for assistance NOTE It is a...

Страница 12: ...ol to do so you will require a null modem serial cable Connect a female end of a serial cable to the serial port used for serial access on the host computer Connect the opposite end to the SVxx41HDIE Configure the terminal software with 8N1 settings Connection speed 115200 bps No of bits 8 Parity None Stop bits 1 Sample HyperTerminal configuration Using the Web Interface The Web interface is the m...

Страница 13: ...n invalid security certificate This does not affect the security of your data in any way Whenever you are prompted about a certificate security problem by your browser or the Java VNC client always choose the option to continue For more information please consult the section entitled About Security Certificate Warnings Web Interface Introduction After the inital login screen the screen is divided ...

Страница 14: ...all times Selected categories will be displayed in the center of the screen Main Menu selections Please note Some of the following items may not be present based on assigned user privileges i e non admin users will not see any items under the Admin category Home The Home screen offers a Screen Thumbnail view of the controlled computer as well as basic file transfer functions Monitoring Information...

Страница 15: ...configuration using DHCP is Enabled Disabled This feature applies only to the LAN port on the rear panel and is enabled by default When enabled the unit will automatically configure itself with an IP address when a DHCP server is present When disabled the LAN port will use the values assigned to it on the IP Addresses and Routing table below IP Addresses and Routing This table allows you to assign...

Страница 16: ...y exists you will change the password for that user System Ident Machine Name This is a name that is used to uniquely identify this machine You might want to create a DNS entry that matches this name The name is provided as the Client Name for the DHCP server It is also shown at the top of each page in the web browser interface and is the desktop name for VNC clients Other identification details T...

Страница 17: ...hat any password changes you make will have to be entered in duplicate to prevent the chance for error Compatibility The Compatibility menu offers features that may offer enhanced functionality with certain KVM and power products such as StarTech com s Remote Power Switch PCM8155HNA These can be left at their default values if you are not connecting the unit to a KVM or power management device SNM...

Страница 18: ...t the RADIUS prompt the system will use name check the password locally and skip RADIUS authentication Delete all local accounts to avoid this behavior When connecting via VNC a login screen is generated that asks for a RADIUS username and password Modem Enable this to allow the modem to answer the phone and start a PPP connection Enable modem connections PPP via serial port modem Serial Ports The...

Страница 19: ...an unlock code that will open any feature you request Types in the code provided exactly into the area provided and click Submit The new features opened by the code will be enabled immediately but you may need to reboot the unit to begin using certain features Manual Upload Enter the name of the firmware file that you downloaded from StarTech com into the field provided or use the Browse button Pr...

Страница 20: ...es that you will not use with the unit To disable a service change its port number to 0 When you have made any necessary changes click Commit Changes to use the settings the next time the SVxx41HDIE restarts To force the unit to restart immediately click Restart Servers Help Menu Provides an FAQ Frequently Asked Questions listing to assist you with the features and operation of the SVxx41HDIE Site...

Страница 21: ...nnection and encrypts the VNC session Each method will be discussed briefly in the following section The type of encryption method or client used is not critical Web Interface Using SVxx41HDIE s web interface requires a browser with cookies and JavaScript enabled To start the Java VNC client login to the Web configuration interface and click on the thumbnail of the desktop on the Home menu or clic...

Страница 22: ...e client will fail The Unix versions of VNC require the flag bgr233 For examples on using this flag review the commands in the following section SSH Tunnel with Native VNC client If you are using openssh here is the appropriate Unix command to use based on the default settings on a machine at 10 0 0 34 ssh f l admin L 15900 127 0 0 1 5900 10 0 0 34 sleep 60 vncviewer bgr233 127 0 0 1 15900 Same co...

Страница 23: ...he bottom of the VNC screen is a dark blue bar with various buttons known as the bribar Its purpose is to show a number of critical status values and to provide shortcuts to commonly used features Here is a snapshot of what it may look like There will be slight differences based on optional features and system configuration Starting from the left side of the Bribar each feature and its function is...

Страница 24: ...button is only present when a KVM model is selected in the Web interface Menu Shows the main menu Video Shows the video tuning menu where the picture quality can be adjusted Keys Shows the VirtKeys menu which allows you to simulate pressing special keys such as the Windows key or complex multi key sequences 1 A S These flags show the state of the keyboard lights NumLock ShiftLock and ScrollLock re...

Страница 25: ...defined by the user in the Web interface This does not affect the operation of the system and is intended to assist with administration Status Current status of the attached system and the status of the unit B W Min Avg Max Auto Bandwidth control current operation will be indicated with white highlighting If you choose Min Avg Max then you will override the default Auto As the automatic mode measu...

Страница 26: ...h video adjustments to be used when automatic picture adjustment does not provide a good quality picture VirtKeys Virtual keyboard provides a menu with special keys that are often hard to generate but needed by the remote system The most common key sequence is the Ctrl Alt Del KVM Menu Generates the key sequence used to access the on screen menu for an enterprise class KVM switch When these conven...

Страница 27: ...hoose RESET to release all depressed keys The VirtKeys menu can be left open while using the host system You can then click the required button at the suitable time and still interact with the host in a normal fashion Examples Ctrl Alt F4 Use L Ctrl then L Alt in the Toggles area Then click F4 To bring up the Start menu under Windows Click the L Windows button at the top left of the above window V...

Страница 28: ...rn on the screen it will say so Check that the pattern isn t scaled or covered up It s important to do this operation in 24 bit or 32 bit color video mode i e truecolor Although the algorithm may work in 16 bit or 8 bit color video modes the results will not be optimum and usually it won t be able to recognize the test pattern Pressing the Advanced button will open the Advanced Video Tuning menu W...

Страница 29: ...ce this effect Enable the Noise Filter option on the Video Tuning menu to mitigate noise issues Network performance The SVxx41HDIE will always send as much data as it can given what s happening on the screen and the actual network performance When nothing is changing on the video screen zero bytes are sent over the network If the whole screen is changing then the unit will send as much data as you...

Страница 30: ...mount In the case of phase this is 4 units For all the others this is 10 units The and buttons decrease or increase the parameter by one unit The middle button sets the parameter to the middle value The text of the middle button also indicates which parameter is being controlled Note that in the case of phase the middle button invokes the auto phase algorithm The Performance section of the screen ...

Страница 31: ...ny Hayes compatible modem that recognizes the standard AT command set Some modem manufacturers offer enterprise grade modem products at a premium price that include technology to improve the stability of connections whether this type of product would be beneficial to your application depends on whether you consider the modem connection to be mission critical the quality of your telecom infrastruct...

Страница 32: ...s the command using the standardized Hayes AT command set that the SVxx41HDIE will send to the modem to activate it The string included should work with the majority of modems and configures the following connection properties answer incoming calls on the first ring enable hardware flow control and lock the connection speed Your modem s documentation will describe other potential init strings that...

Страница 33: ...oint to Point Protocol must be used no other authentication methods are supported TCP IP must be installed enabled on the computer making the connection and must be used for the dial up connection The connection must be configured to obtain a dynamic IP address The user name password must match a user currently configured on the SVxx41HDIE For best performance and to simplify the troubleshooting p...

Страница 34: ...g a Serial Cable in this manual Once connected you will see the following message Expecting a modem if human type admin password Or start PPP Type the password for user admin and press Enter The password will not appear on the screen The configuration menu will appear Make the changes you wish or press q and Enter to exit and leave the modem connection active Modem Troubleshooting Guide The follow...

Страница 35: ...ar panel of the SVxx41HDIE Connect the opposite end to the DATA OUT or similar port on the Serial Remote Control unit Note that some devices may use an integrated cable so you will not need to make a separate connection on the serial device Once you have added the first serial device to the SVxx41HDIE you can connect additional modules to the DATA IN or similar port on the previous module in the c...

Страница 36: ...ght bits none odd even mark space parity one stop bit 8N2 Eight bits no parity two stop bits Force DCD Forces the Carrier Detect signal to be active at all times Normally DCD becomes active when a new user connects and is dropped when the last user disconnects a response that is similar to many modems When active the device will logout and reset itself if the carrier signal is lost increasing secu...

Страница 37: ...ge Press Ctrl Shift _ underscore on the keyboard to access the menu It will be similar to the following RS 232 Menu 1 none 115200 bps 8N1 Q Disconnect Send break H Hangup line drop DCD E Send Ctrl Shift _ L Low log entries line buffer 1 Show last 10 log entries other Return to connection Press key To execute the desired command simply press the corresponding key on the keyboard You can also execut...

Страница 38: ...ill automatically become available after a 15 second initialization period Any log entries will be retained by the R Port module while deactivated but will not be available to users until it is re initialized About Security Certificate Warnings What is a security certificate Sites that employ secure TCP IP Internet connections include a certificate that confirms that users are connecting to a legi...

Страница 39: ... occur Installing the new certificate The following instructions detail how to install the certificate from the SVxx41HDIE onto your local computer in this case when using Internet Explorer with Windows XP 1 Open your Web browser and go to the SVxx41HDIE login screen Click the Update security certificate link 2 When prompted choose Open 3 A Window will appear that offers information about the cert...

Страница 40: ... system as the user name you give your SSH client If you see a warning about identity of host cannot be verified and a question about saving the host s fingerprint this is normal for the first time you connect to any machine running SSH You should answer yes so that your SSH client saves the public key of this host and doesn t re issue this warning Certificate warning shown when connecting via HTT...

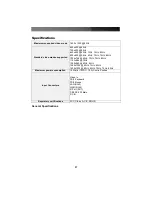
Страница 41: ...6Hz 60Hz 72Hz 75Hz 85Hz 1024x768 60Hz 70Hz 75Hz 85Hz 1152x864 75Hz 1280x960 60Hz 85Hz 1280x1024 60Hz 75Hz 85Hz 1600x1200 60Hz 65Hz 70Hz 75Hz 85Hz Maximum power consumption 18 Watts 12VDC 1 5A Centre Positive Input Connectors Video In PS 2 Keyboard PS 2 Mouse LAN RJ45 WAN RJ45 R Port RJ11 DB9 RS 232 Male DC IN Regulatory certifications FCC Class A CE ROHS General Specifications ...

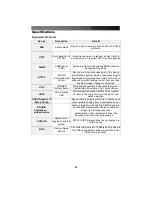
Страница 42: ...l time KVM network protocol Compatible with existing VNC client software VNCS SSL tunneled VNC VNC protocol tunneled via SSLTLS encryption For secure real time control of the server over public networks DHCP Dynamic IP Setup Config Eases network setup by fetching IP address and other network settings from a centralized server RADIUS Centralized authentication Allows integration with existing RADIU...

Страница 43: ...ization of presentations We are seated in Hilversum close to Amsterdam Apart from the pure distribution Compatible distribution offers technical consultation also in co operation with resellers and system houses Among our clientele you will find a diversity of distributors wholesales retailers as well as system houses Our customer service speaks the following languages English Dutch and German We ...

Отзывы: