background image

4-30

   Compaq TFT5600 Rackmount Keyboard and Monitor (RKM) Maintenance and Service Guide

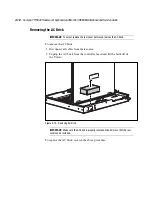
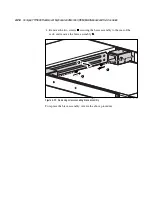
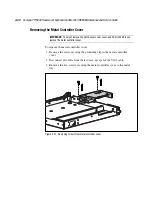
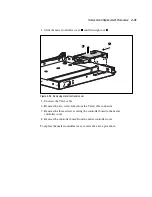
Removing the Metal Controller Cover

IMPORTANT:

  You must remove the clutch covers, rear cover, and AC brick before you

remove the metal controller cover.

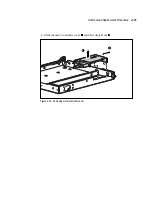
To remove the metal controller cover:


1.


Remove the screw securing the grounding clip to the metal controller
cover.


2.


Disconnect all cables from their source, except for the VGA cable.


3.


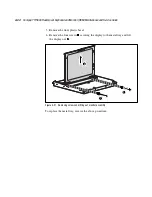
Remove the two screws securing the metal controller cover to the metal
tray.

Figure 4-27.  Removing screws from metal controller cover

Содержание 5600 - TFT RKM

Страница 1: ...TFT5600 Rackmount Keyboard and Monitor RKM Model M5FAE Maintenance and Service Guide First Edition May 2001 Part Number 230204 001 Compaq Computer Corporation...

Страница 2: ...ation in this document is provided as is without warranty of any kind and is subject to change without notice The warranties for Compaq products are set forth in the express limited warranty statement...

Страница 3: ...grated Management Display viii Telephone Numbers viii Chapter 1 Identifying Components Front Panel Components 1 2 Rear Components 1 3 Serial Number Location 1 4 Chapter 2 Illustrated Spare Parts List...

Страница 4: ...g the Front Plastic Bezel 4 8 SPS KEYBOARD 230978 XXX 4 9 Removing the Keyboard Assembly 4 10 SPS DISPLAY LCD 15 229842 001 4 13 Removing the Display 4 14 SPS ADPTRAC 40W 4PRONG MINIJCK 218319 001 4 1...

Страница 5: ...als who are knowledgeable of the procedures precautions and hazards associated with equipment containing hazardous energy circuits Symbols in Text These symbols may be found in the text of this guide...

Страница 6: ...Network Interface Connection WARNING To reduce the risk of electrical shock fire or damage to the equipment do not plug telephone or telecommunications connectors into this receptacle Any surface or a...

Страница 7: ...res Because of the complexity of the individual boards and subassemblies do not attempt to make repairs at the component level or to make modifications to any printed wiring board Improper repairs cou...

Страница 8: ...Compaq server models include a Compaq Integrated Management Display IMD an integrated 16x4 character display mounted on the front of the server This display provides easy to use menu driven access to...

Страница 9: ...provides the illustrated parts breakdown and a serial number location for the Compaq TFT5600 Rackmount Keyboard and Monitor RKM Use the following information to locate and identify the components of t...

Страница 10: ...Monitor RKM Front Panel Components Reference Component Reference Component Display release latch Scroll lock LED Display switch Track ball On screen display scroll up button Right pick button On scre...

Страница 11: ...6 8 7 2 5 Figure 1 2 Identifying rear components Table 1 2 TFT5600 Rackmount Keyboard and Monitor RKM Rear Components Reference Component AC brick Rear cover VGA cable Power cord Brace assembly Clutc...

Страница 12: ...Service Guide Serial Number Location You will need to provide the TFT56000 RKM serial number to Compaq whenever you request information or order spare parts The serial number is located on the bottom...

Страница 13: ...ustrated Spare Parts List This chapter provides an illustrated parts breakdown and a spare parts list for the Compaq TFT5600 Rackmount Keyboard and Monitor RKM See Table 2 1 for the names of reference...

Страница 14: ...2 2 Compaq TFT5600 Rackmount Keyboard and Monitor RKM Maintenance and Service Guide Exploded View of Spare Parts 7 9 3 2 2 4 1 6 10 3 3 3 5 4 2 2 8 2 Figure 2 1 Exploded view of the TFT5600 RKM...

Страница 15: ...9846 001 SPS RAIL MOUNTING W SLIDES MOUNTING RAILS W SLIDES BRACE CMA 229845 001 SPS TRAY METAL TRAY METAL COVER METAL CLIP GROUNDING 229843 001 SPS BD CNTRLR 229847 001 SPS CA VGA MALE MALE 9FT 23872...

Страница 16: ...SPS KEYBOARD SPS KEYBOARD CBN SPS KEYBOARD CBN UK SPS KEYBOARD CBN GR SPS KEYBOARD CBN FR SPS KEYBOARD CBN IT SPS KEYBOARD CBN SP SPS KEYBOARD CBN DK SPS KEYBOARD CBN NO SPS KEYBOARD CBN SE SPS KEYBOA...

Страница 17: ...dures in Chapter 4 read and understand the cautions and warnings in this chapter This chapter provides general service information for the Compaq TFT5600 Rackmount Keyboard and Monitor RKM Adherence t...

Страница 18: ...ainers Keep electrostatic sensitive parts in their containers until they arrive at static free workstations Place parts on a grounded surface before removing them from their containers Avoid touching...

Страница 19: ...ng jackets are extended to the floor The full weight of the rack rests on the leveling jacks The stabilizing feet are attached to the rack if it is a single rack installation The racks are coupled tog...

Страница 20: ...sure to turn off the power to the monitor computer system and other attached devices then disconnect the power cable from the power source CAUTION As you disassemble the TFT5600 RKM be sure to place t...

Страница 21: ...bezel G Palm rest SPS KEYBOARD 230978 XXX SPS DISPLAY LCD 15 229842 001 SPS BD CNTRLR 229847 001 SPS RAIL MOUNTING W SLIDES 229845 001 G Mounting rails G Slides G Brace G Cable management arm SPS TRA...

Страница 22: ...and slides 2 Cable management arm 1 Brace 1 TFT5600 Rackmount Keyboard Monitor 1 G Model M5FAE TFT5600 RKM G Saleable Part Number 221546 001 xxx Lock plate 2 Rack template 1 Keyboard hot key label 2 T...

Страница 23: ...nt Keyboard and Monitor RKM Maintenance and Service Guide SPS PLASTICS 229846 001 Figure 4 1 SPS PLASTICS 229846 001 Table 4 1 SPS PLASTICS 229846 001 Reference Component Rear cover Clutch covers Fron...

Страница 24: ...w slide the rear cover back rotate and remove it out of position 1 2 3 Figure 4 2 Removing screw and sliding rear cover off IMPORTANT When replacing the rear cover make sure the plastic hooks on the u...

Страница 25: ...ch covers Unsnap the clutch covers rotate them toward the front of the unit and remove them Figure 4 3 Removing clutch covers IMPORTANT Before replacing the clutch covers the rear cover must be instal...

Страница 26: ...it over and remove the four screws securing the palm rest slide the palm rest up and out and remove it 1 1 1 2 2 3 Figure 4 4 Removing screws securing palm rest IMPORTANT Before replacing the palm res...

Страница 27: ...u must remove the palm rest before you remove the front plastic bezel To remove the front plastic bezel Remove the four screws securing the front plastic bezel to the metal tray then remove the front...

Страница 28: ...Removal and Replacement Procedures 4 9 SPS KEYBOARD 230978 XXX Figure 4 6 SPS KEYBOARD 230978 XXX...

Страница 29: ...the clutch covers rear cover and AC brick before you remove the keyboard assembly To remove the keyboard assembly 1 Disconnect all cables from their source 2 Turn the unit over and remove the four scr...

Страница 30: ...Removal and Replacement Procedures 4 11 3 Turn the unit right side up and remove the palm rest by sliding the palm rest up and out Figure 4 8 Removing palm rest...

Страница 31: ...Before removing the keyboard assembly the tie wraps holding the cables together in the rear of the unit must be cut 4 Remove the keyboard assembly paying special attention to the cord in the rear Figu...

Страница 32: ...Removal and Replacement Procedures 4 13 SPS DISPLAY LCD 15 229842 001 Figure 4 10 SPS DISPLAY LCD 15 229842 001...

Страница 33: ...Removing the Display IMPORTANT You must remove the clutch covers rear cover keyboard assembly and palm rest before you remove the display To remove the display 1 Remove the screw securing the groundi...

Страница 34: ...plug the three cables connecting the display assembly to the controller board WARNING Do not pull on the exposed wires only pull on the plastic shroud connectors attached to the wires Figure 4 12 Disc...

Страница 35: ...d and Monitor RKM Maintenance and Service Guide 3 Remove the four screws securing the display to the metal tray then remove the display 1 2 1 Figure 4 13 Removing screws securing display To replace th...

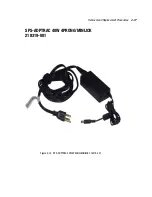
Страница 36: ...Removal and Replacement Procedures 4 17 SPS ADPTRAC 40W 4PRONG MINIJCK 218319 001 Figure 4 14 SPS ADPTRAC 40W 4PRONG MINIJCK 218319 001...

Страница 37: ...remove the AC brick To remove the AC brick 1 Disconnect all cables from their source 2 Unplug the AC brick from the controller board and lift the brick off of the Velcro Figure 4 15 Removing AC brick...

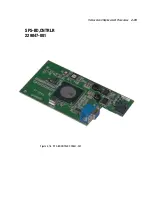
Страница 38: ...Removal and Replacement Procedures 4 19 SPS BD CNTRLR 229847 001 Figure 4 16 SPS BD CNTRLR 229847 001...

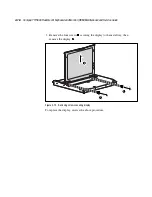
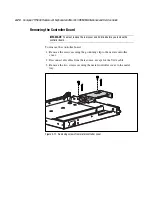
Страница 39: ...d AC brick before you remove the controller board To remove the controller board 1 Remove the screw securing the grounding clip to the metal controller cover 2 Disconnect all cables from their source...

Страница 40: ...Removal and Replacement Procedures 4 21 4 Slide the metal controller cover and lift it straight out 2 1 Figure 4 18 Removing metal controller cover...

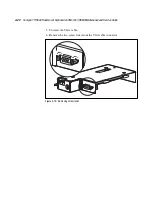
Страница 41: ...4 22 Compaq TFT5600 Rackmount Keyboard and Monitor RKM Maintenance and Service Guide 5 Unscrew the VGA cable 6 Remove the two screw locks from the VGA cable connector Figure 4 19 Removing screw locks...

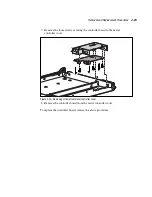
Страница 42: ...three screws securing the controller board to the metal controller cover Figure 4 20 Removing screws from metal controller cover 8 Remove the controller board from the metal controller cover To repla...

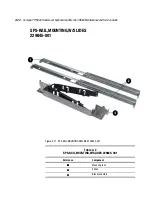
Страница 43: ...and Monitor RKM Maintenance and Service Guide SPS RAIL MOUNTING W SLIDES 229845 001 Figure 4 21 SPS RAIL MOUNTING W SLIDES 229845 001 Table 4 2 SPS RAIL MOUNTING W SLIDES 229845 001 Reference Componen...

Страница 44: ...ly To remove the brace assembly 1 Disconnect all cables from their source 2 Unthread the cables from the cable management arm 3 Remove the two screws securing the cable management arm to the rear of t...

Страница 45: ...M Maintenance and Service Guide 4 Remove the two screws securing the brace assembly to the rear of the rack and remove the brace assembly 1 1 2 Figure 4 23 Removing screws securing brace assembly To r...

Страница 46: ...before you remove the mounting rails with slides To remove mounting rails with slides 1 Remove the two screws on each side of the mounting rails securing them to the brace assembly 2 Remove the brace...

Страница 47: ...ntenance and Service Guide 4 Remove the screw and mounting rails from the rear of the rack 1 2 Figure 4 25 Removing mounting rails from rear of rack 5 Remove the mounting rails with slides To replace...

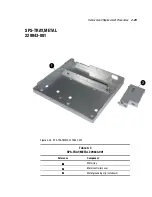
Страница 48: ...Replacement Procedures 4 29 SPS TRAY METAL 229843 001 Figure 4 26 SPS TRAY METAL 229843 001 Table 4 3 SPS TRAY METAL 229843 001 Reference Component Metal tray Metal controller cover Metal grounding cl...

Страница 49: ...r and AC brick before you remove the metal controller cover To remove the metal controller cover 1 Remove the screw securing the grounding clip to the metal controller cover 2 Disconnect all cables fr...

Страница 50: ...g metal controller cover 5 Unscrew the VGA cable 6 Remove the two screw locks from the VGA cable connector 7 Remove the three screws securing the controller board to the metal controller cover 8 Remov...

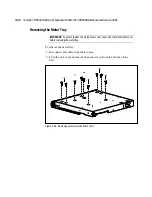
Страница 51: ...ay IMPORTANT You must remove the clutch covers rear cover and metal controller cover before removing the metal tray To remove the metal tray 1 Disconnect all cables from their source 2 Turn the unit o...

Страница 52: ...Replacement Procedures 4 33 3 Remove the palm rest 4 Turn the unit right side up and lift the keyboard assembly straight out paying special attention to the cord in the rear Figure 4 30 Removing keybo...

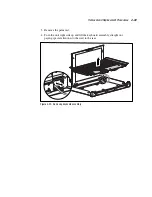
Страница 53: ...ce and Service Guide 5 Remove the front plastic bezel 6 Remove the four screws securing the display to the metal tray and lift the display out 1 2 1 Figure 4 31 Removing screws and lifting out monitor...

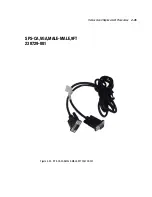
Страница 54: ...Removal and Replacement Procedures 4 35 SPS CA VGA MALE MALE 9FT 238729 001 Figure 4 32 SPS CA VGA MALE MALE 9FT 238729 001...

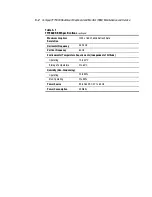
Страница 55: ...Flat panel Active matrix TFT LCD 38 1 cm Viewable Image Size 15 in diagonal 38 1 cm Face Treatment Transparent protector with antiglare coating Maximum Weight Unpacked 13 75 lb 6 25 kg Maximum Dimensi...

Страница 56: ...Resolution 1024 x 768 60Hz Refresh Rate Horizontal Frequency 48 2 kHz Vertical Frequency 60 Hz Environmental Temperature Requirements Independent of Altitude Operating 10 to 50 C Storage Temperature...

Страница 57: ...oll up 1 2 programmable wizard key 1 2 right pick 1 2 scroll left and right 1 2 scroll up and down 1 2 C cable management arm photograph 4 24 removing 4 25 cap lock LED 1 2 cautions See also warnings...

Страница 58: ...scroll down button 1 2 scroll up button 1 2 programmable wizard key 1 2 scroll left and right button 1 2 lock LED 1 2 up and down button 1 2 track ball 1 2 front plastic bezel 1 2 photograph 4 4 remov...

Страница 59: ...4 10 keyboard assembly 4 12 metal controller cover 4 30 metal tray 4 32 mounting rails with slides 4 27 before replacing clutch covers 4 6 palm rest 4 7 rear cover 4 5 symbols in text v installing AC...

Страница 60: ...2 removing 4 4 portable field service kit 3 2 power cord rear components 1 3 product kit contents 4 3 programmable wizard key 1 2 R rack stability 3 3 rails and slides spare kit brace assembly 4 2 ca...

Страница 61: ...nsumption 5 2 power source 5 2 vertical frequency 5 2 viewable image size 5 1 symbols in text v on equipment vi T tables front panel components 1 2 metal tray 4 29 mounting rails with slides 4 24 plas...

Страница 62: ...airs vii electrical shock v vi equipment damage vii exposed wires 4 15 grounding plug vi vii hazardous energy levels vii hot surface vi improper repairs vii multiple sources of power vi personal injur...

Отзывы: