CUSTOMER SERVICE:
United States
PO Box 2
Ulster Park, NY 12487
Office hours: 9-5 EST
Phone (800) 777-4244
Fax (800) 336-5948
(845) 572-3468
www.CommunityPlaythings.com
Page 2
User and
Maintenance
Information
(cont’d)
G248
Changing Table
G268
Changing Table
with Steps
© 2005 by Community Products, LLC
DC03 DC L2264 Revision H
Assembly
Your Changing Table will come in 2 parts consisting
of a cabinet and a hamper. The adjustable shelf is
packaged separately inside the cabinet.
To install the hamper (or hamper with
steps):
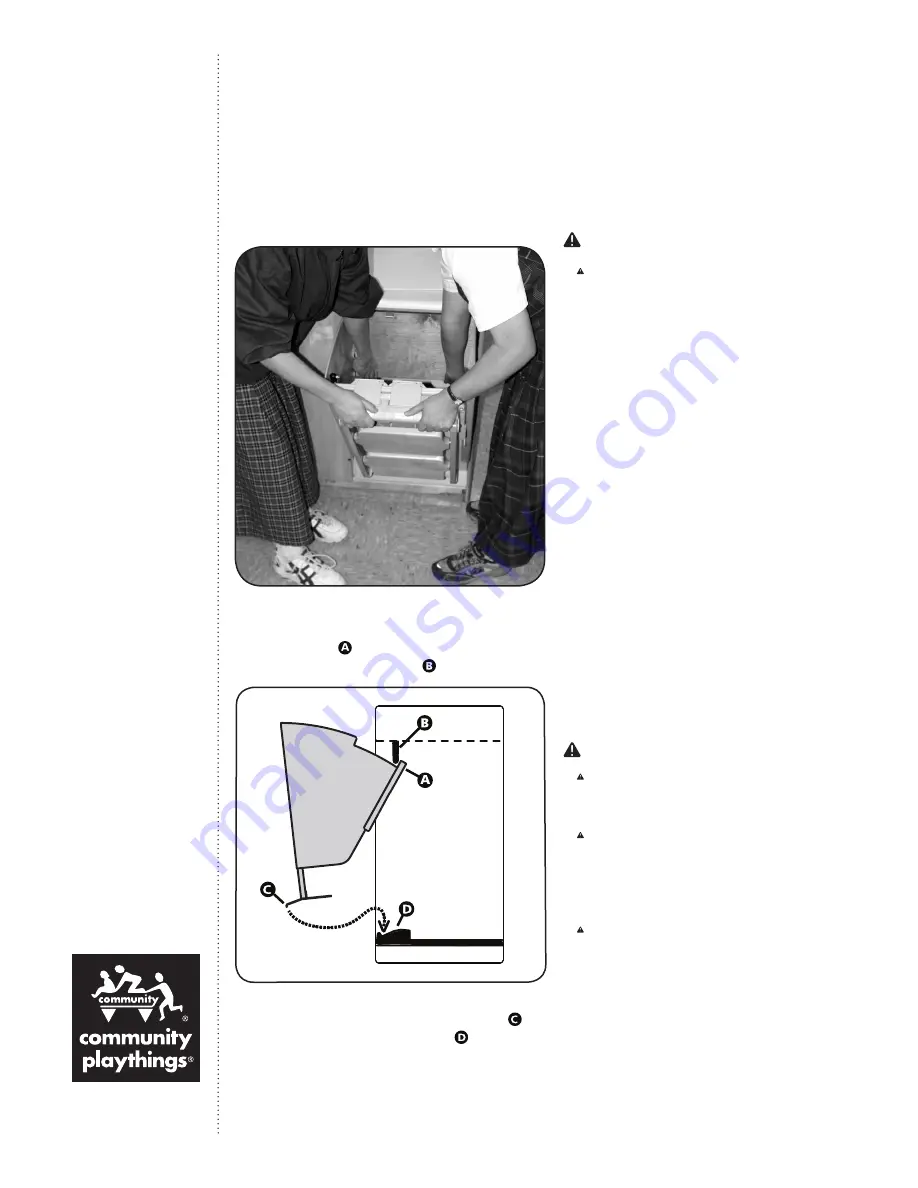
1
.
Remove wastebasket.
Note:
It is recommended that the installation is done
with two people. (Figure A)
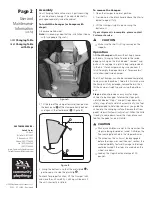
2. Tilt the top of the Hamper forward, then position
the back panel of the Hamper directly behind–
and against–the steel bracket . (Figure B)
3. Swing the bottom in so that the metal plate is
positioned just inside the plastic lip .
To check for proper function, lift the ‘Hamper’ latch
and close the unit carefully. Latching will be easy if
the unit is correctly installed.
To remove the Hamper:
1. Open the Hamper to normal position.
2. Press down on the black handle above the Waste-
basket to open it fully.
3. Lift the Hamper straight up and swing the
bottom out.
If your shipment is incomplete, please contact
Customer Service.
CAUTION
Make sure the shelf is sitting securely on the
supports.
Operation
A
tilt-out hamper
(with or without steps) comes
with every Changing Table. To discard the soiled
diaper, push up on the latch labeled “Hamper” and
pull out. Place diaper in a plastic bag (not provided)
in the bin. Close hamper making sure you hear it
latch. To empty the diaper bin see “To remove bin”
instruction label inside hamper.
The tilt-out hamper can also be removed completely
to clean inside the cabinet. To do this, first make sure
the hamper is fully extended, remove the bin, then
lift the hamper straight up and swing the bottom
out.
Steps
(optional) provide an easy way for larger
children to be changed. To lower the steps push
up latch labeled “Steps,” and pull steps down. For
safety, steps retract and latch automatically. Use foot
pedal provided to hold steps down as you guide the
child up to the changing surface. Remove foot from
pedal; steps will auto matically retract. When the child
is ready to come down, lower the steps, place your
foot on the pedal, and assist child.
CAUTION
Make sure children are not in the area when the
steps are being lowered or raised. A child on the
floor could get pinched in the step mechanism.
The wheels on the unit must be disengaged
before the steps are used. (See next section; the
wheeled mobility feature.) Damage to the steps
could be caused if the steps are used when the
wheels are down.
Load on the steps should not exceed 100
pounds.
Figure A
Figure B


